How to use CUDA and the GPU Version of Tensorflow for Deep Learning
Welcome to part nine of the Deep Learning with Neural Networks and TensorFlow tutorials.
If you are going to realistically continue with deep learning, you're going to need to start using a GPU. While there exists demo data that, like the MNIST sample we used, you can successfully work with, it is not going to prepare you for many of the hardships that large datasets come with, and you wont be able to try out many of the more interesting examples of what neural networks are capable of.
Thus, in this tutorial, we're going to be covering the GPU version of TensorFlow. In order to use the GPU version of TensorFlow, you will need an NVIDIA GPU with a compute capability > 3.0. I had been using a couple GTX 980s, which had been relatively decent, but I was not able to create models to the size that I wanted so I have bought a GTX Titan X instead, which is much more enjoyable to work with, so pay close attention to VRAM on the card. 4 GB is what I had on my 980s, which gives you 8 GB total, but 4+4 in SLI is not the same as 8GB on one card, for example. You can use two cards at once, but this is not ideal. Buy the single best GPU that you can.
If you are not on Windows, you can skip to where we've completed the installation of Ubuntu, but then you will want to pick back up with us as we install the GPU version of TensorFlow and all of the requirements. If you are on Windows, then we're going to be setting up a dual boot option for both Windows and Ubuntu.
Via a virtual machine, you cannot access the full power of your GPU, which is why we need to do this.
If you have been using Virtual Box, you can either keep it, or remove it along with the virtual drive you created for it. I still like having Virtual Box around to quickly test a model and see if it actually works/compiles, but we're about to block off another portion of your harddrive, so you might want the space.
To begin, we're going to need a place to install this operating system to. It's not like before, where we just click a button and the space is made for it, we actually need to section this space off ourselves. Partioning a harddrive can take quite some time, especially if you are using an older drive that has files all over the place. When you partition a drive, you have to clean up that entire chunk, so there is potentially a lot of moving around that needs to be done.
For me, this process takes ~20 minutes on a solid state drive, but I have had it take hours on a regular harddrive. I have also heard of people's taking days and seemingly never finishing. You do NOT want to forcefully stop this process. I strongly suggest you backup anything you care about, because, if this process hangs, its possible you lose everything via corrupting the drive. If a power flicker occurs, you're probably screwed.
Sounds good to you? Great, now, on Windows, type "create and format" into the search, and you should find the "create and format hard disk partitions" choice, which will bring up Disk Management. It will look something like: 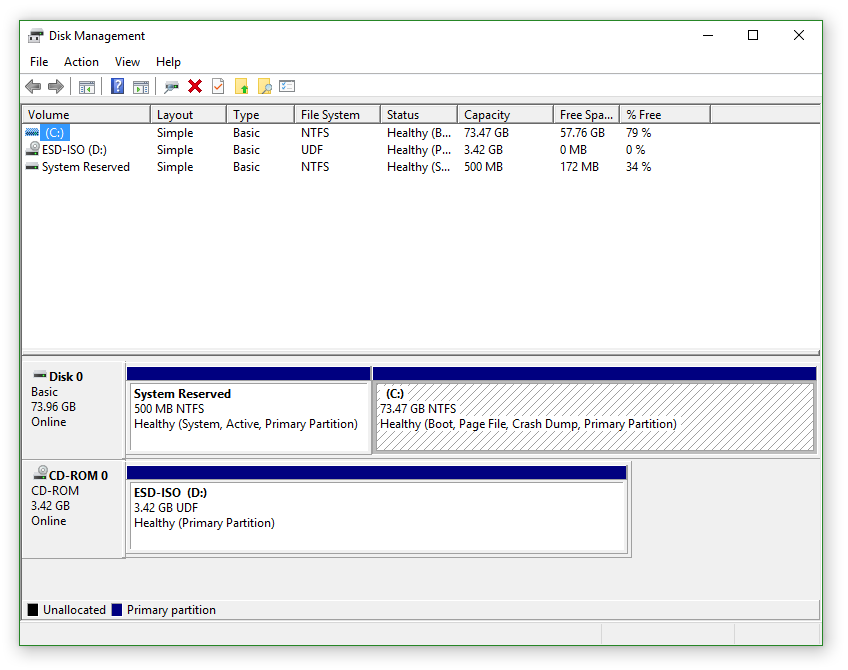 if you haven't messed with it before. If you have other partitions on a drive, you'd see them here.
Select the drive you want to partition off to be the Ubuntu partition, probably your drive C, but you might have others. Right click that drive, and select "shrink volume."
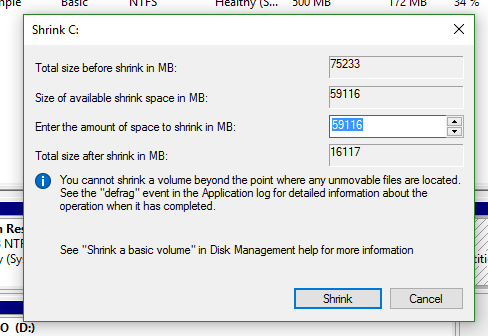
Here, you can see how much size you have currently, how much is available to shrink, and then how much you'd like to shrink. However much you shrink by is how much space you will have on your new Ubuntu partition.
Note: you can elect to give this a relatively small installation, and then actually store the large datasets elsewhere. This is a Dual Boot, rather than a virtual machine, so you will be able to access all of your drives, including your main Windows drive, from within Ubuntu, essentially sharing files across operating systems. Once you've shrunk the drive, you will have some "unallocated" space, of the size that you shrunk. Great, that will be where we install Ubuntu.
If you had a previous partition that you want to remove, or you need to redo Ubuntu for whatever reason, you can right click the Ubuntu partition, delete it. Delete the swap partition too if you have it. This will become "free space." Right click, delete that too. Now it's unallocated. Should you decide to just remove Ubuntu entirely, you would do the previous steps, and then extend your original partion back into the unallocated space (right click, extend).
Now we need Ubuntu.
Unfortunately, Ubuntu 16.04 isn't supported by the CUDA toolkit. You can check by going to download the CUDA requirements from the install CUDA section in the TensorFlow Docs, then seeing what version of Ubuntu you can install CUDA Toolkit 7.5 onto.
Thus, at this point, you can decide whether you want to try anyway, or just use Ubuntu 15.04. I will give instructions that will work for 16.04, but you will have less hangups most likely with 15.04.
If you don't have an Ubuntu image, you need to get one from Ubuntu.com. Since you will be developing within it, I suggest you go for the desktop version, but you can go headless if you want. The quickest download option that I have found is using the Torrent link they provide. You can also just do the Regular Ubuntu download.
Note: The links provided are for 16.04. This is *not* officially supported, so feel free to use 15.04 or 14.04 if you want. 16.04 will work, however.
Next, you need to actually install Ubuntu. Once you have an image, you need to mount that image to either a disk or a USB drive. To do this, I used Universal USB Installer. Once you've created the boot media, you can restart your computer. Depending on your settings, you might boot into the boot media. If not, usually you need to press somethign like F11 on restart, at the same time you might press DEL to load BIOS settings. When in the boot options, you can choose your USB drive, and this will launch you into the Ubuntu installation sequence.
This time, you want to install Ubuntu *alongside* Windows...unless you don't want Windows anymore. Ubuntu will automatically use the unallocated space. The only downside is Ubuntu will likely give you a bunch of Swap space automatically. On a solid state drive, you don't want any swap since it's harmful to the drive. On a regular drive, it doesn't matter as much, but Ubuntu seems to want to do something like half and half. Very annoying. You can customize it, but it's not user-friendly in my opinion. Feel free to lookup a guide and try it for yourself though.
Once you've got Ubuntu installed, you're ready to get the GPU version of TensorFlow installed and working!
There are major steps that need to be taken, in order for all of this to work.
- Install CUDA Toolkit 7.5
- Download cuDNN 4.0, adding it's contents to your CUDA directory
- Install GPU TensorFlow
Now, to install CUDA Toolkit 7.5, you will need to have a CUDA developer account, and log in. If you do not, register for one, and then you can log in and access the downloads. Download for Ubuntu, 15.04. You want the run file. Maybe later the .deb will work, but, right now, it wont because it uses a too-old hash, and apt-get will not let you pass go and collect your $200 because of it.
Once you have the run file downloaded, go ahead and get the latest NVIDIA graphics drivers for your GPU.
Once you've done this, you're ready to install the driver and the CUDA Toolkit. To begin, navigate to your downloads, and do chmod +x for both .run files (CUDA Toolkit and the graphics driver). Now, do ctrl+alt+f1 to enter tty mode. Next, log back in using your credentials, and then do sudo stop lightdm or sudo lightdm stop.
Now, navigate to your Downloads directory (usually something like /home/yourusername/Downloads/), wherever you saved the .run files to, and first do the graphics driver with ./NVIDIA-xxxx.run, where the xxxx is the information in the .run file like version, etc. When that is done, you can move on to the CUDA Toolkit .run file, with the same thing ./cuda_7.5.xxxx.run --override. If you are using Ubuntu 15.04, you will not need the override parameter. We use this to override the check for the compiler version, which is a later version for 16.04 than the toolkit is expecting, and you will not be successful.
This one is a bit more tedious, press and hold the space bar for about 5 seconds, and then wait for the license agreement to pass by. Accept the agreement. Go through, and keep everything as default. You will be likely warned that you're installing this on an unsupported system, if you are using 16.04, that's fine. The *only* thing you DO NOT want to do is install the graphics driver. Make sure you say no to that, otherwise say yes to everything else, and keep the defaults for things like file paths. To use the defaults on paths, you can just press enter without inputting anything. When all is said and done, it will likely say you didn't fully install it, since you didn't install the graphics drivers. That's fine, just make sure it says that you installed the Toolkit. If not, read the error and see why it failed.
If it installed, congratulations, you are coming down the home stretch!
Now we need to download and setup the cuDNN files. Do a sudo reboot, and get back to your desktop.
Once at your desktop, Download cuDNN 4.0. Go to the downloads directory, and extract this. If you are using the GUI desktop, you can just right click, and extract. This will extract to a folder called cuda, which we want to merge with our official CUDA directory, located: /usr/local/cuda/. To do this, open a terminal to your downloads:
$ cd ~/Downloads
Copy the includes contents:
$ sudo cp cuda/include/cudnn.h /usr/local/cuda/include
Copy the lib64 contents:
$ sudo cp cuda/lib64/* /usr/local/cuda/lib64
Grant permissions:
$ sudo chmod a+r /usr/local/cuda/lib64/libcudnn*
Now, finally, we just need to export the system path to CUDA elements:
$ sudo nano ~/.bashrc
Go to the very end of this file, and add:
export LD_LIBRARY_PATH="$LD_LIBRARY_PATH:/usr/local/cuda/lib64"
export CUDA_HOME=/usr/local/cuda
If you plan to be using the super user (sudo) with Python, then you will want to add the above export code to /etc/environment, otherwise you will fail at importing cuDNN.
Whew, okay, step 2 completed! Now we just need to Install GPU TensorFlow. Head there, I will be using the version for Python 3.5 on 64 bit Linux, so my steps:
$ sudo apt-get install python3-pip python3-dev
$ export TF_BINARY_URL=https://storage.googleapis.com/tensorflow/linux/gpu/tensorflow-0.10.0rc0-cp35-cp35m-linux_x86_64.whl
$ sudo pip3 install --upgrade $TF_BINARY_URL
And, now, for the moment of truth, open python3 in your terminal:
$ python3
Now do:
import tensorflow
...and hope you see:
Python 3.5.2 (default, Jul  5 2016, 12:43:10)
[GCC 5.4.0 20160609] on linux
Type "help", "copyright", "credits" or "license" for more information.
>>> import tensorflow
I tensorflow/stream_executor/dso_loader.cc:108] successfully opened CUDA library libcublas.so locally
I tensorflow/stream_executor/dso_loader.cc:108] successfully opened CUDA library libcudnn.so locally
I tensorflow/stream_executor/dso_loader.cc:108] successfully opened CUDA library libcufft.so locally
I tensorflow/stream_executor/dso_loader.cc:108] successfully opened CUDA library libcuda.so.1 locally
I tensorflow/stream_executor/dso_loader.cc:108] successfully opened CUDA library libcurand.so locally
>>>
If so, congratulations, you have successfully installed the GPU version of TensorFlow. From here on out, I will be assuming people following have the GPU version installed.
The errors I have ever recieved so far:libcudnn not being open to be opened when importing tensorflow, and some strange GPU driver issues, causing very disorienting screens, infinite login loops, only one screen to work, or a variety of other strange things.
If you are getting the libcudnn error on import, this can be that you improperly copied over things, or, possibly, you didn't properly export paths (note the above use of sudo, and that you need to put the path in /etc/environment as well). I am sure there are a whole host of other issues that can come up. Of the Deep Learning libraries, TensorFlow has the fewest github issues, which is a good thing, but you can still easily google your errors to find ample help.
If you are having an infinite login loop, your display is doing crazy things with the resolution/graphics, or you are having anything else going on that's strange, enter tty mode (ctrl+alt+f1), do a sudo stop lightdm or sudo lightdm stop, then navigate to where you downloaded the graphics driver and re-install it. I found that I had to do this a few times initially before this nonsense stopped.
-
Practical Machine Learning Tutorial with Python Introduction
-
Regression - Intro and Data
-
Regression - Features and Labels
-
Regression - Training and Testing
-
Regression - Forecasting and Predicting
-
Pickling and Scaling
-
Regression - Theory and how it works
-
Regression - How to program the Best Fit Slope
-
Regression - How to program the Best Fit Line
-
Regression - R Squared and Coefficient of Determination Theory
-
Regression - How to Program R Squared
-
Creating Sample Data for Testing
-
Classification Intro with K Nearest Neighbors
-
Applying K Nearest Neighbors to Data
-
Euclidean Distance theory
-
Creating a K Nearest Neighbors Classifer from scratch
-
Creating a K Nearest Neighbors Classifer from scratch part 2
-
Testing our K Nearest Neighbors classifier
-
Final thoughts on K Nearest Neighbors
-
Support Vector Machine introduction
-
Vector Basics
-
Support Vector Assertions
-
Support Vector Machine Fundamentals
-
Constraint Optimization with Support Vector Machine
-
Beginning SVM from Scratch in Python
-
Support Vector Machine Optimization in Python
-
Support Vector Machine Optimization in Python part 2
-
Visualization and Predicting with our Custom SVM
-
Kernels Introduction
-
Why Kernels
-
Soft Margin Support Vector Machine
-
Kernels, Soft Margin SVM, and Quadratic Programming with Python and CVXOPT
-
Support Vector Machine Parameters
-
Machine Learning - Clustering Introduction
-
Handling Non-Numerical Data for Machine Learning
-
K-Means with Titanic Dataset
-
K-Means from Scratch in Python
-
Finishing K-Means from Scratch in Python
-
Hierarchical Clustering with Mean Shift Introduction
-
Mean Shift applied to Titanic Dataset
-
Mean Shift algorithm from scratch in Python
-
Dynamically Weighted Bandwidth for Mean Shift
-
Introduction to Neural Networks
-
Installing TensorFlow for Deep Learning - OPTIONAL
-
Introduction to Deep Learning with TensorFlow
-
Deep Learning with TensorFlow - Creating the Neural Network Model
-
Deep Learning with TensorFlow - How the Network will run
-
Deep Learning with our own Data
-
Simple Preprocessing Language Data for Deep Learning
-
Training and Testing on our Data for Deep Learning
-
10K samples compared to 1.6 million samples with Deep Learning
-
How to use CUDA and the GPU Version of Tensorflow for Deep Learning
-
Recurrent Neural Network (RNN) basics and the Long Short Term Memory (LSTM) cell
-
RNN w/ LSTM cell example in TensorFlow and Python
-
Convolutional Neural Network (CNN) basics
-
Convolutional Neural Network CNN with TensorFlow tutorial
-
TFLearn - High Level Abstraction Layer for TensorFlow Tutorial
-
Using a 3D Convolutional Neural Network on medical imaging data (CT Scans) for Kaggle
-
Classifying Cats vs Dogs with a Convolutional Neural Network on Kaggle
-
Using a neural network to solve OpenAI's CartPole balancing environment
