Views and Templates - Django Tutorial
Welcome to part 4 of the web development with Django and Python tutorial series, where we will be talking more in depth about views, interacting with models, and templating.
To begin here, let's head into mysite/main/views.py and change our homepage function to:
def homepage(request):
    return render(request = request,
                  template_name='main/home.html',
                  context = {"tutorials":Tutorial.objects.all})
Here, we're using render, which will render an actual html file/template for us. It will also help us to pass Python objects to that template for us to work with. This will allow us to iterate over objects with loops, use if-statements...etc. To do this, we pass a dictionary where the key is the name of the variable which we will reference from within the template, and the value is the object it will represent. As you can see, we want to interact with our Tutorial model. To do this, we need to import it:
from .models import Tutorial
The full script is now:
mysite/main/views.py
from django.shortcuts import render
from django.http import HttpResponse
from .models import Tutorial

# Create your views here.
def homepage(request):
    return render(request = request,
                  template_name='main/home.html',
                  context = {"tutorials":Tutorial.objects.all})
Next, we have referenced a template that simply doesn't exist...so let's fix that next!
Django looks for templates in each of your app's directories by seeking out any directory called "templates." It then builds a list of templates, and will grab the one that matches (or throw an error if none do). The problem is, sometimes, templates will have the same name, because you forgot the names of all of the templates in some other app that maybe you wrote a while ago, or it's someone else's that you've brought in. Anyway, the way we handle for this is to actually have a directory inside of our templates directory called the same as our app name. So, let's make a new directory called templates at mysite/main/templates, then, inside of that, add another directory called main, so you will have mysite/main/templates/main/. Head there, and make a file inside called home.html. Now we can add some HTML here, along with our object. Django has its own templating, which is *similar* to Jinja, but some things are indeed different. To begin, let's just make this page iterate over all of our tutorials so far and display them.
The way we iterate in Django's templating is:
{% for tut in tutorials %}
Unlike Python, however, we also have to denote where the loop ends:
{% endfor %}
Generally, logic in templating is done with {% %} and then variables are encased in {{}}
Now, let's interact with our tut var. Each of these tut objects is a Tutorial object so it has our attributes for content, title, and published date. Let's check that out:
{% for tut in tutorials %}
    <p>{{tut.tutorial_title}}</p>
    <p>{{tut.tutorial_published}}</p>
    <p>{{tut.tutorial_content}}</p>
    <br><br>
{% endfor %}
Okay, save everything and let's check it out by visiting our homepage: http://127.0.0.1:8000/
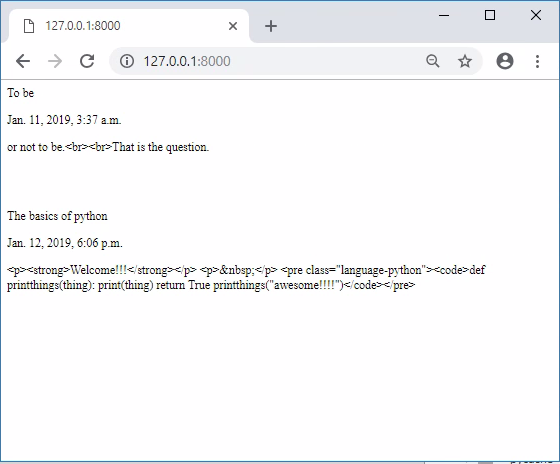
It's not the most beautiful thing I've ever seen, but still, it worked! ...sort of. We can see our HTML is being displayed as plain text. This is because Django escapes it by default. It's not quite ideal if our users can do something like...insert javascript into forms, for example. That said, these tutorials are coming from our Admin page, so they should be trust worthy for display. When this is the case, we can use the |safe flag:
<p>{{tut.tutorial_content|safe}}</p>
{% for tut in tutorials %}
    <p>{{tut.tutorial_title}}</p>
    <p>{{tut.tutorial_published}}</p>
    <p>{{tut.tutorial_content|safe}}</p>
    <br><br>
{% endfor %}
Now, refresh the homepage, and you should see:
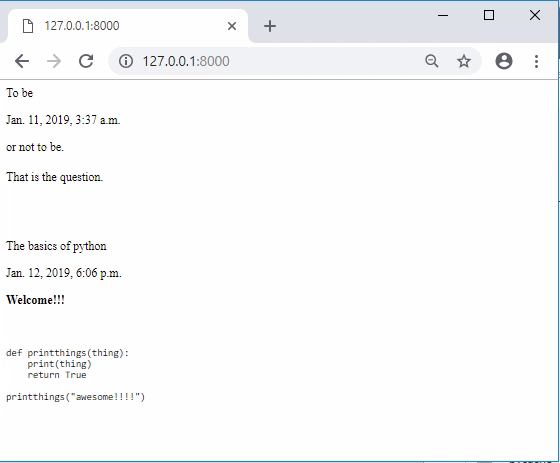
Very cool. But hmm, our code snippet doesnt actually have any syntax highlighting like it did in the editor, what gives?!
For this, we need to bring in the required CSS and javascript. We need to either load CSS/js locally, or we can also use it when it's hosted somewhere else. Often, we want to have custom javascript or CSS, so we host it locally. In this case, we've got both the CSS and js we need local for the TinyMCE, as it came with the app we installed. So, how might we use it? Django by default is going to look for static files inside of a static directory, much like it looks for templates, which also means we use the same convention : APPNAME/static/APPNAME/
TinyMCE has already done this, however, so we just need to reference it. Before we can reference static files, we need to load in the static files
mysite/main/templates/main/home.html
{% load static %}
<!-- Prism CSS -->
<link href="{% static "tinymce/css/prism.css" %}" rel="stylesheet">
</head>
<body>

{% for tut in tutorials %}
    <p>{{tut.tutorial_title}}</p>
    <p>{{tut.tutorial_published}}</p>
    <p>{{tut.tutorial_content|safe}}</p>
    <br><br>
{% endfor %}


<!-- Prism JS -->
<script src="{% static "tinymce/js/prism.js" %}"></script>
</body>
We use the {% load static %} to load in the static file options. This doesn't actually load in the static files, really just the pathways to static files. Then, we can actually get the path to one with:
{% static "tinymce/css/prism.css" %}
With that, refresh the homepage and the syntax highlighting should be working:
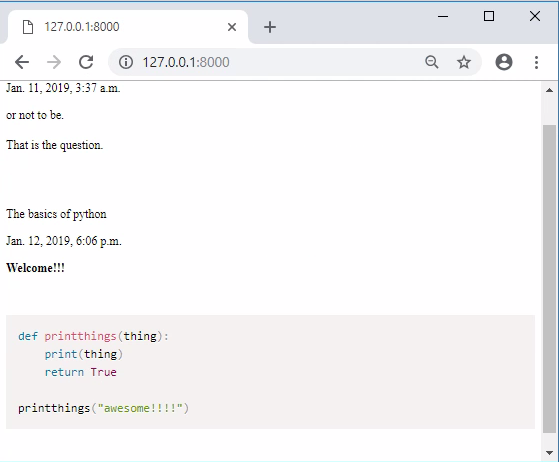
Great, but things are still pretty darn ugly. In the next tutorial, we'll spice things up slightly with a CSS framework.
-
Django Web Development with Python Introduction
-
Models - Django Tutorial
-
Admin and Apps - Django Tutorial
-
Views and Templates - Django Tutorial
-
CSS - Django Tutorial
-
User Registration - Django Tutorial
-
Messages - Django Tutorial
-
User Login and Logout - Django Tutorial
-
Foreign Keys with Models - Django Tutorial
-
Working with Foreign Keys - Django Tutorial
-
Dynamic sidebar - Django Tutorial
-
Deploying to a Server - Django Tutorial
