Programming for Finance Part 3 - Back Testing Strategy
Algorithmic trading with Python Tutorial
In this Python with Finance tutorial, we're going to be building on the last tutorial to actually add the trading logic to our algorithm. So far we have the following code:
def initialize(context):
    context.security = symbol('SPY')

def handle_data(context, data):
    MA1 = data[context.security].mavg(50)
    MA2 = data[context.security].mavg(200)

    current_price = data[context.security].price
    current_positions = context.portfolio.positions[symbol('SPY')].amount
    cash = context.portfolio.cash
Our initialize method is setting our stock universe to the SPY (S&P 500 index ETF), and that's all. Next, our handle_data method is defining our moving average information first, then we are collecting information on the stock's current price, our current positions in the stock, and then finally how much cash we currently have for investing.
Now that we have all of this necessary information, we're ready to build actual trading logic that will trade the crossover, only if we do not already currently have that position in place, and if we can actually afford a position in that company.
Notice all the "ifs" there? Sounds like a task for the Python if statement.
To start:
    if (MA1 > MA2) and current_positions == 0:
        number_of_shares = int(cash/current_price)
        order(context.security, number_of_shares)
        log.info("Buying shares")
If the MA's suggest a buy and we don't have a position:
How many shares can we afford to buy?
Place the order.
Output to console.
The above block of code establishes our logic to purchase shares. The new method here is order. This is the most basic form of placing orders with Quantopian. We are passing two parameters here, the first is what security are we actually ordering here, and the second is how many. If you made this a negative number, then we'd either sell shares if we had some, or we would engage in a short. There are many other ordering mechanisms built into Quantopian, like ordering a percent of a portfolio, or ordering a dollar amount of shares, and so on. We will be covering those as time goes on.
Now that we have the buying block create, we need to create the selling block:
    elif (MA1 < MA2) and current_positions != 0:
        order_target(context.security, 0)
        log.info("Selling shares")
If the MA's suggest a sell and we have shares to sell:
Make our target position in this security 0 shares.
Output to console.
Here, we see a new form of ordering called order_target. This allows us to order a "target" amount of shares of a company. In this case, we made our target 0, which means if we were shorting the company, we'd exit those shorts. If we had positions in the company, which we would in this case, we sell all of the positions.
Finally, the last line we'll put in this handle_data method is:
record(MA1 = MA1, MA2 = MA2, Price= current_price)
The record method allows us to track up to 5 custom attributes to our algorithm. In this case, we track both moving averages and the price. Where you see MA1 = MA1, what is happening here is first we give the label as MA1, and then we say what this MA1 label is representing, which is our MA1 variable. Now, we're ready to run out code. Go ahead and click "run full back test."
Full code up to now should be:
def initialize(context):
    context.security = symbol('SPY')

def handle_data(context, data):
    MA1 = data[context.security].mavg(50)
    MA2 = data[context.security].mavg(200)

    current_price = data[context.security].price
    current_positions = context.portfolio.positions[symbol('SPY')].amount
    cash = context.portfolio.cash

    if (MA1 > MA2) and current_positions == 0:
        number_of_shares = int(cash/current_price)
        order(context.security, number_of_shares)
        log.info("Buying shares")

    elif (MA1 < MA2) and current_positions != 0:
        order_target(context.security, 0)
        log.info("Selling shares")


    record(MA1 = MA1, MA2 = MA2, Price= current_price)
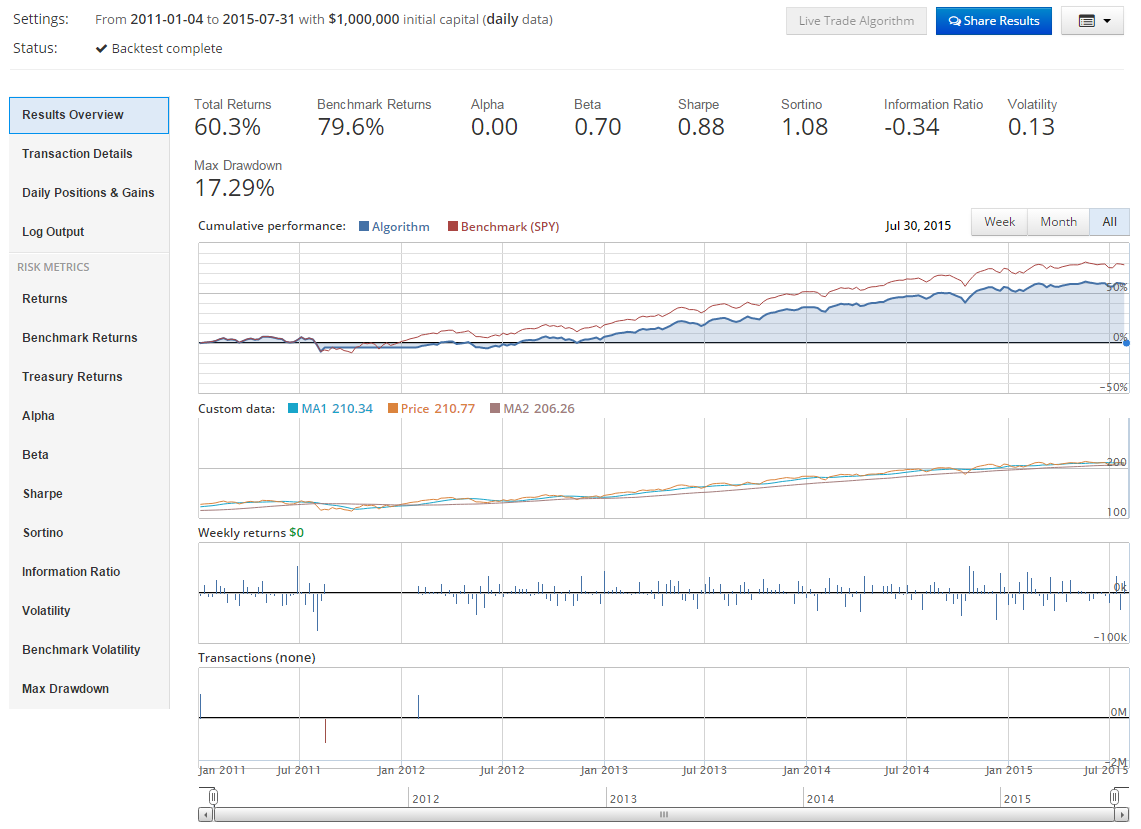
The results should look something like:

Here, we can see the results of our basic strategy. We didn't beat the market, but we made some money. We can see all of the places where we placed trades in the bottom chart. We also can see the custom data that we traced in the 2nd row graph. You can click on the transaction details tab to see all of the trades you placed exactly, and you can click on the daily positions and gains tab to see a table of your positions each day and your performance.
There exists 2 quiz/question(s) for this tutorial. for access to these, video downloads, and no ads.
-
Programming for Finance with Python, Zipline and Quantopian
-
Programming for Finance Part 2 - Creating an automated trading strategy
-
Programming for Finance Part 3 - Back Testing Strategy
-
Accessing Fundamental company Data - Programming for Finance with Python - Part 4
-
Back-testing our strategy - Programming for Finance with Python - part 5
-
Strategy Sell Logic with Schedule Function with Quantopian - Python for Finance 6
-
Stop-Loss in our trading strategy - Python for Finance with Quantopian and Zipline 7
-
Achieving Targets - Python for Finance with Zipline and Quantopian 8
-
Quantopian Fetcher - Python for Finance with Zipline and Quantopian 9
-
Trading Logic with Sentiment Analysis Signals - Python for Finance 10
-
Shorting based on Sentiment Analysis signals - Python for Finance 11
-
Paper Trading a Strategy on Quantopian - Python for Finance 12
-
Understanding Hedgefund and other financial Objectives - Python for Finance 13
-
Building Machine Learning Framework - Python for Finance 14
-
Creating Machine Learning Classifier Feature Sets - Python for Finance 15
-
Creating our Machine Learning Classifiers - Python for Finance 16
-
Testing our Machine Learning Strategy - Python for Finance 17
-
Understanding Leverage - Python for Finance 18
-
Quantopian Pipeline Tutorial Introduction
-
Simple Quantopian Pipeline Strategy
