Programming for Finance with Python, Zipline and Quantopian
Algorithmic trading with Python Tutorial
A lot of people hear programming with finance and they immediately think of High Frequency Trading (HFT), but we can also leverage programming to help up in finance even with things like investing and even long term investing. Most people think of programming with finance to be used for High Frequency Trading or Algorithmic Trading because the idea is that computers can be used to actually execute trades and make positions at a rate far quicker than a human can.
This is true, but machines can also aid humans with investing by greatly shortening the research time required. Even long term investors tend to do a lot of work to create a sort of "algorithm," where they research companies, looking at all sorts of fundamentals like Price/Earnings (PE) ratio, Revenue/Earnings per Share (EPS), Quarterly Earnings, Debt/Equity, and the list goes on. Even if an investor was simply looking for specific values for these company fundamental metrics, there are over 10,000 US stocks to possibly trade. Going through all of these would take an immense amount of time, easily years, and by the time you have done this, many new values have come out.
Notice the text that looks like this? You can click on text like this to learn more about the topic if you are not familiar. With finance, there are a lot of terms that can quickly leave you behind if you are not familiar, so, for any newcomers, the terms are explained. Still confused? Post a comment on the video.
Another reason why we might be interested in utilizing computers for finance is to attempt to filter out our inherent biases. Arguably, one of the major reasons why humans rose to dominance is our inate ability to immediately make patterns and see relationships in things. We do this very well, sometimes a bit too well, seeing patterns and relationships where there are none. As a predator and possible prey, seeing patterns and relationships is usually more helpful than not, so it worked out. In finance, seeing patterns where there are none can be detrimental, and it is. You have probably heard figures like over 90% of traders lose money in the markets. This is pretty much why.

Image Source: morguefile
I would argue that the value added for using machines with finance has nothing to do with High Frequency Trading, it has everything to do with the research and back-testing abilities.
Back testing is a form of analysis that allows us to look backward on history and trade a strategy against historical data to see how we did. This is of course a very simple definition of back-testing, but encompasses it well. The idea here is to do a sort of blind back-test where possible, as well as to eliminate survivorship bias.
Where many traders fail is they tend to "overfit" strategies to historical data. This usually happens where the results of a back test aren't as good as they hoped, so they tweak the numbers a bit and repeat. They just keep doing this until the results are what they wanted. This is overfitting and data snooping, and it is going to break you.
With that in mind, there are some more factors to back-testing, which allow us to not only test the performance of a strategy, but also perform risk analysis and validity testing on the strategies we write, which can help us to get more information beyond how we did, like how much risk we were taking in, in comparison to the returns we would have made.
Programming with Finance may or may not earn you money, but it is almost certain that it will save you money if employed right. That's what this tutorial series is going to be geared towards. To do this, we're going to be utilizing the Python programming language.
Python makes for a great language to use because it is fairly easy to understand. Generally, Python code is legible even by a non-programmer. There are also many useful modules and a great community backing up Python, so it is a great language to use with finance.
Next, we have to decide how we plan to actually test strategies. Writing a back-testing framework is a massive undertaking, and it sure seems very important that we get it right if we do it. Just like you should probably not write your own cryptography algorithms, you probably should not try to actually write your own back-testing systems unless it's just for fun. We're going to utilize the web service called Quantopian
Quantopian is built on top of a powerful back-testing algorithm for Python called Zipline. Zipline is capable of back-testing trading algorithms, including accounting for things like slippage, as well as calculating various risk metrics.
While we will be doing most of this series on Quantopian, it is completely possible to download Zipline and use that on your own computer, locally, without actually using Quantopian at all. The reason why I would like us to use Quantopian is because the risk metrics and the general user interface that is provided on Quantopian is superb. This alone will wind up saving us an incredible amount of time in development, and it is also quite widely tested. If we did it ourselves, we could do it with something like Matplotlib, but we'd be almost certain to mess a lot of things up along the way.
Heading to Quantopian, create an account by choosing "sign up" on the home page:
Feel free to poke around, but the next place to head once you create an account and login is the "Algorithms" tab at the top.
Once there, you should see a section called "Testing Algorithms." If you do not have any algorithms, you should see something like:
'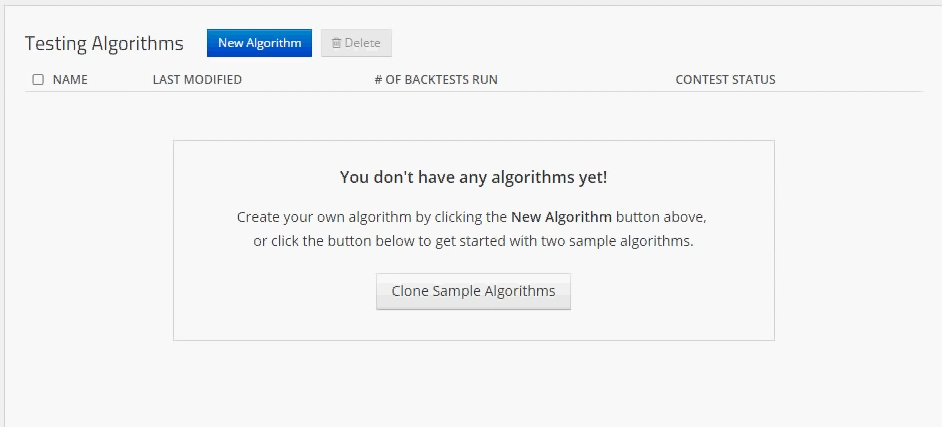
Choose to "clone sample algorithms." If you do not see the option to do that, do not worry! Instead, head to the documentation for Quantopian and the sample algorithms are here and then you can click "clone algorithm" here. As a note, you can do this with just about any algorithm you see. If you head to the community tab, you will see people posting questions and information about Quantopian in general. Some people will share their algorithms and back-tests here, which you can then clone to play with yourself.
When you clone the algorithm, you should be taken to your active-editing algorithms page with the cloned algorithm, which looks like this (minus the colored boxes)
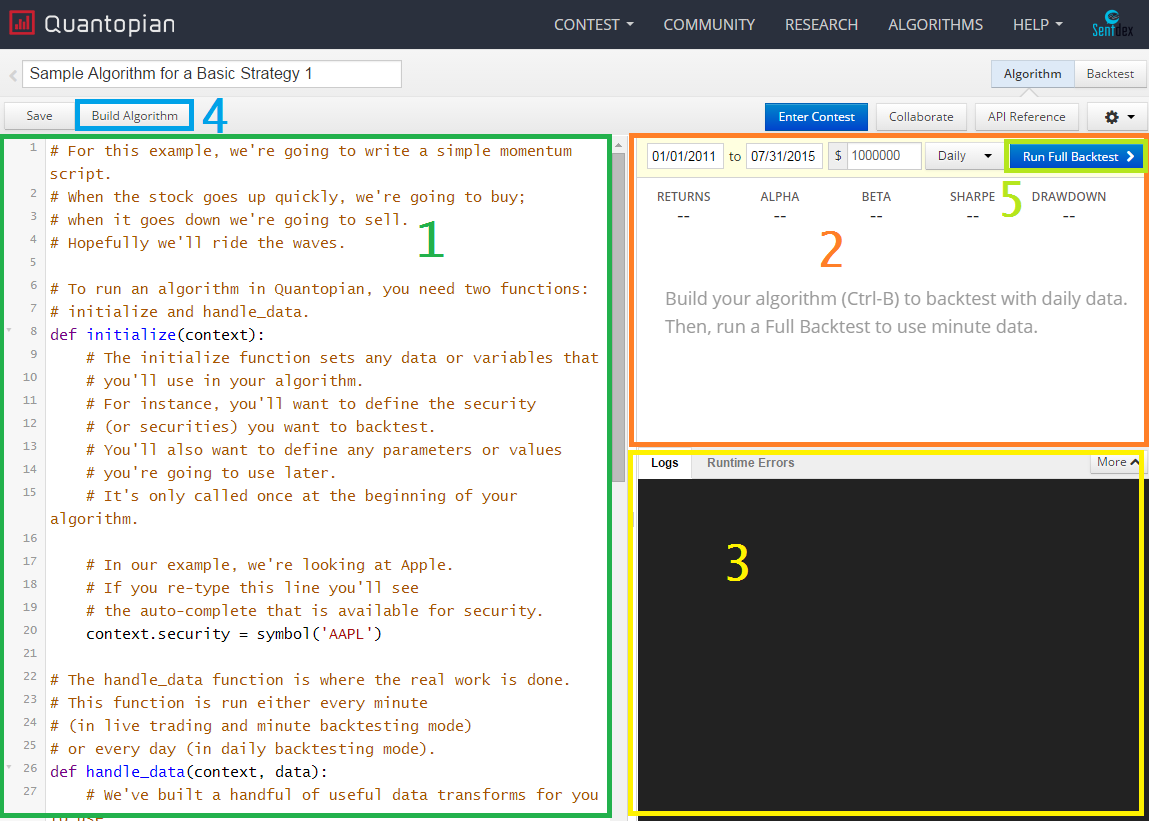
- Python Editor - This is where you code your Python logic for the algoirthm.
- Built-algorithm results - When you build the algorithm, graphical results will apppear here.
- Log / Error output - Any console output / log information will come here. It's common to have your program output various bits of text for debugging or just for more information.
- Build Algorithm - Use this to quickly test what you've written. Results wont be saved, but you can see the result in the built-algorithm results section.
- Full Backtest - This will run a full back test based on your current algorithm. Full back tests come with a bit more analysis, results are saved, and the algorithm that generated those results is also saved, so you can go back through back tests and view the exact code that generated a specific result.
The full sample code is something like:
# For this example, we're going to write a simple momentum script.
# When the stock goes up quickly, we're going to buy;
# when it goes down we're going to sell.
# Hopefully we'll ride the waves.

# To run an algorithm in Quantopian, you need two functions:
# initialize and handle_data.
def initialize(context):
    # The initialize function sets any data or variables that
    # you'll use in your algorithm.
    # For instance, you'll want to define the security
    # (or securities) you want to backtest.
    # You'll also want to define any parameters or values
    # you're going to use later.
    # It's only called once at the beginning of your algorithm.

    # In our example, we're looking at Apple.
    # If you re-type this line you'll see
    # the auto-complete that is available for security.
    context.security = symbol('AAPL')

# The handle_data function is where the real work is done.
# This function is run either every minute
# (in live trading and minute backtesting mode)
# or every day (in daily backtesting mode).
def handle_data(context, data):
    # We've built a handful of useful data transforms for you to use,
    # such as moving average.

    # To make market decisions, we're calculating the stock's
    # moving average for the last 5 days and its current price.
    average_price = data[context.security].mavg(5)
    current_price = data[context.security].price

    # Another powerful built-in feature of the Quantopian backtester is the
    # portfolio object.  The portfolio object tracks your positions, cash,
    # cost basis of specific holdings, and more.  In this line, we calculate
    # the current amount of cash in our portfolio.
    cash = context.portfolio.cash

    # Here is the meat of our algorithm.
    # If the current price is 1% above the 5-day average price
    # AND we have enough cash, then we will order.
    # If the current price is below the average price,
    # then we want to close our position to 0 shares.
    if current_price > 1.01*average_price and cash > current_price:

        # Need to calculate how many shares we can buy
        number_of_shares = int(cash/current_price)

        # Place the buy order (positive means buy, negative means sell)
        order(context.security, +number_of_shares)
        log.info("Buying %s" % (context.security.symbol))


    elif current_price < average_price:

        # Sell all of our shares by setting the target position to zero
        order_target(context.security, 0)
        log.info("Selling %s" % (context.security.symbol))

    # You can use the record() method to track any custom signal.
    # The record graph tracks up to five different variables.
    # Here we record the Apple stock price.
    record(stock_price=data[context.security].price)
Under the "def initialize(context):," this is code that will run on start up just once, and then we have the handle_data method. The handle_data method is going to run once per-bar. Quantopian has two major settings: Daily or Minute. If you are running Daily, for example, then handle_data will run "once a day."
Within this handle_data method, we are calculating the 5 day moving average as well as storing the current price to variables. From here, we ask if the current price is greater than the average price, and if we have the money to afford another share. If this is the case, then we buy. If it is not, then we want to sell if we have shares to do it.
This is just a rough summary of what is happening here. In the next tutorial, we'll be running through code line by line which will help solidify your understanding of how this work.
Now, hit "run full back-test." It will take a moment to start up, and then you should start seeing results. Here, we can see the historical performance of our algorithm as compared to some benchmark. The default benchmark is the S&P 500 index, which is a collection of the top 500 (It's actually currently 502 at the time of my writing this) companies converted to an index. This is a popular measurement used to calculate the health of the stock market as a whole.
Not only can we see the performance, we see some risk metrics at the top, but also we can play with that side nav-bar to look through a ton of data that is also tracked in regards to our strategy.
Feel free to poke around this page and see what is available. If you're still a bit cloudy, that should not be a surprise, we will be clearing up more about Quantopian as we go. If you are finding yourself lost with Python code, you may want to look into the Python 3 Basics tutorial series.
You can also try heading to the Python tutorials search bar to see if you can find a quick answer to a specific topic. If all else fails, post a comment on the related video and I or someone else will likely be able to help you out!
There exists 2 quiz/question(s) for this tutorial. for access to these, video downloads, and no ads.
-
Programming for Finance with Python, Zipline and Quantopian
-
Programming for Finance Part 2 - Creating an automated trading strategy
-
Programming for Finance Part 3 - Back Testing Strategy
-
Accessing Fundamental company Data - Programming for Finance with Python - Part 4
-
Back-testing our strategy - Programming for Finance with Python - part 5
-
Strategy Sell Logic with Schedule Function with Quantopian - Python for Finance 6
-
Stop-Loss in our trading strategy - Python for Finance with Quantopian and Zipline 7
-
Achieving Targets - Python for Finance with Zipline and Quantopian 8
-
Quantopian Fetcher - Python for Finance with Zipline and Quantopian 9
-
Trading Logic with Sentiment Analysis Signals - Python for Finance 10
-
Shorting based on Sentiment Analysis signals - Python for Finance 11
-
Paper Trading a Strategy on Quantopian - Python for Finance 12
-
Understanding Hedgefund and other financial Objectives - Python for Finance 13
-
Building Machine Learning Framework - Python for Finance 14
-
Creating Machine Learning Classifier Feature Sets - Python for Finance 15
-
Creating our Machine Learning Classifiers - Python for Finance 16
-
Testing our Machine Learning Strategy - Python for Finance 17
-
Understanding Leverage - Python for Finance 18
-
Quantopian Pipeline Tutorial Introduction
-
Simple Quantopian Pipeline Strategy
