Dynamic sidebar - Django Tutorial
Welcome to part 11 of the Django tutorial series. In this part, we're going to finally point to specific tutorials, along with adding the side bar to help users navigate through that specific tutorial.
Inside our views.py, and the single_slug function, our tutorial code now becomes:
    tutorials = [t.tutorial_slug for t in Tutorial.objects.all()]

    if single_slug in tutorials:
        this_tutorial = Tutorial.objects.get(tutorial_slug=single_slug)

        return render(request = request,
                      template_name='main/tutorial.html',
                      context = {"tutorial":this_tutorial})
Now we need to make that tutorial page.
{% extends 'main/header.html' %}

{% block content %}

    <div class="row">
        <div class="col s12, m8, l8">
            <h3>{{tutorial.tutorial_title}}</h3>
            <p style="font-size:70%">Published {{tutorial.tutorial_published}}</p>
            {{tutorial.tutorial_content|safe}}
        </div>
    </div>

{% endblock %}
With this, we can click on a tutorial now and that works now.
Next, we might want to have a side-bar that helps users navigate through the parts of the tutorial series like pythonprogramming.net currently has.
To do this, head back to views.py
    tutorials = [t.tutorial_slug for t in Tutorial.objects.all()]

    if single_slug in tutorials:
        this_tutorial = Tutorial.objects.get(tutorial_slug=single_slug)
        tutorials_from_series = Tutorial.objects.filter(tutorial_series__tutorial_series=this_tutorial.tutorial_series).order_by('tutorial_published')
        this_tutorial_idx = list(tutorials_from_series).index(this_tutorial)

        return render(request=request,
                      template_name='main/tutorial.html',
                      context={"tutorial: "this_tutorial,
                               "sidebar": tutorials_from_series,
                               "this_tut_idx": this_tutorial_idx})
Now we can use this newly passed data in our tutorial.html template. We can make a side bar with:
        <div class="col s12 m4 l4">
            <ul class="collapsible popout">
                {% for tutorial in sidebar %}
                    {% if forloop.counter0 == this_tut_idx %}
                        <li class="active">
                            <div class="collapsible-header">{{tutorial.tutorial_title}}<br>(currently viewing)</div>
                        </li>
                    {% else %}
                        <li>
                            <div class="collapsible-header">{{tutorial.tutorial_title}}</div>
                            <div class="collapsible-body">
                                <p><a href="/{{tutorial.tutorial_slug}}"><button class="btn waves-effect waves-light right-align" style="background-color:yellow; color:black">Go</button></a></p>

                            </div>
                        </li>
                    {% endif %}
                {% endfor %}
            </ul>
        </div>
Full code for tutorial.html:
{% extends 'main/header.html' %}

{% block content %}

    <div class="row">

        <div class="col s12, m8, l8">
            <h3>{{tutorial.tutorial_title}}</h3>
            <p style="font-size:70%">Published {{tutorial.tutorial_published}}</p>
            {{tutorial.tutorial_content|safe}}
        </div>

        <div class="col s12 m4 l4">
            <ul class="collapsible popout">
                {% for tutorial in sidebar %}
                    {% if forloop.counter0 == this_tut_idx %}
                        <li class="active">
                            <div class="collapsible-header">{{tutorial.tutorial_title}}<br>(currently viewing)</div>
                        </li>
                    {% else %}
                        <li>
                            <div class="collapsible-header">{{tutorial.tutorial_title}}</div>
                            <div class="collapsible-body">
                                <p><a href="/{{tutorial.tutorial_slug}}"><button class="btn waves-effect waves-light right-align" style="background-color:yellow; color:black">Go</button></a></p>

                            </div>
                        </li>
                    {% endif %}
                {% endfor %}
            </ul>
        </div>

    </div>

{% endblock %}
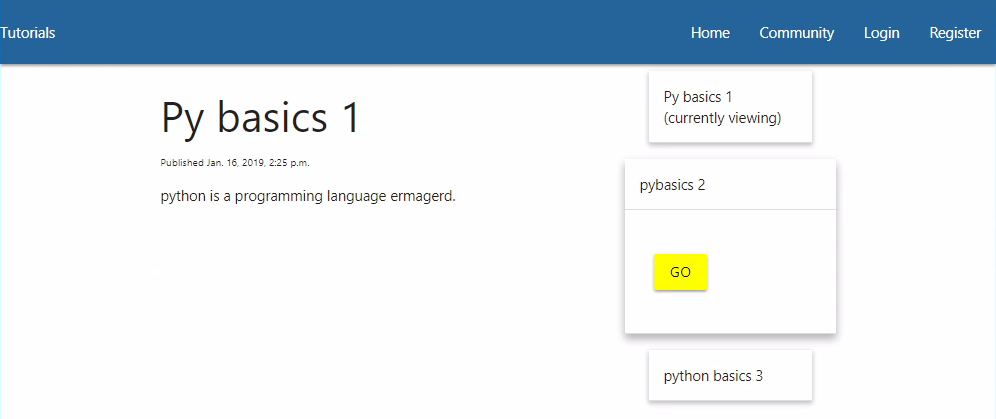
Now, viewing any of the tutorials should give you something like:

If we click on the side bar though, it appears to not quite function right. This is because we need to initialize the collapsible javascript. That said, as time goes on, we're going to likely need to initialize a few, or many, of the javascript things. Instead, we can just do them all with:
<script>
  M.AutoInit();
</script>
So let's just add that to our header file like:
header.html
<head>
    {% load static %}
    <!-- Prism CSS -->
    <link href="{% static "tinymce/css/prism.css" %}" rel="stylesheet">
    <!-- Compiled and minified CSS -->
    <link rel="stylesheet" href="{% static "main/css/materialize.css" %}">
    <!-- Compiled and minified JavaScript -->
    <script src="https://cdnjs.cloudflare.com/ajax/libs/materialize/1.0.0/js/materialize.min.js"></script>
</head>

<body>
  <nav>
    <div class="nav-wrapper"
      <a href="/" class="brand-logo">Tutorials</a>
      <ul id="nav-mobile" class="right hide-on-med-and-down">
        {% include 'main/includes/navbaritems.html' %}
      </ul>
    </div>
  </nav>

  {% include 'main/includes/messaging.html' %}

  <div class="container">
    {% block content %}
    {% endblock %}
  </div>
</body>

<script src="{% static "tinymce/js/prism.js" %}"></script>
<script>M.AutoInit();</script>
With that, we should have no trouble clicking on and interacting with the nav bar.

Ok, at this point, we've covered the bulk of what you need to know about how to use Django. I may continue to develop this Django version of my site further and incorporate a bunch more, and I may cover that process. That said, much of it will be done using concepts you've already learned up to this point.
So, the last thing I want to show is deployment to an actual server where you can access your website from anywhere in the world, which is what we'll be doing in the next tutorial. See you there!
-
Django Web Development with Python Introduction
-
Models - Django Tutorial
-
Admin and Apps - Django Tutorial
-
Views and Templates - Django Tutorial
-
CSS - Django Tutorial
-
User Registration - Django Tutorial
-
Messages - Django Tutorial
-
User Login and Logout - Django Tutorial
-
Foreign Keys with Models - Django Tutorial
-
Working with Foreign Keys - Django Tutorial
-
Dynamic sidebar - Django Tutorial
-
Deploying to a Server - Django Tutorial
