Tkinter buttons
Once you've figured out the basics to a tkinter window, you might fancy the addition of some buttons. Buttons are used for all sorts of things, but generally are great to incite some interaction between the program and the user. Adding buttons is a two-fold thing in the end. In this video, we show just plainly how to add a button. The addition of a button and its button-like functionality is great, but, in the end, we actually want the button to do something. We'll get there, but first let's just show the button.
Here's our new code:
from tkinter import *

class Window(Frame):


    def __init__(self, master=None):
        Frame.__init__(self, master)
        self.master = master
        self.init_window()

    #Creation of init_window
    def init_window(self):

        # changing the title of our master widget
        self.master.title("GUI")

        # allowing the widget to take the full space of the root window
        self.pack(fill=BOTH, expand=1)

        # creating a button instance
        quitButton = Button(self, text="Quit")

        # placing the button on my window
        quitButton.place(x=0, y=0)

root = Tk()

#size of the window
root.geometry("400x300")

app = Window(root)
root.mainloop()
So here we see a few new concepts. The first is self.init_window(). Why have we done this? Well, in the world of window-making, what we might normally refer to as a "window," is actually correctly called a frame. So that outer edge that people generally call a window is actually the frame. In the first tutorial, we actually just created the frame for windows. I know, I know... earth-shattering things coming at you.
So, once you have the frame, you need to specify some rules to the window within it. here, we initialize the actual window, which we can begin to modify. The next major thing we see is the init_window() function in our window class. Here, we give the window a title, which adds the title of GUI. Then we pack, which allows our widget to take the full space of our root window, or frame.
From there, we then create a button instance, with the text on it that says quit. While tkinter is very basic and simplistic, I sometimes fear that its simplicity is very confusing to programmers. At least for me, I wondered, how we actually get "quit" written on the button. Surely it would take a lot of work? What about making the button go up and down like a button? All of this is just plain done for us. So when you say text="quit," that's really all you have to do and tkinter handles all of the rest. Finally, when we're done creating this button instance, we place it on the window. Here, we place it at the coordinates of 0,0. This can also be quite confusing, because 0,0 may make people expect the quit button to be at the lower left. Instead, it appears at the upper-left. When it comes to computer design, like css or here, 0,0 means upper left. Adding to x moves right, as expected. Adding to the y variable, however, moves down, which is contrary to what you're taught in your graphing lessons in school.
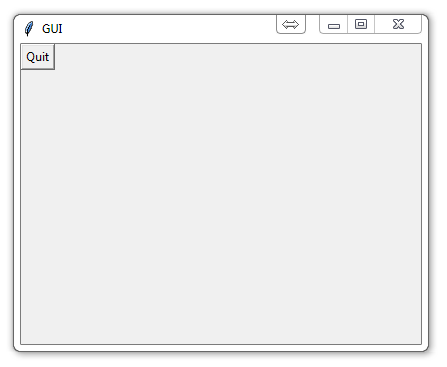
With all of this done, you should now be greeted with a window that looks like:
-
Python Introduction
-
Print Function and Strings
-
Math with Python
-
Variables Python Tutorial
-
While Loop Python Tutorial
-
For Loop Python Tutorial
-
If Statement Python Tutorial
-
If Else Python Tutorial
-
If Elif Else Python Tutorial
-
Functions Python Tutorial
-
Function Parameters Python Tutorial
-
Function Parameter Defaults Python Tutorial
-
Global and Local Variables Python Tutorial
-
Installing Modules Python Tutorial
-
How to download and install Python Packages and Modules with Pip
-
Common Errors Python Tutorial
-
Writing to a File Python Tutorial
-
Appending Files Python Tutorial
-
Reading from Files Python Tutorial
-
Classes Python Tutorial
-
Frequently asked Questions Python Tutorial
-
Getting User Input Python Tutorial
-
Statistics Module Python Tutorial
-
Module import Syntax Python Tutorial
-
Making your own Modules Python Tutorial
-
Python Lists vs Tuples
-
List Manipulation Python Tutorial
-
Multi-dimensional lists Python Tutorial
-
Reading CSV files in Python
-
Try and Except Error handling Python Tutorial
-
Multi-Line printing Python Tutorial
-
Python dictionaries
-
Built in functions Python Tutorial
-
OS Module Python Tutorial
-
SYS module Python Tutorial
-
Python urllib tutorial for Accessing the Internet
-
Regular Expressions with re Python Tutorial
-
How to Parse a Website with regex and urllib Python Tutorial
-
Tkinter intro
-
Tkinter buttons
-
Tkinter event handling
-
Tkinter menu bar
-
Tkinter images, text, and conclusion
-
Threading module
-
CX_Freeze Python Tutorial
-
The Subprocess Module Python Tutorial
-
Matplotlib Crash Course Python Tutorial
-
Python ftplib Tutorial
-
Sockets with Python Intro
-
Simple Port Scanner with Sockets
-
Threaded Port Scanner
-
Binding and Listening with Sockets
-
Client Server System with Sockets
-
Python 2to3 for Converting Python 2 scripts to Python 3
-
Python Pickle Module for saving Objects by serialization
-
Eval Module with Python Tutorial
-
Exec with Python Tutorial
