Tkinter menu bar
Now that we've got the basic window, buttons, and event handling down, we're ready to tackle the idea of a menu bar. The way tkinter works, along with quite a few graphics/windows operations work, is with a main window, then you sort of build things on top of it, then display everything all at once, which gives the appearance of a singular package. What makes tkinter most confusing, at least to me, is that you have to work both forwards and backwards in relation to your goal.
So, when I make programs, I usually work backwards from my goal. I know what the end objective is going to be, and then I take steps in reverse, first calling a non-existent function as if it works how I might need it to, then I define it to fit how I need it to act. With tkinter, this methodology is used as well, only you have to do some of the beginning steps, then you have to go to the end and work backwards. Let's hit the code to understand better:
# Simple enough, just import everything from tkinter.
from tkinter import *


# Here, we are creating our class, Window, and inheriting from the Frame
# class. Frame is a class from the tkinter module. (see Lib/tkinter/__init__)
class Window(Frame):

    # Define settings upon initialization. Here you can specify
    def __init__(self, master=None):

        # parameters that you want to send through the Frame class.
        Frame.__init__(self, master)

        #reference to the master widget, which is the tk window
        self.master = master

        #with that, we want to then run init_window, which doesn't yet exist
        self.init_window()

    #Creation of init_window
    def init_window(self):

        # changing the title of our master widget
        self.master.title("GUI")

        # allowing the widget to take the full space of the root window
        self.pack(fill=BOTH, expand=1)

        # creating a menu instance
        menu = Menu(self.master)
        self.master.config(menu=menu)

        # create the file object)
        file = Menu(menu)

        # adds a command to the menu option, calling it exit, and the
        # command it runs on event is client_exit
        file.add_command(label="Exit", command=self.client_exit)

        #added "file" to our menu
        menu.add_cascade(label="File", menu=file)

        # create the file object)
        edit = Menu(menu)

        # adds a command to the menu option, calling it exit, and the
        # command it runs on event is client_exit
        edit.add_command(label="Undo")

        #added "file" to our menu
        menu.add_cascade(label="Edit", menu=edit)


    def client_exit(self):
        exit()


# root window created. Here, that would be the only window, but
# you can later have windows within windows.
root = Tk()

root.geometry("400x300")

#creation of an instance
app = Window(root)

#mainloop
root.mainloop()
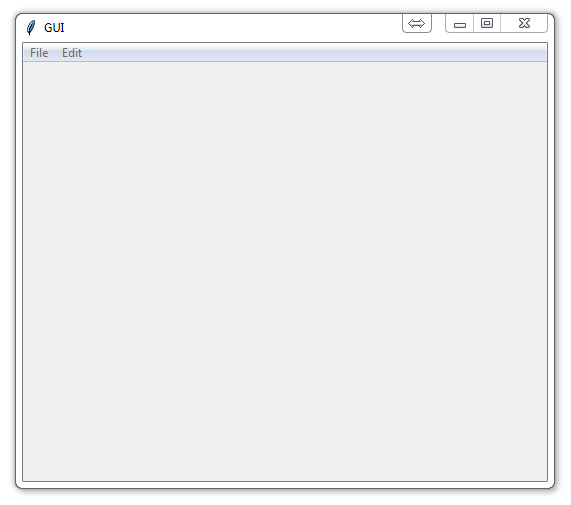
Output:

Sometimes I like to describe things line by line, and sometimes I think it can make it confusing. For tkinter, you've probably noticed I've been commenting the heck out of it and describing. Hopefully that helps a bit. So, here, we can see that the menus are all done within init_window().
We see to begin, we need a menu instance, then we bind that instance as a menu. Then, we create a menu within the menu. Then, we add the items to the menu within a menu...then we do it again.
...and people are quickly lost with this. It's quite a confusing way to go about it at first, but that's what we've got. Once you get comfortable with tkinter, you can perform these operations much quicker. If you are confused, then I highly suggest you watch the video as well, since I show how the grouping of the 3 lines of object creation, adding options, then appending to the main menu sort of simplifies the process.
-
Python Introduction
-
Print Function and Strings
-
Math with Python
-
Variables Python Tutorial
-
While Loop Python Tutorial
-
For Loop Python Tutorial
-
If Statement Python Tutorial
-
If Else Python Tutorial
-
If Elif Else Python Tutorial
-
Functions Python Tutorial
-
Function Parameters Python Tutorial
-
Function Parameter Defaults Python Tutorial
-
Global and Local Variables Python Tutorial
-
Installing Modules Python Tutorial
-
How to download and install Python Packages and Modules with Pip
-
Common Errors Python Tutorial
-
Writing to a File Python Tutorial
-
Appending Files Python Tutorial
-
Reading from Files Python Tutorial
-
Classes Python Tutorial
-
Frequently asked Questions Python Tutorial
-
Getting User Input Python Tutorial
-
Statistics Module Python Tutorial
-
Module import Syntax Python Tutorial
-
Making your own Modules Python Tutorial
-
Python Lists vs Tuples
-
List Manipulation Python Tutorial
-
Multi-dimensional lists Python Tutorial
-
Reading CSV files in Python
-
Try and Except Error handling Python Tutorial
-
Multi-Line printing Python Tutorial
-
Python dictionaries
-
Built in functions Python Tutorial
-
OS Module Python Tutorial
-
SYS module Python Tutorial
-
Python urllib tutorial for Accessing the Internet
-
Regular Expressions with re Python Tutorial
-
How to Parse a Website with regex and urllib Python Tutorial
-
Tkinter intro
-
Tkinter buttons
-
Tkinter event handling
-
Tkinter menu bar
-
Tkinter images, text, and conclusion
-
Threading module
-
CX_Freeze Python Tutorial
-
The Subprocess Module Python Tutorial
-
Matplotlib Crash Course Python Tutorial
-
Python ftplib Tutorial
-
Sockets with Python Intro
-
Simple Port Scanner with Sockets
-
Threaded Port Scanner
-
Binding and Listening with Sockets
-
Client Server System with Sockets
-
Python 2to3 for Converting Python 2 scripts to Python 3
-
Python Pickle Module for saving Objects by serialization
-
Eval Module with Python Tutorial
-
Exec with Python Tutorial
