Recurrent Neural Networks - Deep Learning basics with Python, TensorFlow and Keras p.7
Welcome to part 7 of the Deep Learning with Python, TensorFlow and Keras tutorial series. In this part we're going to be covering recurrent neural networks. The idea of a recurrent neural network is that sequences and order matters. For many operations, this definitely does.
Consider something like a sentence:
some people made a neural network
Then, let's say we tokenized (split by) that sentence by word, and each word was a feature.
Feeding through a regular neural network, the above sentence would carry no more meaning that, say:
a neural network made some people
Obviously, these two sentences have widely varying impacts and meanings!
This is where recurrent neural networks come into play. They attempt to retain some of the importance of sequential data.
With a Recurrent Neural Network, your input data is passed into a cell, which, along with outputting the activiation function's output, we take that output and include it as an input back into this cell.
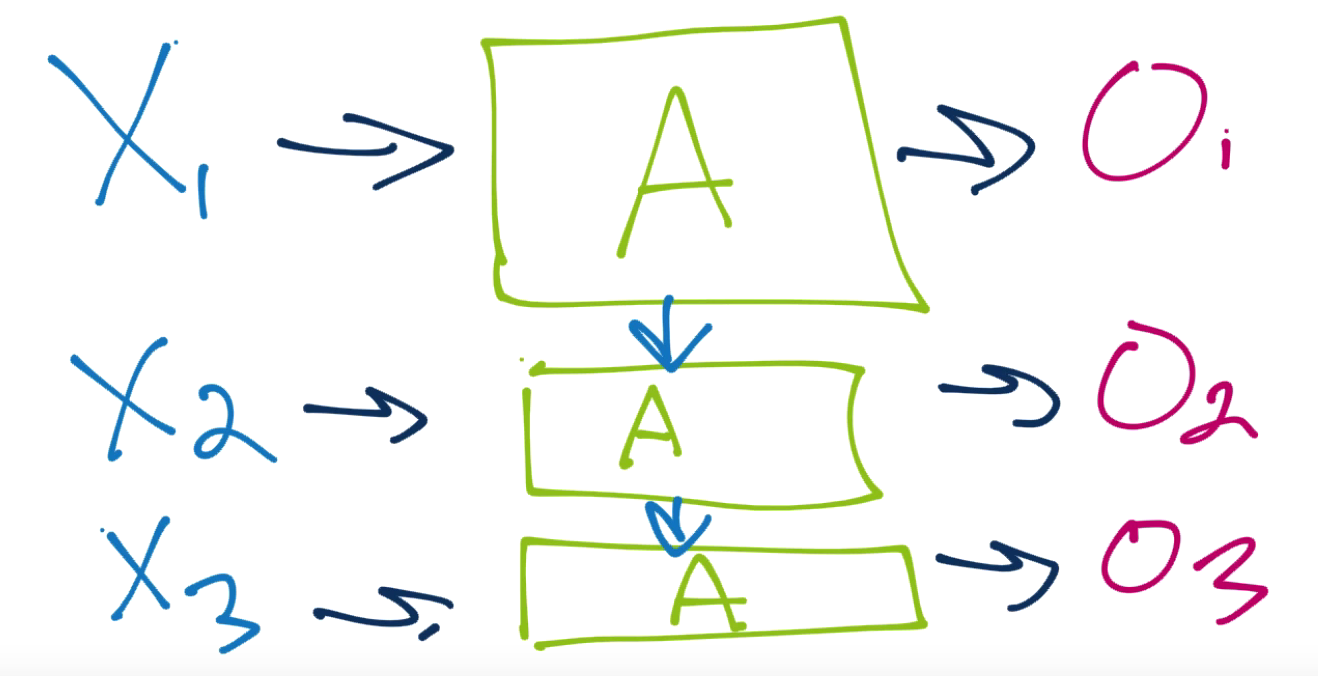
This can work, but this means we have a new set of problems: How should we weight incoming new data? How should we handle the recurring data? How should we handle/weight the relationship of the new data to the recurring data? What about as we continue down the line? If we're not careful, that initial signal could dominate everything down the line.
This is where the Long Short Term Memory (LSTM) Cell comes in. An LSTM cell looks like:
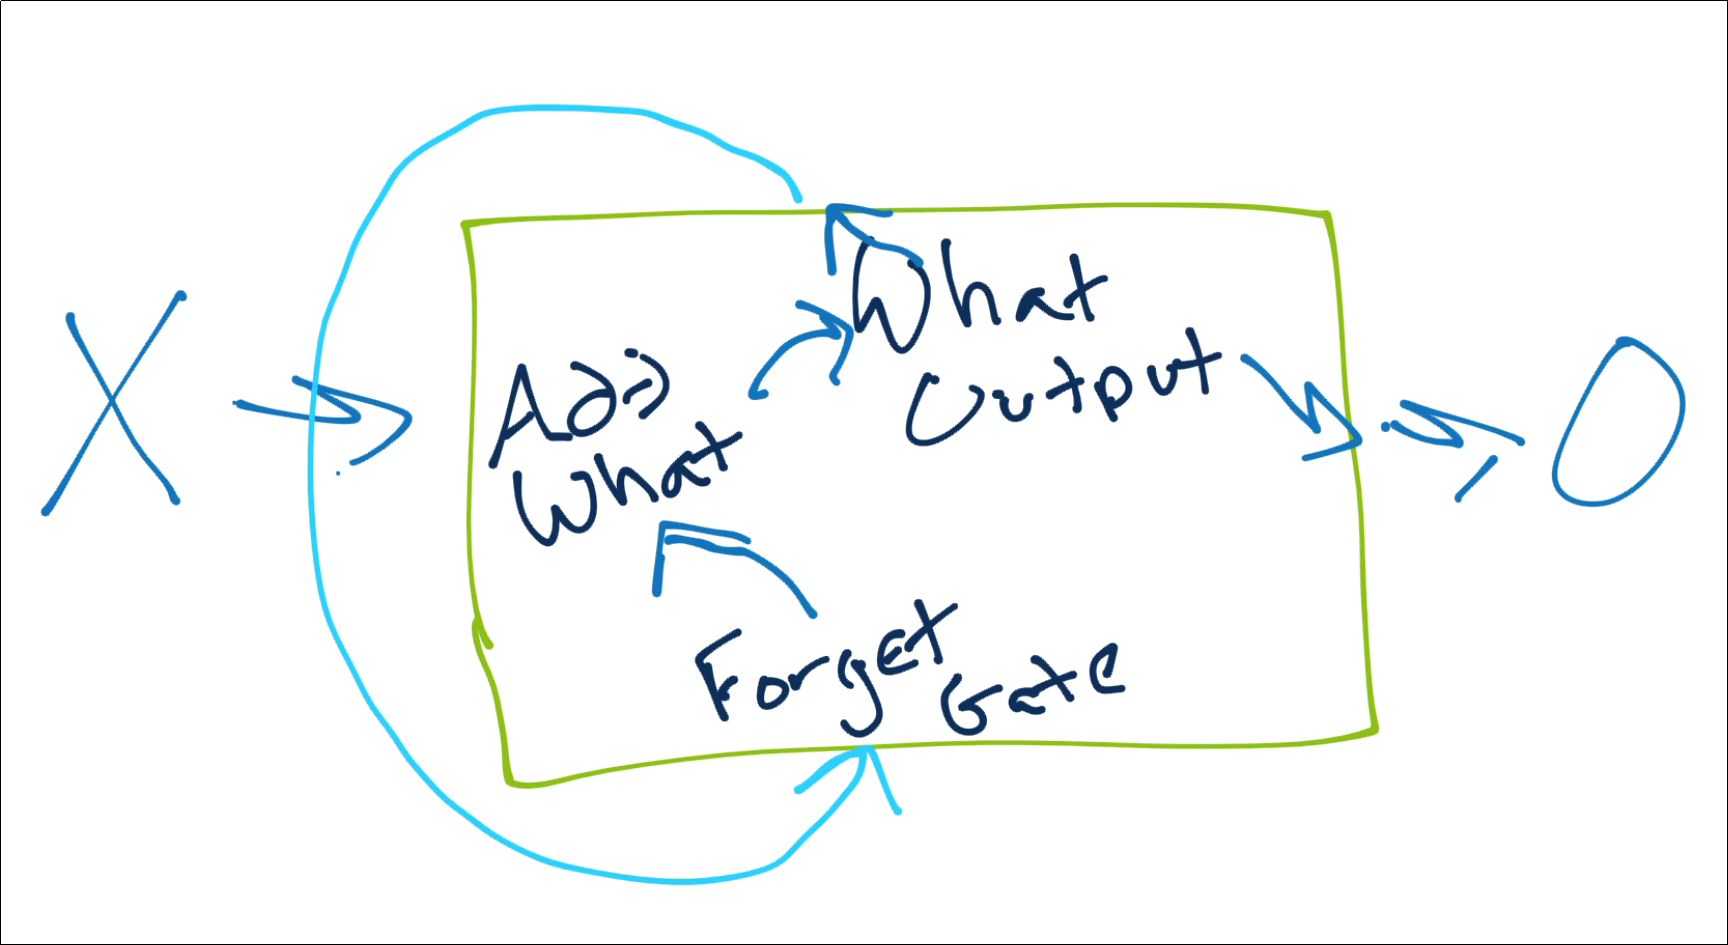
The idea here is that we can have some sort of functions for determining what to forget from previous cells, what to add from the new input data, what to output to new cells, and what to actually pass on to the next layer.
If you'd like to know more, check out my original RNN tutorial as well as Understanding LSTM Networks.
Now let's work on applying an RNN to something simple, then we'll use an RNN on a more realistic use-case. I am going to have us start by using an RNN to predict MNIST, since that's a simple dataset, already in sequences, and we can understand what the model wants from us relatively easily.
In the next tutorial, we'll instead apply a recurrent neural network to some crypto currency pricing data, which will present a much more significant challenge and be a bit more realistic to your experience when trying to apply an RNN to time-series data.
We'll begin our basic RNN example with the imports we need:
import tensorflow as tf
from tensorflow.keras.models import Sequential
from tensorflow.keras.layers import Dense, Dropout, LSTM
The type of RNN cell that we're going to use is the LSTM cell. Layers will have dropout, and we'll have a dense layer at the end, before the output layer.
Similar to before, we load in our data, and we can see the shape again of the dataset and individual samples:
mnist = tf.keras.datasets.mnist  # mnist is a dataset of 28x28 images of handwritten digits and their labels
(x_train, y_train),(x_test, y_test) = mnist.load_data()  # unpacks images to x_train/x_test and labels to y_train/y_test

x_train = x_train/255.0
x_test = x_test/255.0

print(x_train.shape)
print(x_train[0].shape)
So, what is our input data here? Recall we had to flatten this data for the regular deep neural network. In this model, we're passing the rows of the image as the sequences. So basically, we're showing the the model each pixel row of the image, in order, and having it make the prediction. (28 sequences of 28 elements)
model = Sequential()
model.add(LSTM(128, input_shape=(x_train.shape[1:]), activation='relu', return_sequences=True))
model.add(Dropout(0.2))

model.add(LSTM(128, activation='relu'))
model.add(Dropout(0.1))

model.add(Dense(32, activation='relu'))
model.add(Dropout(0.2))

model.add(Dense(10, activation='softmax'))
This should all be straight forward, where rather than Dense or Conv, we're just using LSTM as the layer type. The only new thing is return_sequences. This flag is used for when you're continuing on to another recurrent layer. If you are, then you want to return sequences. If you're not going to another recurrent-type of layer, then you don't set this to true.
We've not yet covered in this series for the rest of the model either:
opt = tf.keras.optimizers.Adam(lr=0.001, decay=1e-6)

model.compile(
    loss='sparse_categorical_crossentropy',
    optimizer=opt,
    metrics=['accuracy'],
)

model.fit(x_train,
          y_train,
          epochs=3,
          validation_data=(x_test, y_test))
Full code up to this point:
import tensorflow as tf
from tensorflow.keras.models import Sequential
from tensorflow.keras.layers import Dense, Dropout, LSTM#, CuDNNLSTM


mnist = tf.keras.datasets.mnist  # mnist is a dataset of 28x28 images of handwritten digits and their labels
(x_train, y_train),(x_test, y_test) = mnist.load_data()  # unpacks images to x_train/x_test and labels to y_train/y_test

x_train = x_train/255.0
x_test = x_test/255.0

print(x_train.shape)
print(x_train[0].shape)

model = Sequential()

# IF you are running with a GPU, try out the CuDNNLSTM layer type instead (don't pass an activation, tanh is required)
model.add(LSTM(128, input_shape=(x_train.shape[1:]), activation='relu', return_sequences=True))
model.add(Dropout(0.2))

model.add(LSTM(128, activation='relu'))
model.add(Dropout(0.1))

model.add(Dense(32, activation='relu'))
model.add(Dropout(0.2))

model.add(Dense(10, activation='softmax'))

opt = tf.keras.optimizers.Adam(lr=0.001, decay=1e-6)

# Compile model
model.compile(
    loss='sparse_categorical_crossentropy',
    optimizer=opt,
    metrics=['accuracy'],
)

model.fit(x_train,
          y_train,
          epochs=3,
          validation_data=(x_test, y_test))
In the next tutorial, we're going to cover a more realistic timeseries example using cryptocurrency pricing, which will require us to build our own sequences and targets.
-
Introduction to Deep Learning - Deep Learning basics with Python, TensorFlow and Keras p.1
-
Loading in your own data - Deep Learning basics with Python, TensorFlow and Keras p.2
-
Convolutional Neural Networks - Deep Learning basics with Python, TensorFlow and Keras p.3
-
Analyzing Models with TensorBoard - Deep Learning basics with Python, TensorFlow and Keras p.4
-
Optimizing Models with TensorBoard - Deep Learning basics with Python, TensorFlow and Keras p.5
-
How to use your trained model - Deep Learning basics with Python, TensorFlow and Keras p.6
-
Recurrent Neural Networks - Deep Learning basics with Python, TensorFlow and Keras p.7
-
Creating a Cryptocurrency-predicting finance recurrent neural network - Deep Learning basics with Python, TensorFlow and Keras p.8
-
Normalizing and creating sequences for our cryptocurrency predicting RNN - Deep Learning basics with Python, TensorFlow and Keras p.9
-
Balancing Recurrent Neural Network sequence data for our crypto predicting RNN - Deep Learning basics with Python, TensorFlow and Keras p.10
-
Cryptocurrency-predicting RNN Model - Deep Learning basics with Python, TensorFlow and Keras p.11
