Training Custom Object Detector - Tensorflow Object Detection API Tutorial
Welcome to part 5 of the TensorFlow Object Detection API tutorial series. In this part of the tutorial, we will train our object detection model to detect our custom object. To do this, we need the Images, matching TFRecords for the training and testing data, and then we need to setup the configuration of the model, then we can train. For us, that means we need to setup a configuration file.
Here, we have two options. We can use a pre-trained model, and then use transfer learning to learn a new object, or we could learn new objects entirely from scratch. The benefit of transfer learning is that training can be much quicker, and the required data that you might need is much less. For this reason, we're going to be doing transfer learning here.
TensorFlow has quite a few pre-trained models with checkpoint files available, along with configuration files. You can do all of this yourself if you like by checking out their configuring jobs documentation. The object API also provides some sample configurations to choose from.
I am going to go with mobilenet, using the following checkpoint and configuration file
wget https://raw.githubusercontent.com/tensorflow/models/master/object_detection/samples/configs/ssd_mobilenet_v1_pets.config
wget http://download.tensorflow.org/models/object_detection/ssd_mobilenet_v1_coco_11_06_2017.tar.gz
You can check out some of the other checkpoint options to start with here.
Put the config in the training directory, and extract the ssd_mobilenet_v1 in the models/object_detection directory
In the configuration file, you need to search for all of the PATH_TO_BE_CONFIGURED points and change them. You may also want to modify batch size. Currently, it is set to 24 in my configuration file. Other models may have different batch sizes. If you get a memory error, you can try to decrease the batch size to get the model to fit in your VRAM. Finally, you also need to change the checkpoint name/path, num_classes to 1, num_examples to 12, and label_map_path: "training/object-detect.pbtxt"
It's a few edits, so here is my full configuration file:
# SSD with Mobilenet v1, configured for the mac-n-cheese dataset.
# Users should configure the fine_tune_checkpoint field in the train config as
# well as the label_map_path and input_path fields in the train_input_reader and
# eval_input_reader. Search for "${YOUR_GCS_BUCKET}" to find the fields that
# should be configured.

model {
  ssd {
    num_classes: 1
    box_coder {
      faster_rcnn_box_coder {
        y_scale: 10.0
        x_scale: 10.0
        height_scale: 5.0
        width_scale: 5.0
      }
    }
    matcher {
      argmax_matcher {
        matched_threshold: 0.5
        unmatched_threshold: 0.5
        ignore_thresholds: false
        negatives_lower_than_unmatched: true
        force_match_for_each_row: true
      }
    }
    similarity_calculator {
      iou_similarity {
      }
    }
    anchor_generator {
      ssd_anchor_generator {
        num_layers: 6
        min_scale: 0.2
        max_scale: 0.95
        aspect_ratios: 1.0
        aspect_ratios: 2.0
        aspect_ratios: 0.5
        aspect_ratios: 3.0
        aspect_ratios: 0.3333
      }
    }
    image_resizer {
      fixed_shape_resizer {
        height: 300
        width: 300
      }
    }
    box_predictor {
      convolutional_box_predictor {
        min_depth: 0
        max_depth: 0
        num_layers_before_predictor: 0
        use_dropout: false
        dropout_keep_probability: 0.8
        kernel_size: 1
        box_code_size: 4
        apply_sigmoid_to_scores: false
        conv_hyperparams {
          activation: RELU_6,
          regularizer {
            l2_regularizer {
              weight: 0.00004
            }
          }
          initializer {
            truncated_normal_initializer {
              stddev: 0.03
              mean: 0.0
            }
          }
          batch_norm {
            train: true,
            scale: true,
            center: true,
            decay: 0.9997,
            epsilon: 0.001,
          }
        }
      }
    }
    feature_extractor {
      type: 'ssd_mobilenet_v1'
      min_depth: 16
      depth_multiplier: 1.0
      conv_hyperparams {
        activation: RELU_6,
        regularizer {
          l2_regularizer {
            weight: 0.00004
          }
        }
        initializer {
          truncated_normal_initializer {
            stddev: 0.03
            mean: 0.0
          }
        }
        batch_norm {
          train: true,
          scale: true,
          center: true,
          decay: 0.9997,
          epsilon: 0.001,
        }
      }
    }
    loss {
      classification_loss {
        weighted_sigmoid {
          anchorwise_output: true
        }
      }
      localization_loss {
        weighted_smooth_l1 {
          anchorwise_output: true
        }
      }
      hard_example_miner {
        num_hard_examples: 3000
        iou_threshold: 0.99
        loss_type: CLASSIFICATION
        max_negatives_per_positive: 3
        min_negatives_per_image: 0
      }
      classification_weight: 1.0
      localization_weight: 1.0
    }
    normalize_loss_by_num_matches: true
    post_processing {
      batch_non_max_suppression {
        score_threshold: 1e-8
        iou_threshold: 0.6
        max_detections_per_class: 100
        max_total_detections: 100
      }
      score_converter: SIGMOID
    }
  }
}

train_config: {
  batch_size: 10
  optimizer {
    rms_prop_optimizer: {
      learning_rate: {
        exponential_decay_learning_rate {
          initial_learning_rate: 0.004
          decay_steps: 800720
          decay_factor: 0.95
        }
      }
      momentum_optimizer_value: 0.9
      decay: 0.9
      epsilon: 1.0
    }
  }
  fine_tune_checkpoint: "ssd_mobilenet_v1_coco_11_06_2017/model.ckpt"
  from_detection_checkpoint: true
  data_augmentation_options {
    random_horizontal_flip {
    }
  }
  data_augmentation_options {
    ssd_random_crop {
    }
  }
}

train_input_reader: {
  tf_record_input_reader {
    input_path: "data/train.record"
  }
  label_map_path: "data/object-detection.pbtxt"
}

eval_config: {
  num_examples: 40
}

eval_input_reader: {
  tf_record_input_reader {
    input_path: "data/test.record"
  }
  label_map_path: "training/object-detection.pbtxt"
  shuffle: false
  num_readers: 1
}
Inside training dir, add object-detection.pbtxt:
item {
  id: 1
  name: 'macncheese'
}
And now, the moment of truth! From within models/object_detection:
python3 train.py --logtostderr --train_dir=training/ --pipeline_config_path=training/ssd_mobilenet_v1_pets.config
Barring errors, you should see output like:
INFO:tensorflow:global step 11788: loss = 0.6717 (0.398 sec/step)
INFO:tensorflow:global step 11789: loss = 0.5310 (0.436 sec/step)
INFO:tensorflow:global step 11790: loss = 0.6614 (0.405 sec/step)
INFO:tensorflow:global step 11791: loss = 0.7758 (0.460 sec/step)
INFO:tensorflow:global step 11792: loss = 0.7164 (0.378 sec/step)
INFO:tensorflow:global step 11793: loss = 0.8096 (0.393 sec/step)
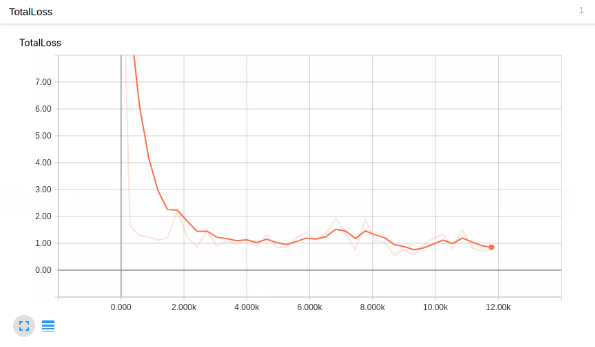
Your steps start at 1 and the loss will be much higher. Depending on your GPU and how much training data you have, this process will take varying amounts of time. On something like a 1080ti, it should take only about an hour or so. If you have a lot of training data, it might take much longer. You want to shoot for a loss of about ~1 on average (or lower). I wouldn't stop training until you are for sure under 2. You can check how the model is doing via TensorBoard. Your models/object_detection/training directory will have new event files that can be viewed via TensorBoard.
From models/object_detection, via terminal, you start TensorBoard with:
tensorboard --logdir='training'
This runs on 127.0.0.1:6006 (visit in your browser)
My total loss graph:

Looks good enough, but does it detect macaroni and cheese?!
In order to use the model to detect things, we need to export the graph, so, in the next tutorial, we're going to export the graph and then test the model.
-
Introduction and Use - Tensorflow Object Detection API Tutorial
-
Streaming Object Detection Video - Tensorflow Object Detection API Tutorial
-
Tracking Custom Objects Intro - Tensorflow Object Detection API Tutorial
-
Creating TFRecords - Tensorflow Object Detection API Tutorial
-
Training Custom Object Detector - Tensorflow Object Detection API Tutorial
-
Testing Custom Object Detector - Tensorflow Object Detection API Tutorial
