PyQT Menubar
In this tutorial for PyQT application development, we're going to show how to add a menu-bar to your GUI.
First, we need to consider where to put this. We could put this in the home method, but it seems to make the most sense to put it in the init method, since the menu-bar is likely to stay the same, no matter where you go in the application, or at least mostly the same. Depending on where you go in the application, you can modify the menu-bar, but I think this would be easier than re-defining the menu bar at every stage for each window.
Adding menu bars, and tool bars, is usually the same-ish process across GUI development kits in Python:
First, you define item within the menu, and what it will look like. Then you define what you want that item to do. Then, you create the actual menu that you want it to sit on, then you put it all together. Let's show that in the code:
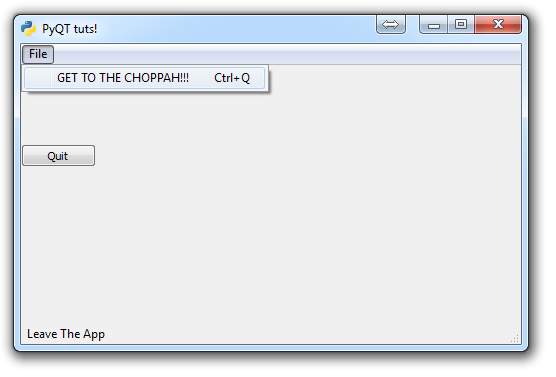
        extractAction = QtGui.QAction("&GET TO THE CHOPPAH!!!", self)
        extractAction.setShortcut("Ctrl+Q")
        extractAction.setStatusTip('Leave The App')
        extractAction.triggered.connect(self.close_application)
First, we define the label itself for the menu object.
Next, we set a shortcut to that menu item if we want.
Then we set a status tip informational message.
Then finally we define what we want to do if clicked.
The status tip is something that is built into QT, but we do still need to call it into being to see anything. Luckily, this is super easy:
self.statusBar()
Boom done.
Now that we have the menu item, what's next? Oh right, we need a menu!
        mainMenu = self.menuBar()
        fileMenu = mainMenu.addMenu('&File')
        fileMenu.addAction(extractAction)
First we create the menuBar object.
Next, we add a file menu object to the menubar
Now we add the menu item we created earlier.
That's it. The code all put together is:
import sys
from PyQt4 import QtGui, QtCore

class Window(QtGui.QMainWindow):

    def __init__(self):
        super(Window, self).__init__()
        self.setGeometry(50, 50, 500, 300)
        self.setWindowTitle("PyQT tuts!")
        self.setWindowIcon(QtGui.QIcon('pythonlogo.png'))

        extractAction = QtGui.QAction("&GET TO THE CHOPPAH!!!", self)
        extractAction.setShortcut("Ctrl+Q")
        extractAction.setStatusTip('Leave The App')
        extractAction.triggered.connect(self.close_application)

        self.statusBar()

        mainMenu = self.menuBar()
        fileMenu = mainMenu.addMenu('&File')
        fileMenu.addAction(extractAction)

        self.home()

    def home(self):
        btn = QtGui.QPushButton("Quit", self)
        btn.clicked.connect(self.close_application)
        btn.resize(btn.minimumSizeHint())
        btn.move(0,100)
        self.show()

    def close_application(self):
        print("whooaaaa so custom!!!")
        sys.exit()


def run():
    app = QtGui.QApplication(sys.argv)
    GUI = Window()
    sys.exit(app.exec_())


run()
Which gives us:
In the next PyQT tutorial, we'll cover how to create a toolbar.
-
PyQT Basic Tutorial
-
PyQT Application Structure
-
PyQT buttons
-
Button Functions with PyQT
-
PyQT Menubar
-
PyQT Toolbar
-
Pop up Message PyQT
-
PyQT Check box
-
PyQT Progress bar example
-
PyQT Dropdown button and QT Styles
-
PyQT Font widget
-
PyQT Color picker widget
-
PyQT Text Editor
-
PyQT open files to edit
-
PyQT file saving
