PyQT Basic Tutorial
PyQT is a Python wrapper around the QT framework for creating graphical user interfaces, or GUIs.
This tutorial is written in PyQt4, but there is a newer version, PyQt5, that you can use. There are some differences, and kenwaldek has ported this series code, by individual tutorial code, to PyQt5 here.
First, we need to go ahead and get PyQT4. To do this, if you are on Windows, head to: river bank computing.
If you are on Mac or Linux, then you should be able to just do:
sudo apt-get install python-qt4
You can also get a wheel file for pip installation at: http://www.lfd.uci.edu/~gohlke/pythonlibs/#pyqt4
Once you have PyQT, let's create a simple application.
First, we'll need some basic imports:
import sys
We will use sys shortly just in case we want our application to be able to accept command line arguments, but also later on to ensure a nice, clean, close of the application when we want to exit.
Next:
from PyQt4 import QtGui
Here, we're importing QtGui, which deals with all things GUI with PyQT. Now some of you may be thinking "isn't all PyQT GUI stuff?" Nope, PyQT does a lot of other things besides just GUIs, and QtGui is purely just the graphical stuff. All of the PyQT sections are:
- QtGui - Deals with the graphical elements.
- QtCore - other non-GUI essentials.
- QtNetwork - Networking, as you may have guessed.
- QtOpenGL - Allows for the incorporation of OpenGL!
- QtSql - Wrapper for SQL handling.
- QtSvg - support for support vector graphics.
- QtXML - for handling XML data
Next, we need some sort of application definition:
app = QtGui.QApplication(sys.argv)
We are creating a QApplication object, and saving it to "app." Here, we pass this sys.argv argument because sys.argv allows us to pass command line arguments to the application. For more information on this, see our sys module with Python tutorial.
window = QtGui.QWidget()
Next, we define our window. Now this can sometimes be a little confusing. With GUIs, you generally have what is referred to as the "application," or the "frame," and then you have the "window" or the actual "gui" part. The frame is just the encapsulation of the window, literally on the screen, as well as in the background. You will probably better understand this as time goes on, but think of "application" as literally the border that goes around your window.
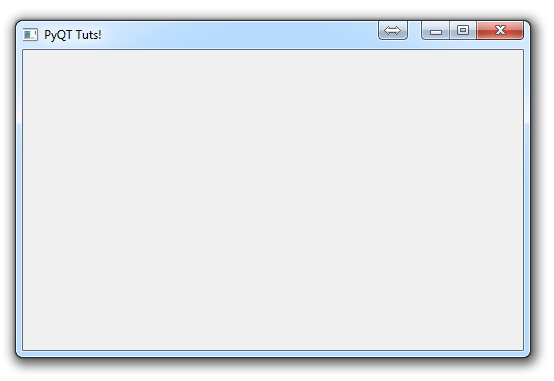
window.setGeometry(0, 0, 500, 300)
Here, we can modify the window a bit. Keep in mind, that applications and their windows are created in memory first, then they are brought to the user's screen last. This is the same process that you see done with other forms of Graphics in programming, like games with PyGame, or graphing with Matplotlib. The reason for this is graphical rendering is cumbersome, and it would be rather inefficient to continuously be making edits and refreshing to the user's screen for each element. So, when we modify the window like this, it is not like the window will pop up full screen, and then change shape moments later. The screen has not yet been shown to the user, we're just building it in the memory.
.setGeometry is a method that belongs to a few methods, but here the method is the QtGui.QWidget class. It is taking four parameters from us. First you have the window's starting x coordinate, then you have the starting y coordinate (0 and 0). Next, you have the window's dimensions, which are 500 and 300, meaning 500 pixels wide and 300 tall.
Next, we can do something like:
window.setWindowTitle("PyQT Tuts!")
This method simply sets the window's title to what we choose.
Finally, once we're content with the GUI that we have built, we invoke:
window.show()
.show() brings the window to the screen for the user. ".show()" is a QT method.
Full code for this:
import sys
from PyQt4 import QtGui

app = QtGui.QApplication(sys.argv)

window = QtGui.QWidget()
window.setGeometry(0, 0, 500, 300)
window.setWindowTitle("PyQT Tuts!")

window.show()
So now you have a very basic GUI application. Now that you see the fundamentals of how a GUI with QT works, we're going to talk about how to lay the foundation for a full application next.
There exists 6 quiz/question(s) for this tutorial. for access to these, video downloads, and no ads.
-
PyQT Basic Tutorial
-
PyQT Application Structure
-
PyQT buttons
-
Button Functions with PyQT
-
PyQT Menubar
-
PyQT Toolbar
-
Pop up Message PyQT
-
PyQT Check box
-
PyQT Progress bar example
-
PyQT Dropdown button and QT Styles
-
PyQT Font widget
-
PyQT Color picker widget
-
PyQT Text Editor
-
PyQT open files to edit
-
PyQT file saving
