Drawing a Number by Request with Generative Model - Unconventional Neural Networks in Python and Tensorflow p.6
Hello and welcome to part 6 of our neural network antics. In the previous tutorial, we attempted to use a generative model to generate classes of MNIST numbers, using the number data as the primer for the generative model. That didn't go too well, but we did find the model to be pretty decent at predicting it's own generated numbers.
My line of thinking is that drawing a number based on us inputing a vector will be an easier task to get right than predicting the number based on image input for a generative model. The generative model works by sliding a window. For the image vector, it really just has a brief chance to be right based on numerical input. Let's create a new directory:
char-rnn-tensorflow-master/data/mnist/draw
Then let's modify the previous mnist-data-creation.py
from tensorflow.examples.tutorials.mnist import input_data
import matplotlib.pyplot as plt
import numpy as np

mnist = input_data.read_data_sets("MNIST_data/", one_hot=True)
# mnist.train, mnist.test, mnist.validation
batch_xs, batch_ys = mnist.train.next_batch(10000)

with open('draw/input.txt','a') as f:
    for i, data in enumerate(batch_xs):
        data = np.rint(batch_xs[i]).astype(int)
        label = np.rint(batch_ys[i]).astype(int)
        pixels = data.reshape((28,28))
        str_label = str(label).replace(' ','')
        str_img = str(pixels).replace(' ','')
        gen_to_data = "::{}::\n{}\n\n".format(str_label, str_img)
        #classify_data = "{}\n::{}::\n\n".format(str_img, str_label)
        #plt.imshow(pixels, cmap='gray')
        #plt.show()
        f.write(gen_to_data)
Mainly to instead use the gen_to_data instead, so we have the classification, then drawing.
Running this should produce an output file in draw/input.txt, with contents like:
::[0000010000]::
[[0000000000000000000000000000]
[0000000000000000000000000000]
[0000000000000000000000000000]
[0000000000000000000000000000]
[0000000000000000000000000000]
[0000000000000000000000000000]
[0000000000001111111110000000]
[0000000001111111111110000000]
[0000000001110000000000000000]
[0000000001110000000000000000]
[0000000000110000000000000000]
[0000000000110000000000000000]
[0000000000110011000000000000]
[0000000000101111110000000000]
[0000000000111000110000000000]
[0000000000111000011000000000]
[0000000000110000001000000000]
[0000000000000000001000000000]
[0000000000000000001000000000]
[0000000000000000001000000000]
[0000000000000000011000000000]
[0000000000000000011000000000]
[0000000000100000110000000000]
[0000000000100001110000000000]
[0000000000111111100000000000]
[0000000000011110000000000000]
[0000000000000000000000000000]
[0000000000000000000000000000]]

::[1000000000]::
[[0000000000000000000000000000]
[0000000000000000000000000000]
[0000000000000000000000000000]
[0000000000000000000000000000]
[0000000000001110000000000000]
[0000000000111111100000000000]
[0000000000111111111000000000]
[0000000000111111111100000000]
[0000000000111111111110000000]
[0000000001111111111110000000]
[0000000011111100011111000000]
[0000000011111000000111100000]
[0000000011110000000011100000]
[0000000111110000000011100000]
[0000000111100000000001100000]
[0000000111000000000011100000]
[0000000111000000000111100000]
[0000000111000000001111100000]
[0000000011110000111111100000]
[0000000011111111111111000000]
[0000000011111111111110000000]
[0000000001111111111110000000]
[0000000000111111111000000000]
[0000000000011111100000000000]
[0000000000000000000000000000]
[0000000000000000000000000000]
[0000000000000000000000000000]
[0000000000000000000000000000]]
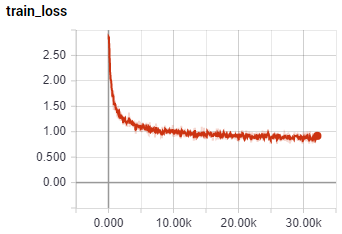
python train.py --data_dir=data/mnist/draw --rnn_size=128 --num_layers=3 --batch_size=28 --seq_length=250
After 39K steps, my loss graph looks like:
Now let's sample it:
python sample.py -n=10000 --prime=::
A snippet from the output:
::[0000001000]::
[[0000000000000000000000000000]
[0000000000000000000000000000]
[0000000000000001000000000000]
[0000000000000011000000000000]
[0000000000000111000000000000]
[0000000000000111000000000000]
[0000000000001110000000000000]
[0000000000001110000000000000]
[0000000000011100000000000000]
[0000000000111100000000000000]
[0000000000111000000000000000]
[0000000000111000000000000000]
[0000000001110000011110000000]
[0000000001110001111111000000]
[0000000011110011111111000000]
[0000000011101111000111000000]
[0000000011111110000111000000]
[0000000001111100001111000000]
[0000000001111100111111000000]
[0000000000111111111000000000]
[0000000000011111000000000000]
[0000000000000000000000000000]
[0000000000000000000000000000]
[0000000000000000000000000000]
[0000000000000000000000000000]
[0000000000000000000000000000]]

::[0000000001]::
[[0000000000000000000000000000]
[0000000000000000000000000000]
[0000000000000000000000000000]
[0000000000000000000000000000]
[0000000000000000000000000000]
[0000000000000000000000000000]
[0000000000011110000000000000]
[0000000000111111000000000000]
[0000000001111111001000000000]
[0000000001111001011100000000]
[0000000011100001111100000000]
[0000000111000001111100000000]
[0000000110000011111000000000]
[0000000110000111111000000000]
[0000000111101110110000000000]
[0000000011111000110000000000]
[0000000000110001110000000000]
[0000000000000001110000000000]
[0000000000000001100000000000]
[0000000000000011100000000000]
[0000000000000011100000000000]
[0000000000000001100000000000]
[0000000000000000000000000000]
[0000000000000000000000000000]
[0000000000000000000000000000]
[0000000000000000000000000000]]
Looks correct, but, the real question is whether or not this model can draw us a picture of what we ask for!
To do this, we *could* train an mnist classifier and automate the generation process, but the generator is quite slow and we can easily classify this ourselves, so I think we'll just use ourselves for now, since this is just testing anyway. If we actually find we're on to something, then we can automate the testing process. For now though, I suspect we're going to need a lot of work before that point.
Modifying the sample.py script a bit:
from __future__ import print_function
import tensorflow as tf
import argparse
import os
from six.moves import cPickle
from model import Model
from six import text_type
import numpy as np


def main():
    parser = argparse.ArgumentParser(
                       formatter_class=argparse.ArgumentDefaultsHelpFormatter)
    parser.add_argument('--save_dir', type=str, default='save',
                        help='model directory to store checkpointed models')
    parser.add_argument('-n', type=int, default=500,
                        help='number of characters to sample')
    parser.add_argument('--prime', type=text_type, default=u' ',
                        help='prime text')
    parser.add_argument('--sample', type=int, default=1,
                        help='0 to use max at each timestep, 1 to sample at '
                             'each timestep, 2 to sample on spaces')

    args = parser.parse_args()
    sample(args)


def sample(args):
    with open(os.path.join(args.save_dir, 'config.pkl'), 'rb') as f:
        saved_args = cPickle.load(f)
    with open(os.path.join(args.save_dir, 'chars_vocab.pkl'), 'rb') as f:
        chars, vocab = cPickle.load(f)
    model = Model(saved_args, training=False)
    with tf.Session() as sess:
        tf.global_variables_initializer().run()
        saver = tf.train.Saver(tf.global_variables())
        ckpt = tf.train.get_checkpoint_state(args.save_dir)
        if ckpt and ckpt.model_checkpoint_path:
            saver.restore(sess, ckpt.model_checkpoint_path)
            with open("out.txt","a") as f:
                for n in range(10):
                    for _ in range(10):
                        num = np.zeros(10).astype(int)
                        #n = int(input("what number? 0-9: "))
                        num[n] = 1
                        num = "::{}::\r\n".format(str(num).replace(' ',''))

                        data = model.sample(sess, chars, vocab, 770, num,
                                           args.sample).encode('utf-8')

                        print(data.decode('utf-8'))

                        f.write(data.decode('utf-8').replace('\r\n','\n'))
                        f.write("\n\n")
                    f.write("\n\n\n--------------------------------------------------\n\n\n")


if __name__ == '__main__':
    main()
I originally also had a script where you manually entered a number, and it then generated that number, but I found this to be tedious. Instead, I decided to just render 10 examples of each number, making it much quicker to test this thing.
I first trained a model for a mere 6k steps, tested it, and found the results to be sub-par. I feel like this task should be do-able though, so I ended up training a classifier for a bit longer, doing 54K steps instead. The results:
Asked to draw:
1: Drew all 1s, nice!
2: Drew all 1s, uh oh, does this model just draw 1?
3: Drew all 1s and a lot of 4s. Hmm...
4: Drew mostly 6s
5: Drew 6s
6: Drew 6s...yay!
7: Drew some squigglies, a heart, a 5, a bird, and some more 5s
8: Drew mostly 9s, a sickle, and a 4.
9: Mostly 9s. a 7 in there.
So 1, 6, and 9 appear to have been learned pretty well. This has given me some hope that something is possible here. I think that I will train a larger model. I also wonder if the way we're doing things at the moment could be improved.
Right now, we just have ::[0000000001]:: then the picture of the number. I think this might be somewhat challenging for our classifier to learn. I am wondering, what if we instead do a few rows of THE number we're attempting to classify? This way, as the classifer slides through the sequence, and begins to build the number it's predicting, it can keep referencing the prediction, and, there is less room for error. Eventually, it will be beyond the number we're trying to draw, but, hopefully by this point, there will be enough of the number to just finish it off. Since we could easily draw correct numbers with a 250 seq_length, this tells me a partial number is more than enough to finish it correctly. Since this is just generation too, let's go ahead and do all of our samples.
To do this, I am going to make a copy of the file: char-rnn-tensorflow-master/data/mnist/mnist-data-creation.py, calling it just mnist-data-creation2.py. Now:
from tensorflow.examples.tutorials.mnist import input_data
import matplotlib.pyplot as plt
import numpy as np

mnist = input_data.read_data_sets("MNIST_data/", one_hot=True)
elements = [mnist.train, mnist.test, mnist.validation]

for element in elements:
    batch_xs, batch_ys = element.next_batch(999999999999999999)

    with open('draw2/input.txt','a') as f:
        for i, data in enumerate(batch_xs):
            data = np.rint(batch_xs[i]).astype(int)
            label = np.rint(batch_ys[i]).astype(int)
            pixels = data.reshape((28,28))

            for i in range(15):
                f.write(":{}:\n".format(20*str(np.argmax(label))) )

            str_label = str(label).replace(' ','')
            str_img = str(pixels).replace(' ','')
            gen_to_data = "{}\n\n\n\n".format(str_img)
            #classify_data = "{}\n::{}::\n\n".format(str_img, str_label)
            f.write(gen_to_data)
With this, we have a new sample dataset that looks like:
:55555555555555555555:
:55555555555555555555:
:55555555555555555555:
:55555555555555555555:
:55555555555555555555:
:55555555555555555555:
:55555555555555555555:
:55555555555555555555:
:55555555555555555555:
:55555555555555555555:
:55555555555555555555:
:55555555555555555555:
:55555555555555555555:
:55555555555555555555:
:55555555555555555555:
[[0000000000000000000000000000]
[0000000000000000000000000000]
[0000000000000000000000000000]
[0000000000000000000000000000]
[0000000000000000000000000000]
[0000000000000000000011111000]
[0000000000000000011111111000]
[0000000000000001111111111000]
[0000000000011011111101110000]
[0000000000011111110000000000]
[0000000000111111000000000000]
[0000000000111000000000000000]
[0000000000111000000000000000]
[0000000000111000000000000000]
[0000000001111111111000000000]
[0000000001111111111100000000]
[0000000001111100111100000000]
[0000000011111000111000000000]
[0000000001100000011000000000]
[0000000000000001110000000000]
[0000001110000011100000000000]
[0000011111001111100000000000]
[0000011111111111000000000000]
[0000001111111110000000000000]
[0000000011100000000000000000]
[0000000000000000000000000000]
[0000000000000000000000000000]
[0000000000000000000000000000]]
Alright, this is in the new draw2 dir, so we want to do:
python train.py --data_dir=data/mnist/draw2 --rnn_size=128 --num_layers=3 --batch_size=28 --seq_length=800
Alright, let's let THIS thing train for 50 epochs and see what we've got.
50...epochs...later...
With this trained model, we need to modify the sampling script to generate the multiple rows of the number first, using that as the primer, and then generate from there. Here's the modified script for that:
import tensorflow as tf
import argparse
import os
from six.moves import cPickle
from model import Model
from six import text_type
import numpy as np


def main():
    parser = argparse.ArgumentParser(
                       formatter_class=argparse.ArgumentDefaultsHelpFormatter)
    parser.add_argument('--save_dir', type=str, default='save',
                        help='model directory to store checkpointed models')
    parser.add_argument('-n', type=int, default=500,
                        help='number of characters to sample')
    parser.add_argument('--prime', type=text_type, default=u' ',
                        help='prime text')
    parser.add_argument('--sample', type=int, default=1,
                        help='0 to use max at each timestep, 1 to sample at '
                             'each timestep, 2 to sample on spaces')

    args = parser.parse_args()
    sample(args)


def sample(args):
    with open(os.path.join(args.save_dir, 'config.pkl'), 'rb') as f:
        saved_args = cPickle.load(f)
    with open(os.path.join(args.save_dir, 'chars_vocab.pkl'), 'rb') as f:
        chars, vocab = cPickle.load(f)
    model = Model(saved_args, training=False)
    with tf.Session() as sess:
        tf.global_variables_initializer().run()
        saver = tf.train.Saver(tf.global_variables())
        ckpt = tf.train.get_checkpoint_state(args.save_dir)
        if ckpt and ckpt.model_checkpoint_path:
            saver.restore(sess, ckpt.model_checkpoint_path)


            with open("out.txt","a") as f:
                for n in range(10):  # number

                    for _ in range(10):  #  each drawing instance of that number
                        primer = ''
                        for _ in range(15):  # each row of numbers for that instance.
                            primer += ":{}:\n".format(20*str(n))
                        data = model.sample(sess, chars, vocab, 1500, primer,
                                           args.sample).encode('utf-8')
                        print(data.decode('utf-8'))
                        f.write(data.decode('utf-8').replace('\r\n','\n'))
                        f.write("\n\n")
                    f.write("\n\n\n--------------------------------------------------\n\n\n")


if __name__ == '__main__':
    main()
With this, we can check the out.txt file, and we have data like:
:00000000000000000000:
:00000000000000000000:
:00000000000000000000:
:00000000000000000000:
:00000000000000000000:
:00000000000000000000:
:00000000000000000000:
:00000000000000000000:
:00000000000000000000:
:00000000000000000000:
:00000000000000000000:
:00000000000000000000:
:00000000000000000000:
:00000000000000000000:
:00000000000000000000:
[[0000000000000000000000000000]
[0000000000000000000000000000]
[0000000000000000000000000000]
[0000000000000000000000000000]
[0000000000000000000000000000]
[0000000000000000000000000000]
[0000000000000001110000000000]
[0000000000000011111100000000]
[0000000000001111101110000000]
[0000000000011110000111000000]
[0000000001111000000011100000]
[0000000001110000000011100000]
[0000000011100000000001110000]
[0000000111000000000000110000]
[0000001111000000000000111000]
[0000001110000000000011110000]
[0000011100000000000011110000]
[0000011100000000001111100000]
[0000111100000001111110000000]
[0000011111111111111100000000]
[0000011111111111000000000000]
[0000000111110000000000000000]
[0000000001000000000000000000]
[0000000000000000000000000000]
[0000000000000000000000000000]
[0000000000000000000000000000]
[0000000000000000000000000000]
[0000000000000000000000000000]]
Scrolling through this file, I can see some times where the number's seed is just spammed the whole time, but, in general, this clearly works. I am pretty confident that we can get the number if we just let it generate long enough. At this point, I am just too excited. It's time to convert this to a program that can display this as an image, and lets us input the number we want. Rather than iterating 0 through 9 and then generating the seed, then getting output, we want to let the user just input a number they want drawn. Then, create the seed, produce output, then render it.
Rather than rendering as 0s and 1s though, I want an actual picture/graph of this. How will we do this?
Well, first we need to just isolate the actual number data. For this, we can use the following regular expression: num = re.findall("(\[\[[\s\S]*?\]\])", data.decode("utf-8")). Basically, we want to find anything between pairs of pairs of brackets. Whatever that is, should be our number. Then, once we find the data that is just like:
[[0000000000000000000000000000]
[0000000000000000000000000000]
[0000000000000000000000000000]
[0000000000000000000000000000]
[0000000000000000000000000000]
[0000000000000000000000000000]
[0000000000000001110000000000]
[0000000000000011111100000000]
[0000000000001111101110000000]
[0000000000011110000111000000]
[0000000001111000000011100000]
[0000000001110000000011100000]
[0000000011100000000001110000]
[0000000111000000000000110000]
[0000001111000000000000111000]
[0000001110000000000011110000]
[0000011100000000000011110000]
[0000011100000000001111100000]
[0000111100000001111110000000]
[0000011111111111111100000000]
[0000011111111111000000000000]
[0000000111110000000000000000]
[0000000001000000000000000000]
[0000000000000000000000000000]
[0000000000000000000000000000]
[0000000000000000000000000000]
[0000000000000000000000000000]
[0000000000000000000000000000]]
...it's just a string of data. We need it to be a real list of lists (or an array). How can we do that?
Well I am thinking .replace('0','0,').replace('1','1,').replace(']','],') to add in the commas that we need so it looks right, then good ol' eval. Once we've done that, we should be able to just graph it!
Let's try.
import tensorflow as tf
import argparse
import os
from six.moves import cPickle
from model import Model
from six import text_type
import numpy as np
import re
import matplotlib.pyplot as plt


def main():
    parser = argparse.ArgumentParser(
                       formatter_class=argparse.ArgumentDefaultsHelpFormatter)
    parser.add_argument('--save_dir', type=str, default='save',
                        help='model directory to store checkpointed models')
    parser.add_argument('-n', type=int, default=500,
                        help='number of characters to sample')
    parser.add_argument('--prime', type=text_type, default=u' ',
                        help='prime text')
    parser.add_argument('--sample', type=int, default=1,
                        help='0 to use max at each timestep, 1 to sample at '
                             'each timestep, 2 to sample on spaces')

    args = parser.parse_args()
    sample(args)


def sample(args):
    with open(os.path.join(args.save_dir, 'config.pkl'), 'rb') as f:
        saved_args = cPickle.load(f)
    with open(os.path.join(args.save_dir, 'chars_vocab.pkl'), 'rb') as f:
        chars, vocab = cPickle.load(f)
    model = Model(saved_args, training=False)
    with tf.Session() as sess:
        tf.global_variables_initializer().run()
        saver = tf.train.Saver(tf.global_variables())
        ckpt = tf.train.get_checkpoint_state(args.save_dir)
        if ckpt and ckpt.model_checkpoint_path:
            saver.restore(sess, ckpt.model_checkpoint_path)

            while True:
                n = int(input("What number to draw, 0-9? "))
                primer = ''
                for _ in range(15):  # each row of numbers for that instance.
                    primer += ":{}:\n".format(20*str(n))

                while True:
                    data = model.sample(sess, chars, vocab, 3500, primer,
                                       args.sample).encode('utf-8')

                    num = re.findall("(\[\[[\s\S]*?\]\])", data.decode("utf-8"))
                    if len(num)>0:
                        break
                print(num[0])
                num = num[0].replace('0','0,').replace('1','1,').replace(']','],')
                num = eval(num)
                plt.imshow(num[0], cmap="gray")
                plt.show()


if __name__ == '__main__':
    main()
Running that, let's start with a 9, since that was an example that didn't appear to do so well in the code. Output:
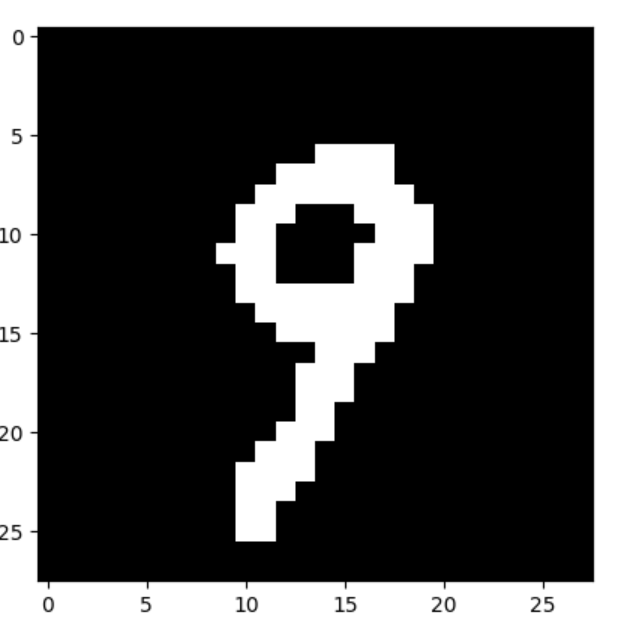
Woohoo! Again!!
...takes a while this time. Hmmm...I'll try a 7:
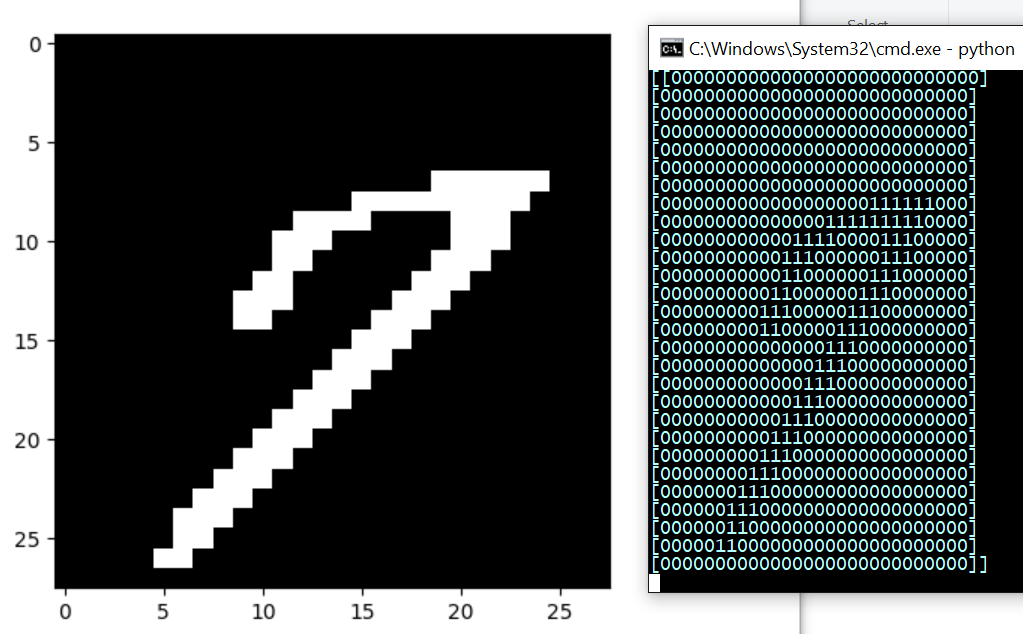
A 5:

You get the idea.
-
Generative Model Basics (Character-Level) - Unconventional Neural Networks in Python and Tensorflow p.1
-
Generating Pythonic code with Character Generative Model - Unconventional Neural Networks in Python and Tensorflow p.2
-
Generating with MNIST - Unconventional Neural Networks in Python and Tensorflow p.3
-
Classification Generator Training Attempt - Unconventional Neural Networks in Python and Tensorflow p.4
-
Classification Generator Testing Attempt - Unconventional Neural Networks in Python and Tensorflow p.5
-
Drawing a Number by Request with Generative Model - Unconventional Neural Networks in Python and Tensorflow p.6
-
Deep Dream - Unconventional Neural Networks in Python and Tensorflow p.7
-
Deep Dream Frames - Unconventional Neural Networks in Python and Tensorflow p.8
-
Deep Dream Video - Unconventional Neural Networks in Python and Tensorflow p.9
-
Doing Math with Neural Networks - Unconventional Neural Networks in Python and Tensorflow p.10
-
Doing Math with Neural Networks testing addition results - Unconventional Neural Networks in Python and Tensorflow p.11
-
Complex Math - Unconventional Neural Networks in Python and Tensorflow p.12
