Deep Dream - Unconventional Neural Networks in Python and Tensorflow p.7
What's going on everyone and welcome to part 7 of our "unconventional" neural networks series. In this part, we're going to get into deep dreaming in TensorFlow. If you are not familiar with deep dream, it's a method we can use to allow a neural network to "amplify" the patterns it notices in images. When you do this, you will generally do it on a specific layer at the time. Initial layers in a convolutional neural network, for example, will often see straight lines. As you progress, you will see squares/corners, then maybe some circles, then things will get a bit more advanced, depending on what your network was trained on. In our case, we're going to use the inception model, which means we're likely to see things like eyes, faces, fur, buildings, and various animals as we get deeper into the layers and allow the model to run wild.
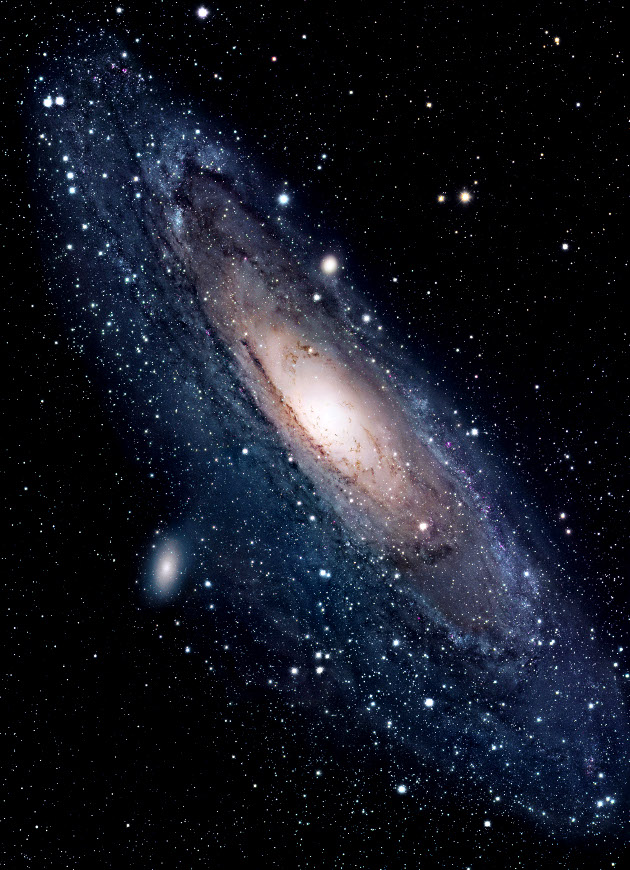
Here's an example of a deep dream that I created. I find that starting with space imagery is fun, but you can start with anything you want, including random noise. The starting image in this case was the Andromeda galaxy:
After some iterations of a dream:
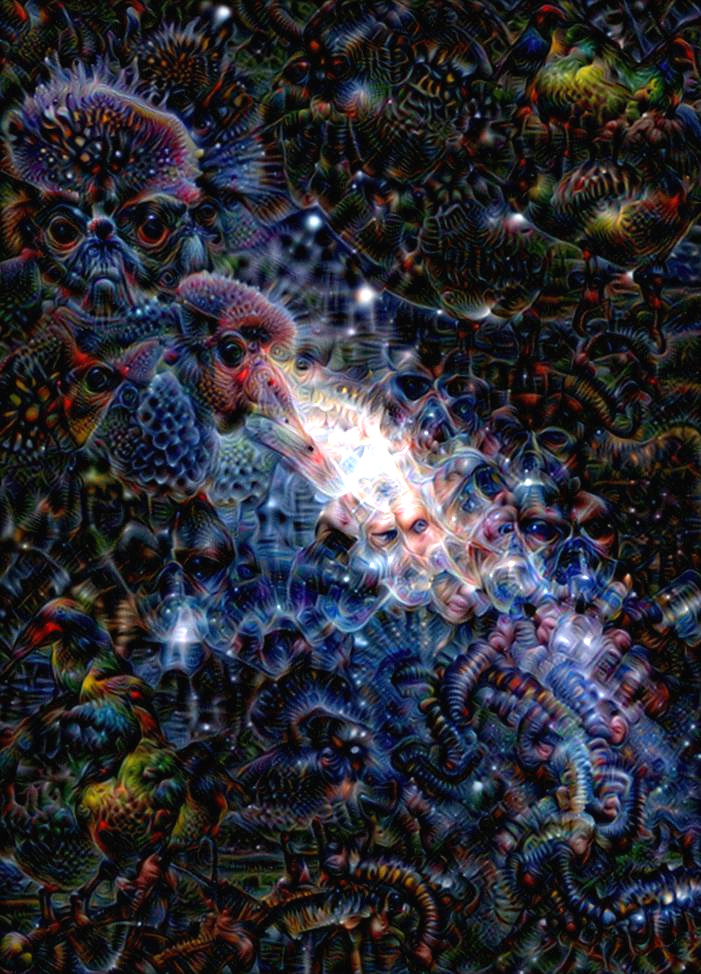
Pretty neat! I think it certainly makes fascinating art.
To continue along with me here, note that I am using Python 3.6 and TensorFlow 1.7. You will also need to install Open CV pip install opencv-python or grab from the unofficial Windows Binaries.
Another fun thing we can do is iteratively produce a deep dream image. For example:
Alright, so how do we go about actually doing this? We need to take a trained model, and then use the gradients to update some input image. To do this, I am going to reference: 14_DeepDream.ipynb from a TensorFlow tutorial series of IPython notebooks. We're going to make use of a bunch of those helper functions to save a bunch of time. If you are interested in learning more, check out the tutorial series itself, it runs through what's happening step by step.
To begin, I am going to host the basic starting point for this project here: Deep Dreaming. This zipped directory contains the necessary starting code for you to work with, and we'll just add to it.
From that part 14, I am going to take the code with all the helper functions that we need, and I am going to put it in a new file, with some slight changes, called deepdreamer.py. Here's the full code:
'''
Copyright (c) 2016 by Magnus Erik Hvass Pedersen

Permission is hereby granted, free of charge, to any person obtaining a copy of this software and associated documentation files (the "Software"), to deal in the Software without restriction, including without limitation the rights to use, copy, modify, merge, publish, distribute, sublicense, and/or sell copies of the Software, and to permit persons to whom the Software is furnished to do so, subject to the following conditions:

The above copyright notice and this permission notice shall be included in all copies or substantial portions of the Software.

THE SOFTWARE IS PROVIDED "AS IS", WITHOUT WARRANTY OF ANY KIND, EXPRESS OR IMPLIED, INCLUDING BUT NOT LIMITED TO THE WARRANTIES OF MERCHANTABILITY, FITNESS FOR A PARTICULAR PURPOSE AND NONINFRINGEMENT. IN NO EVENT SHALL THE AUTHORS OR COPYRIGHT HOLDERS BE LIABLE FOR ANY CLAIM, DAMAGES OR OTHER LIABILITY, WHETHER IN AN ACTION OF CONTRACT, TORT OR OTHERWISE, ARISING FROM, OUT OF OR IN CONNECTION WITH THE SOFTWARE OR THE USE OR OTHER DEALINGS IN THE SOFTWARE.
'''

# https://github.com/Hvass-Labs/TensorFlow-Tutorials/blob/master/14_DeepDream.ipynb

import matplotlib.pyplot as plt
import tensorflow as tf
import numpy as np
import random
import math
# Image manipulation.
import PIL.Image
from scipy.ndimage.filters import gaussian_filter
import inception5h


model = inception5h.Inception5h()
gpu_options = tf.GPUOptions(per_process_gpu_memory_fraction=0.5)
session = tf.Session(graph=model.graph,
                     config=tf.ConfigProto(gpu_options=gpu_options))


def load_image(filename):
    image = PIL.Image.open(filename)
    return np.float32(image)


def save_image(image, filename):
    # Ensure the pixel-values are between 0 and 255.
    image = np.clip(image, 0.0, 255.0)
    # Convert to bytes.
    image = image.astype(np.uint8)
    # Write the image-file in jpeg-format.
    with open(filename, 'wb') as file:
        PIL.Image.fromarray(image).save(file, 'jpeg')


def plot_image(image):
    # Assume the pixel-values are scaled between 0 and 255.
    if False:
        # Convert the pixel-values to the range between 0.0 and 1.0
        image = np.clip(image/255.0, 0.0, 1.0)
        # Plot using matplotlib.
        plt.imshow(image, interpolation='lanczos')
        plt.show()
    else:
        # Ensure the pixel-values are between 0 and 255.
        image = np.clip(image, 0.0, 255.0)
        # Convert pixels to bytes.
        image = image.astype(np.uint8)

        # Convert to a PIL-image and display it.
        plt.imshow(image, interpolation='lanczos')
        plt.show()


def normalize_image(x):
    # Get the min and max values for all pixels in the input.
    x_min = x.min()
    x_max = x.max()

    # Normalize so all values are between 0.0 and 1.0
    x_norm = (x - x_min) / (x_max - x_min)
    return x_norm


def plot_gradient(gradient):
    # Normalize the gradient so it is between 0.0 and 1.0
    gradient_normalized = normalize_image(gradient)
    # Plot the normalized gradient.
    plt.imshow(gradient_normalized, interpolation='bilinear')
    plt.show()


def resize_image(image, size=None, factor=None):
    # If a rescaling-factor is provided then use it.
    if factor is not None:
        # Scale the numpy array's shape for height and width.
        size = np.array(image.shape[0:2]) * factor
        # The size is floating-point because it was scaled.
        # PIL requires the size to be integers.
        size = size.astype(int)
    else:
        # Ensure the size has length 2.
        size = size[0:2]
    # The height and width is reversed in numpy vs. PIL.
    size = tuple(reversed(size))

    # Ensure the pixel-values are between 0 and 255.
    img = np.clip(image, 0.0, 255.0)
    # Convert the pixels to 8-bit bytes.
    img = img.astype(np.uint8)
    # Create PIL-object from numpy array.
    img = PIL.Image.fromarray(img)
    # Resize the image.
    img_resized = img.resize(size, PIL.Image.LANCZOS)
    # Convert 8-bit pixel values back to floating-point.
    img_resized = np.float32(img_resized)

    return img_resized


def get_tile_size(num_pixels, tile_size=400):
    """
    num_pixels is the number of pixels in a dimension of the image.
    tile_size is the desired tile-size.
    """

    # How many times can we repeat a tile of the desired size.
    num_tiles = int(round(num_pixels / tile_size))
    # Ensure that there is at least 1 tile.
    num_tiles = max(1, num_tiles)
    # The actual tile-size.
    actual_tile_size = math.ceil(num_pixels / num_tiles)
    return actual_tile_size


def tiled_gradient(gradient, image, tile_size=400):
    # Allocate an array for the gradient of the entire image.
    grad = np.zeros_like(image)

    # Number of pixels for the x- and y-axes.
    x_max, y_max, _ = image.shape

    # Tile-size for the x-axis.
    x_tile_size = get_tile_size(num_pixels=x_max, tile_size=tile_size)
    # 1/4 of the tile-size.
    x_tile_size4 = x_tile_size // 4

    # Tile-size for the y-axis.
    y_tile_size = get_tile_size(num_pixels=y_max, tile_size=tile_size)
    # 1/4 of the tile-size
    y_tile_size4 = y_tile_size // 4

    # Random start-position for the tiles on the x-axis.
    # The random value is between -3/4 and -1/4 of the tile-size.
    # This is so the border-tiles are at least 1/4 of the tile-size,
    # otherwise the tiles may be too small which creates noisy gradients.
    x_start = random.randint(-3*x_tile_size4, -x_tile_size4)

    while x_start < x_max:
        # End-position for the current tile.
        x_end = x_start + x_tile_size
        # Ensure the tile's start- and end-positions are valid.
        x_start_lim = max(x_start, 0)
        x_end_lim = min(x_end, x_max)

        # Random start-position for the tiles on the y-axis.
        # The random value is between -3/4 and -1/4 of the tile-size.
        y_start = random.randint(-3*y_tile_size4, -y_tile_size4)

        while y_start < y_max:
            # End-position for the current tile.
            y_end = y_start + y_tile_size

            # Ensure the tile's start- and end-positions are valid.
            y_start_lim = max(y_start, 0)
            y_end_lim = min(y_end, y_max)

            # Get the image-tile.
            img_tile = image[x_start_lim:x_end_lim,
                             y_start_lim:y_end_lim, :]

            # Create a feed-dict with the image-tile.
            feed_dict = model.create_feed_dict(image=img_tile)

            # Use TensorFlow to calculate the gradient-value.
            g = session.run(gradient, feed_dict=feed_dict)

            # Normalize the gradient for the tile. This is
            # necessary because the tiles may have very different
            # values. Normalizing gives a more coherent gradient.
            g /= (np.std(g) + 1e-8)

            # Store the tile's gradient at the appropriate location.
            grad[x_start_lim:x_end_lim,
                 y_start_lim:y_end_lim, :] = g
            # Advance the start-position for the y-axis.
            y_start = y_end

        # Advance the start-position for the x-axis.
        x_start = x_end

    return grad


def optimize_image(layer_tensor, image,
                   num_iterations=10, step_size=3.0, tile_size=400,
                   show_gradient=False):
    """
    Use gradient ascent to optimize an image so it maximizes the
    mean value of the given layer_tensor.

    Parameters:
    layer_tensor: Reference to a tensor that will be maximized.
    image: Input image used as the starting point.
    num_iterations: Number of optimization iterations to perform.
    step_size: Scale for each step of the gradient ascent.
    tile_size: Size of the tiles when calculating the gradient.
    show_gradient: Plot the gradient in each iteration.
    """

    # Copy the image so we don't overwrite the original image.
    img = image.copy()

    print("Processing image: ")

    # Use TensorFlow to get the mathematical function for the
    # gradient of the given layer-tensor with regard to the
    # input image. This may cause TensorFlow to add the same
    # math-expressions to the graph each time this function is called.
    # It may use a lot of RAM and could be moved outside the function.
    gradient = model.get_gradient(layer_tensor)

    for i in range(num_iterations):
        # Calculate the value of the gradient.
        # This tells us how to change the image so as to
        # maximize the mean of the given layer-tensor.
        grad = tiled_gradient(gradient=gradient, image=img)

        # Blur the gradient with different amounts and add
        # them together. The blur amount is also increased
        # during the optimization. This was found to give
        # nice, smooth images. You can try and change the formulas.
        # The blur-amount is called sigma (0=no blur, 1=low blur, etc.)
        # We could call gaussian_filter(grad, sigma=(sigma, sigma, 0.0))
        # which would not blur the colour-channel. This tends to
        # give psychadelic / pastel colours in the resulting images.
        # When the colour-channel is also blurred the colours of the
        # input image are mostly retained in the output image.
        sigma = (i * 4.0) / num_iterations + 0.5
        grad_smooth1 = gaussian_filter(grad, sigma=sigma)
        grad_smooth2 = gaussian_filter(grad, sigma=sigma*2)
        grad_smooth3 = gaussian_filter(grad, sigma=sigma*0.5)
        grad = (grad_smooth1 + grad_smooth2 + grad_smooth3)

        # Scale the step-size according to the gradient-values.
        # This may not be necessary because the tiled-gradient
        # is already normalized.
        step_size_scaled = step_size / (np.std(grad) + 1e-8)

        # Update the image by following the gradient.
        img += grad * step_size_scaled

        if show_gradient:
            # Print statistics for the gradient.
            msg = "Gradient min: {0:>9.6f}, max: {1:>9.6f}, stepsize: {2:>9.2f}"
            print(msg.format(grad.min(), grad.max(), step_size_scaled))

            # Plot the gradient.
            plot_gradient(grad)
        else:
            # Otherwise show a little progress-indicator.
            print(". ", end="")
    return img


def recursive_optimize(layer_tensor, image,
                       num_repeats=4, rescale_factor=0.7, blend=0.2,
                       num_iterations=10, step_size=3.0,
                       tile_size=400):
    """
    Recursively blur and downscale the input image.
    Each downscaled image is run through the optimize_image()
    function to amplify the patterns that the Inception model sees.

    Parameters:
    image: Input image used as the starting point.
    rescale_factor: Downscaling factor for the image.
    num_repeats: Number of times to downscale the image.
    blend: Factor for blending the original and processed images.

    Parameters passed to optimize_image():
    layer_tensor: Reference to a tensor that will be maximized.
    num_iterations: Number of optimization iterations to perform.
    step_size: Scale for each step of the gradient ascent.
    tile_size: Size of the tiles when calculating the gradient.
    """

    # Do a recursive step?
    if num_repeats > 0:
        # Blur the input image to prevent artifacts when downscaling.
        # The blur amount is controlled by sigma. Note that the
        # colour-channel is not blurred as it would make the image gray.
        sigma = 0.5
        img_blur = gaussian_filter(image, sigma=(sigma, sigma, 0.0))

        # Downscale the image.
        img_downscaled = resize_image(image=img_blur,
                                      factor=rescale_factor)

        # Recursive call to this function.
        # Subtract one from num_repeats and use the downscaled image.
        img_result = recursive_optimize(layer_tensor=layer_tensor,
                                        image=img_downscaled,
                                        num_repeats=num_repeats-1,
                                        rescale_factor=rescale_factor,
                                        blend=blend,
                                        num_iterations=num_iterations,
                                        step_size=step_size,
                                        tile_size=tile_size)

        # Upscale the resulting image back to its original size.
        img_upscaled = resize_image(image=img_result, size=image.shape)

        # Blend the original and processed images.
        image = blend * image + (1.0 - blend) * img_upscaled

    print("Recursive level:", num_repeats)

    # Process the image using the DeepDream algorithm.
    img_result = optimize_image(layer_tensor=layer_tensor,
                                image=image,
                                num_iterations=num_iterations,
                                step_size=step_size,
                                tile_size=tile_size)

    return img_result
You do not need to copy it or anything, the above is included in the starting point to this project.
We can use this as our main "module" for creating dream images. To do this, we'll just import model, load_image, and finally the recursive_optimize functions from this file in our main script. Let's see a quick example of how we might do just that.
Now, let's create a new python file called dream_image in this project's directory, starting by making some necessary imports:
from deepdreamer import model, load_image, recursive_optimize
import numpy as np
import PIL.Image
Next, let's decide on which layer we want to visualize in this image. Depending on the model and what you've trained it on, your layers might be different. If you're using our starting model here, then here are some notes for the layers:
layer 1: wavy
layer 2: lines
layer 3: boxes
layer 4: circles?
layer 6: dogs, bears, cute animals.
layer 7: faces, buildings
layer 8: fish begin to appear, frogs/reptilian eyes.
layer 10: Monkies, lizards, snakes, duck
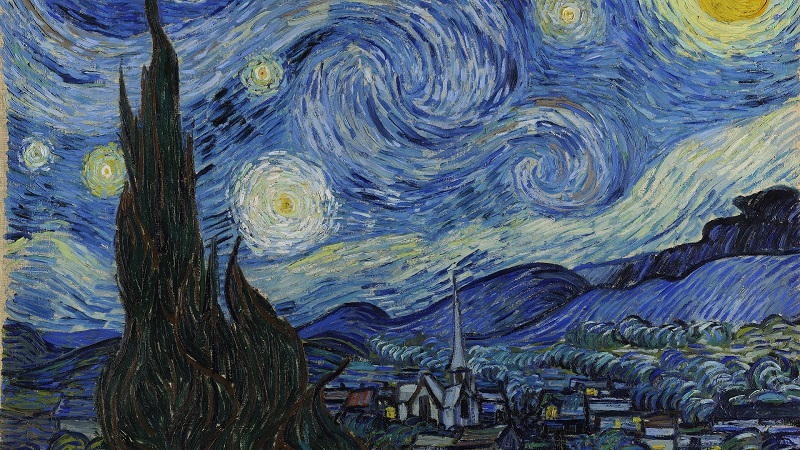
The image I am going to work with to start is The Starry Night:
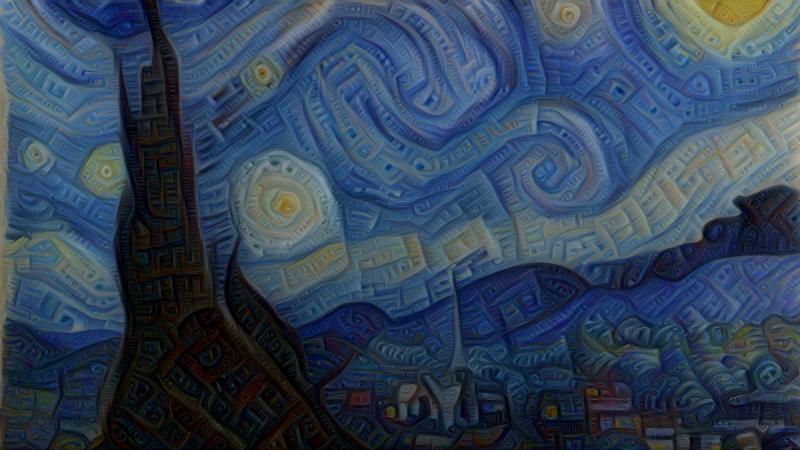
This image is currently very "wavy," so I think it'd be cool to go with layer 3, which turns things more to straight edges, corners, and boxes, since layer 3 is looking for these sorts of shapes/designs. To specify the layer we want to use:
layer_tensor = model.layer_tensors[3]
Next, we'll give the file name and the starting image:
file_name = "the-starry-night/the-starry-night-800x450.jpg"
img = load_image(filename='{}'.format(file_name))
Now, let's use our deepdreamer module to create our dream image:
img_result = recursive_optimize(layer_tensor=layer_tensor, image=img,
                 # how clear is the dream vs original image
                 num_iterations=20, step_size=1.0, rescale_factor=0.5,
                 # How many "passes" over the data. More passes, the more granular the gradients will be.
                 num_repeats=8, blend=0.2)
The neural network doesn't really understand the limitations of color needing to be 0-255, so we want to take our result, clip it, convert the datatype of the array, then convert to an actual image. Then we can save and show it:
img_result = np.clip(img_result, 0.0, 255.0)
img_result = img_result.astype(np.uint8)
result = PIL.Image.fromarray(img_result, mode='RGB')
result.save('dream_image_out.jpg')
result.show()
Full code:
from deepdreamer import model, load_image, recursive_optimize
import numpy as np
import PIL.Image

layer_tensor = model.layer_tensors[3]
file_name = "the-starry-night/the-starry-night-800x450.jpg"
img = load_image(filename='{}'.format(file_name))

img_result = recursive_optimize(layer_tensor=layer_tensor, image=img,
                 # how clear is the dream vs original image
                 num_iterations=20, step_size=1.0, rescale_factor=0.5,
                 # How many "passes" over the data. More passes, the more granular the gradients will be.
                 num_repeats=8, blend=0.2)

img_result = np.clip(img_result, 0.0, 255.0)
img_result = img_result.astype(np.uint8)
result = PIL.Image.fromarray(img_result, mode='RGB')
result.save('dream_image_out.jpg')
result.show()
Our result:
There are many parameters to play with here. The above result is with 8 repeats. What if we did 10?

Now layer 10 with 40 iterations, 25 repeats, and 0.99 rescale:

While you could easily play with just this for days, another fun thing to do is to make deep dream movies, like I showed initially in this part of the series. This is a bit more of a challenge to do, but the results are pretty neat!
-
Generative Model Basics (Character-Level) - Unconventional Neural Networks in Python and Tensorflow p.1
-
Generating Pythonic code with Character Generative Model - Unconventional Neural Networks in Python and Tensorflow p.2
-
Generating with MNIST - Unconventional Neural Networks in Python and Tensorflow p.3
-
Classification Generator Training Attempt - Unconventional Neural Networks in Python and Tensorflow p.4
-
Classification Generator Testing Attempt - Unconventional Neural Networks in Python and Tensorflow p.5
-
Drawing a Number by Request with Generative Model - Unconventional Neural Networks in Python and Tensorflow p.6
-
Deep Dream - Unconventional Neural Networks in Python and Tensorflow p.7
-
Deep Dream Frames - Unconventional Neural Networks in Python and Tensorflow p.8
-
Deep Dream Video - Unconventional Neural Networks in Python and Tensorflow p.9
-
Doing Math with Neural Networks - Unconventional Neural Networks in Python and Tensorflow p.10
-
Doing Math with Neural Networks testing addition results - Unconventional Neural Networks in Python and Tensorflow p.11
-
Complex Math - Unconventional Neural Networks in Python and Tensorflow p.12
