Determining other vehicle distances and collision warning - Self Driving Cars in GTA
Hello and welcome to another self-driving cars tutorial, in this tutorial we're going to use the TensorFlow Object Detection API to determine whether or not other vehicles on the road are too close. We will be building on the previous tutorial code:
# coding: utf-8
# # Object Detection Demo
# License: Apache License 2.0 (https://github.com/tensorflow/models/blob/master/LICENSE)
# source: https://github.com/tensorflow/models
import numpy as np
import os
import six.moves.urllib as urllib
import sys
import tarfile
import tensorflow as tf
import zipfile

from collections import defaultdict
from io import StringIO
from matplotlib import pyplot as plt
from PIL import Image
from grabscreen import grab_screen
import cv2

# This is needed since the notebook is stored in the object_detection folder.
sys.path.append("..")


# ## Object detection imports
# Here are the imports from the object detection module.

from utils import label_map_util
from utils import visualization_utils as vis_util


# # Model preparation
# What model to download.
MODEL_NAME = 'ssd_mobilenet_v1_coco_11_06_2017'
MODEL_FILE = MODEL_NAME + '.tar.gz'
DOWNLOAD_BASE = 'http://download.tensorflow.org/models/object_detection/'

# Path to frozen detection graph. This is the actual model that is used for the object detection.
PATH_TO_CKPT = MODEL_NAME + '/frozen_inference_graph.pb'

# List of the strings that is used to add correct label for each box.
PATH_TO_LABELS = os.path.join('data', 'mscoco_label_map.pbtxt')

NUM_CLASSES = 90

# ## Download Model
opener = urllib.request.URLopener()
opener.retrieve(DOWNLOAD_BASE + MODEL_FILE, MODEL_FILE)
tar_file = tarfile.open(MODEL_FILE)
for file in tar_file.getmembers():
  file_name = os.path.basename(file.name)
  if 'frozen_inference_graph.pb' in file_name:
    tar_file.extract(file, os.getcwd())


# ## Load a (frozen) Tensorflow model into memory.
detection_graph = tf.Graph()
with detection_graph.as_default():
  od_graph_def = tf.GraphDef()
  with tf.gfile.GFile(PATH_TO_CKPT, 'rb') as fid:
    serialized_graph = fid.read()
    od_graph_def.ParseFromString(serialized_graph)
    tf.import_graph_def(od_graph_def, name='')


# ## Loading label map
# Label maps map indices to category names, so that when our convolution network predicts `5`, we know that this corresponds to `airplane`.  Here we use internal utility functions, but anything that returns a dictionary mapping integers to appropriate string labels would be fine
label_map = label_map_util.load_labelmap(PATH_TO_LABELS)
categories = label_map_util.convert_label_map_to_categories(label_map, max_num_classes=NUM_CLASSES, use_display_name=True)
category_index = label_map_util.create_category_index(categories)


# ## Helper code
def load_image_into_numpy_array(image):
  (im_width, im_height) = image.size
  return np.array(image.getdata()).reshape(
      (im_height, im_width, 3)).astype(np.uint8)

# Size, in inches, of the output images.
IMAGE_SIZE = (12, 8)

with detection_graph.as_default():
  with tf.Session(graph=detection_graph) as sess:
    while True:
      #screen = cv2.resize(grab_screen(region=(0,40,1280,745)), (WIDTH,HEIGHT))
      screen = cv2.resize(grab_screen(region=(0,40,1280,745)), (800,450))
      image_np = cv2.cvtColor(screen, cv2.COLOR_BGR2RGB)
      # Expand dimensions since the model expects images to have shape: [1, None, None, 3]
      image_np_expanded = np.expand_dims(image_np, axis=0)
      image_tensor = detection_graph.get_tensor_by_name('image_tensor:0')
      # Each box represents a part of the image where a particular object was detected.
      boxes = detection_graph.get_tensor_by_name('detection_boxes:0')
      # Each score represent how level of confidence for each of the objects.
      # Score is shown on the result image, together with the class label.
      scores = detection_graph.get_tensor_by_name('detection_scores:0')
      classes = detection_graph.get_tensor_by_name('detection_classes:0')
      num_detections = detection_graph.get_tensor_by_name('num_detections:0')
      # Actual detection.
      (boxes, scores, classes, num_detections) = sess.run(
          [boxes, scores, classes, num_detections],
          feed_dict={image_tensor: image_np_expanded})
      # Visualization of the results of a detection.
      vis_util.visualize_boxes_and_labels_on_image_array(
          image_np,
          np.squeeze(boxes),
          np.squeeze(classes).astype(np.int32),
          np.squeeze(scores),
          category_index,
          use_normalized_coordinates=True,
          line_thickness=8)

      cv2.imshow('window',image_np)
      if cv2.waitKey(25) & 0xFF == ord('q'):
          cv2.destroyAllWindows()
          break
The code that actually recognizes objects and returns the information for the locations and confidence is:
      (boxes, scores, classes, num_detections) = sess.run(
          [boxes, scores, classes, num_detections],
          feed_dict={image_tensor: image_np_expanded})
So, here, we can iterate through the boxes for further analysis. Boxes are an array, inside of an array, so, to iterate through them, we need to do:
for i,b in enumerate(boxes[0]):
Now, for the "too close" tracking, we're interested in some specific classes. One could argue that *any* object that is too close is something we might want to avoid. The deal is, however, that, to determine distance, you need to know the object's size before-hand.
For example, a car that is too close, being a few feet across if it's driving in front of you, will be much larger than a tree trunk, even if they're the exact distance from you. For this reason, we're only going to lump in cars, buses, and trucks for this loop. You can detect other smaller or larger objects in other loops if you like.
      for i,b in enumerate(boxes[0]):
        #                 car                    bus                  truck
        if classes[0][i] == 3 or classes[0][i] == 6 or classes[0][i] == 8:
Next, we want to be fairly certain these are *actually* vehicles. For example, in the vis_util.visualize_boxes_and_labels_on_image_array function, the default parameter for drawing boxes is a score of 0.5. I discovered this by simply viewing the code to see what all of the options were. We can use the same score of 0.5 or more logic. It's important to note that the object detector actually detects quite a few more objects, you just might not have been aware since only the scores of 0.5 or greater were being drawn.
      for i,b in enumerate(boxes[0]):
        #                 car                    bus                  truck
        if classes[0][i] == 3 or classes[0][i] == 6 or classes[0][i] == 8:
          if scores[0][i] >= 0.5:
Now, we want to measure the width of the detected object. We can do this by asking how many pixels-wide the object is. We can do this with:
apx_distance = round(((1 - (boxes[0][i][3] - boxes[0][i][1]))),1)
For some added granularity, I am going to add:
apx_distance = round(((1 - (boxes[0][i][3] - boxes[0][i][1]))**4),1)
You can play with this calculation more if you like, but I am going to move on. For debugging purposes, I would like to display this number on screen. To do this, I am going to display at the following coordinates:
            mid_x = (boxes[0][i][1]+boxes[0][i][3])/2
            mid_y = (boxes[0][i][0]+boxes[0][i][2])/2
Basically, this displays at left of the detected object, in the middle vertically.
      for i,b in enumerate(boxes[0]):
        #                 car                    bus                  truck
        if classes[0][i] == 3 or classes[0][i] == 6 or classes[0][i] == 8:
          if scores[0][i] >= 0.5:
            mid_x = (boxes[0][i][1]+boxes[0][i][3])/2
            mid_y = (boxes[0][i][0]+boxes[0][i][2])/2
            apx_distance = round(((1 - (boxes[0][i][3] - boxes[0][i][1]))**4),1)
We can write this to the screen with:
cv2.putText(image_np, '{}'.format(apx_distance), (int(mid_x*800),int(mid_y*450)), cv2.FONT_HERSHEY_SIMPLEX, 0.7, (255,255,255), 2)
If that distance is less than 0.5, then I am going to say this is too close for an object ~the width of a car, so we want to display a warning:
            if apx_distance <=0.5:
              if mid_x > 0.3 and mid_x < 0.7:
                cv2.putText(image_np, 'WARNING!!!', (50,50), cv2.FONT_HERSHEY_SIMPLEX, 1.0, (0,0,255), 3)
Also note: if mid_x > 0.3 and mid_x < 0.7:. This code just looks to see that, even if the object is close, it might be far enough to the side that it's not a likely collision issue. Obviously, to do this right, you would probably want to track object history and trajectory. For example, if you're going through an intersection, and there's a car coming across, a reasonable person would know that, despite the car not being in front, that vehicle is a collision risk.
Full code up to this point:
# coding: utf-8
# # Object Detection Demo
# License: Apache License 2.0 (https://github.com/tensorflow/models/blob/master/LICENSE)
# source: https://github.com/tensorflow/models
import numpy as np
import os
import six.moves.urllib as urllib
import sys
import tarfile
import tensorflow as tf
import zipfile

from collections import defaultdict
from io import StringIO
from matplotlib import pyplot as plt
from PIL import Image
from grabscreen import grab_screen
import cv2

# This is needed since the notebook is stored in the object_detection folder.
sys.path.append("..")


# ## Object detection imports
# Here are the imports from the object detection module.

from utils import label_map_util
from utils import visualization_utils as vis_util


# # Model preparation
# What model to download.
MODEL_NAME = 'ssd_mobilenet_v1_coco_11_06_2017'
MODEL_FILE = MODEL_NAME + '.tar.gz'
DOWNLOAD_BASE = 'http://download.tensorflow.org/models/object_detection/'

# Path to frozen detection graph. This is the actual model that is used for the object detection.
PATH_TO_CKPT = MODEL_NAME + '/frozen_inference_graph.pb'

# List of the strings that is used to add correct label for each box.
PATH_TO_LABELS = os.path.join('data', 'mscoco_label_map.pbtxt')

NUM_CLASSES = 90

# ## Download Model
opener = urllib.request.URLopener()
opener.retrieve(DOWNLOAD_BASE + MODEL_FILE, MODEL_FILE)
tar_file = tarfile.open(MODEL_FILE)
for file in tar_file.getmembers():
  file_name = os.path.basename(file.name)
  if 'frozen_inference_graph.pb' in file_name:
    tar_file.extract(file, os.getcwd())


# ## Load a (frozen) Tensorflow model into memory.
detection_graph = tf.Graph()
with detection_graph.as_default():
  od_graph_def = tf.GraphDef()
  with tf.gfile.GFile(PATH_TO_CKPT, 'rb') as fid:
    serialized_graph = fid.read()
    od_graph_def.ParseFromString(serialized_graph)
    tf.import_graph_def(od_graph_def, name='')


# ## Loading label map
# Label maps map indices to category names, so that when our convolution network predicts `5`, we know that this corresponds to `airplane`.  Here we use internal utility functions, but anything that returns a dictionary mapping integers to appropriate string labels would be fine
label_map = label_map_util.load_labelmap(PATH_TO_LABELS)
categories = label_map_util.convert_label_map_to_categories(label_map, max_num_classes=NUM_CLASSES, use_display_name=True)
category_index = label_map_util.create_category_index(categories)


# ## Helper code
def load_image_into_numpy_array(image):
  (im_width, im_height) = image.size
  return np.array(image.getdata()).reshape(
      (im_height, im_width, 3)).astype(np.uint8)

# Size, in inches, of the output images.
IMAGE_SIZE = (12, 8)

with detection_graph.as_default():
  with tf.Session(graph=detection_graph) as sess:
    while True:
      #screen = cv2.resize(grab_screen(region=(0,40,1280,745)), (WIDTH,HEIGHT))
      screen = cv2.resize(grab_screen(region=(0,40,1280,745)), (800,450))
      image_np = cv2.cvtColor(screen, cv2.COLOR_BGR2RGB)
      # Expand dimensions since the model expects images to have shape: [1, None, None, 3]
      image_np_expanded = np.expand_dims(image_np, axis=0)
      image_tensor = detection_graph.get_tensor_by_name('image_tensor:0')
      # Each box represents a part of the image where a particular object was detected.
      boxes = detection_graph.get_tensor_by_name('detection_boxes:0')
      # Each score represent how level of confidence for each of the objects.
      # Score is shown on the result image, together with the class label.
      scores = detection_graph.get_tensor_by_name('detection_scores:0')
      classes = detection_graph.get_tensor_by_name('detection_classes:0')
      num_detections = detection_graph.get_tensor_by_name('num_detections:0')
      # Actual detection.
      (boxes, scores, classes, num_detections) = sess.run(
          [boxes, scores, classes, num_detections],
          feed_dict={image_tensor: image_np_expanded})
      # Visualization of the results of a detection.
      vis_util.visualize_boxes_and_labels_on_image_array(
          image_np,
          np.squeeze(boxes),
          np.squeeze(classes).astype(np.int32),
          np.squeeze(scores),
          category_index,
          use_normalized_coordinates=True,
          line_thickness=8)


      for i,b in enumerate(boxes[0]):
        #                 car                    bus                  truck
        if classes[0][i] == 3 or classes[0][i] == 6 or classes[0][i] == 8:
          if scores[0][i] >= 0.5:
            mid_x = (boxes[0][i][1]+boxes[0][i][3])/2
            mid_y = (boxes[0][i][0]+boxes[0][i][2])/2
            apx_distance = round(((1 - (boxes[0][i][3] - boxes[0][i][1]))**4),1)
            cv2.putText(image_np, '{}'.format(apx_distance), (int(mid_x*800),int(mid_y*450)), cv2.FONT_HERSHEY_SIMPLEX, 0.7, (255,255,255), 2)

            if apx_distance <=0.5:
              if mid_x > 0.3 and mid_x < 0.7:
                cv2.putText(image_np, 'WARNING!!!', (50,50), cv2.FONT_HERSHEY_SIMPLEX, 1.0, (0,0,255), 3)


      cv2.imshow('window',cv2.resize(image_np,(800,450)))
      if cv2.waitKey(25) & 0xFF == ord('q'):
          cv2.destroyAllWindows()
          break
With this code, we're able to track a relative distance to vehicles around us, and determine if they're too close and signal a warning and/or even issue some evasive controls with simulated keypresses. In GTA V specifically, you need direct inputs. You can check out directkeys.py to do this. For example, you could see if the object is more to the left or the right of you and your car. If the object is more to the left, then you could swerve right, for example.
The resulting output from here, for example:
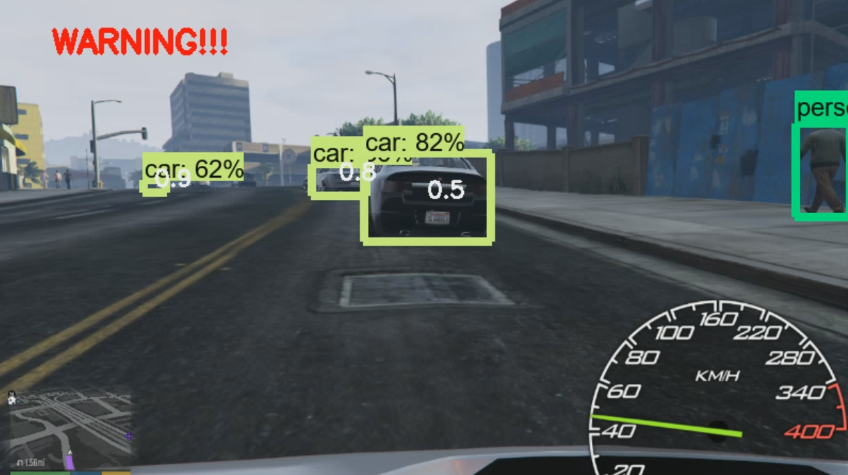
But, even if we're close, but we're not going to collide, we wont get a warning:
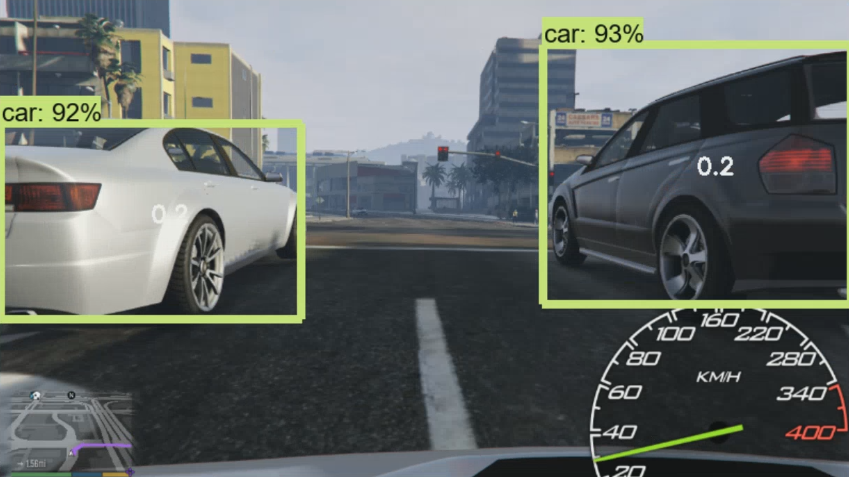
Now, what else might we do with this object detection? How about... using vehicle detection to actually acquire a vehicle? In the next tutorial, we'll be doing just that!
-
Reading game frames in Python with OpenCV - Python Plays GTA V
-
OpenCV basics - Python Plays GTA V
-
Direct Input to Game - Python Plays GTA V
-
Region of Interest for finding lanes - Python Plays GTA V
-
Hough Lines - Python Plays GTA V
-
Finding Lanes for our self driving car - Python Plays GTA V
-
Self Driving Car - Python Plays GTA V
-
Next steps for Deep Learning self driving car - Python Plays GTA V
-
Training data for self driving car neural network- Python Plays GTA V
-
Balancing neural network training data- Python Plays GTA V
-
Training Self-Driving Car neural network- Python Plays GTA V
-
Testing self-driving car neural network- Python Plays GTA V
-
A more interesting self-driving AI - Python Plays GTA V
-
Object detection with Tensorflow - Self Driving Cars in GTA
-
Determining other vehicle distances and collision warning - Self Driving Cars in GTA
-
Getting the Agent a Vehicle- Python Plays GTA V
-
Acquiring a Vehicle for the Agent - Python Plays GTA V
