Securing your Flask website with SSL for HTTPS using Lets Encrypt
In this Flask web development with Python tutorial, we're going to cover how to secure your application/website with SSL, so you have HTTPS. To do this, we're going to leverage Let's Encrypt, which is a service that enables you to not only get a free SSL certificate, but also makes the entire setup process for your web server to actually use the SSL certificate super simple.
First, connect to your web server via SSH, and decide where you want to install the Let's Encrypt files. I'll put mine to ~/letsencrypt
mkdir ~/letsencrypt
cd ~/letsencrypt
git clone https://github.com/letsencrypt/letsencrypt
cd letsencrypt
./letsencrypt-auto --help
Once this is done, you've got the required files and setup, and you are ready to get your certificate.
./letsencrypt-auto --apache -d yourwebsite.com where yourwebsite.com is your website. If you want to support www and other subdomains, you will need to use ServerAlias in the apache conf file (see the first part of the video for more information on this).
When you run this, you will be asked for an email, which can be used to recover lost keys.

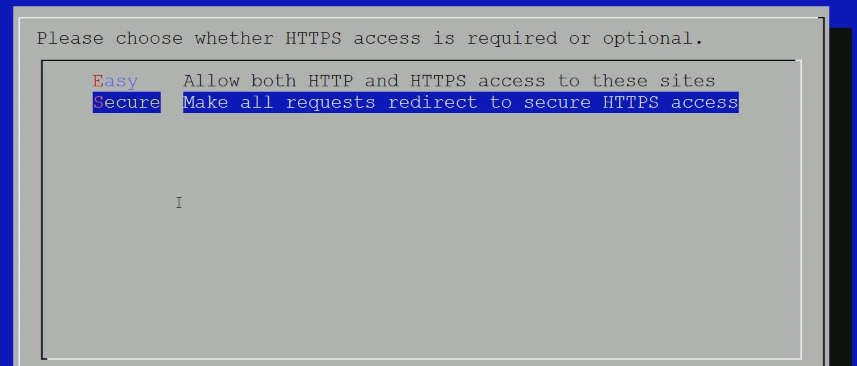
Next, you will agree to terms, then you will need to select either Easy or Secure. Easy will allow both http and https connections. Secure will force HTTPS, with a redirect to HTTPS if the initial request is over HTTP. The only downside here is when the requesting server does not support HTTPS. This is super rare, but can happen. The largest downside is if your website serves advertisements. I noticed no change in traffic after enabling SSL, but lost ~40% in ad revenue within about a week, and those losses stuck. Despite an initial loss in ad revenue, your website will be more trusted not only by your users, but also by Google's search, which I believe are both very valuable investments to make, despite short term ad revenue losses.

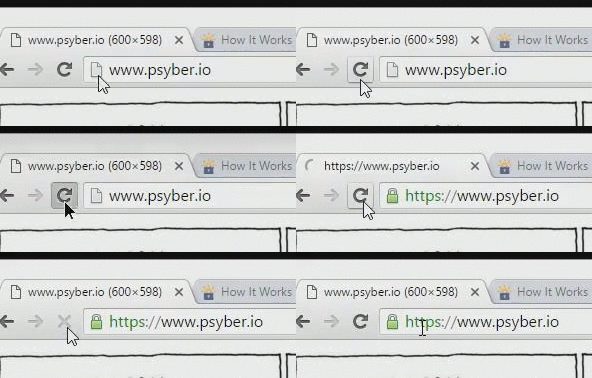
Once you've made your choice, you should be all set. Go back to your browser, refresh, and you should have active SSL and the beautiful green lock and HTTPS in front of your address

One thing to watch out for is insecure elements. You will know that you have these if you have HTTPS, but are lacking the green, or the lock is not green...etc. This almost always means you have SSL on your server, but you're incorporating elements that are not secure. Many times, this is an embedded script or image, which you are referencing with an HTTP request. To solve for this, you can write requests that are universal to http or https by doing //website.com/element.png rather than http://website.com/element.png. If you're using the dynamic sourcing with Jinja as we've done mostly in this tutorial series, then you should have no issues with this, except for when you're referencing outside elements.
Amazed at the super simple HTTPS process? Consider supporting Lets Encrypt. Continued support from sponsors and individuals will keep this awesome project afloat!
-
Introduction to Practical Flask
-
Basic Flask Website tutorial
-
Flask with Bootstrap and Jinja Templating
-
Starting our Website home page with Flask Tutorial
-
Improving the Home Page Flask Tutorial
-
Finishing the Home Page Flask Tutorial
-
Dynamic User Dashboard Flask Tutorial
-
Content Management Beginnings Flask Tutorial
-
Error Handling with Flask Tutorial
-
Flask Flash function Tutorial
-
Users with Flask intro Tutorial
-
Handling POST and GET Requests with Flask Tutorial
-
Creating MySQL database and table Flask Tutorial
-
Connecting to MySQL database with MySQLdb Flask Tutorial
-
User Registration Form Flask Tutorial
-
Flask Registration Code Tutorial
-
Finishing User Registration Flask Tutorial
-
Password Hashing with Flask Tutorial
-
Flask User Login System Tutorial
-
Decorators - Login_Required pages Flask Tutorial
-
Dynamic user-based content Flask Tutorial
-
More on Content Management Flask Tutorial
-
Flask CMS Concluded Flask Tutorial
-
The Crontab Flask Tutorial
-
Flask SEO Tutorial
-
Flask Includes Tutorial
-
Jinja Templating Tutorial
-
Flask URL Converters Tutorial
-
Flask-Mail Tutorial for email with Flask
-
Return Files with Flask send_file Tutorial
-
Protected Directories with Flask Tutorial
-
jQuery with Flask Tutorial
-
Pygal SVG graphs with Flask Tutorial
-
PayPal with Flask Web Development Tutorial
-
Securing your Flask website with SSL for HTTPS using Lets Encrypt
