High-end Cloud GPU Hosts compared, and GPU Server Setup & Use Example on Linode
Hello and welcome to an overview, comparison, and a basic setup tutorial for high end cloud GPUs for the purpose of doing deep learning research. For the setup, we're going to be using Linode's GPU offerings, because, at the moment, they are the best by far when considering how much power you can get your hands on (without distributing the GPUs) and the bang for your buck.
First, let's compare the major cloud GPU providers and their offerings. All of the other providers offer the Tesla V100 GPU, which is slighly older, but no slouch.
The V100 offers 112 TensorTFLOPs and 16gb of VRAM (there are 32GB variants of the V100, but the cloud offerings are all 16GB).
The RTX 6000 is the latest and greatest of the Turing Architecture from NVIDIA and puts out 130 TensorTFLOPS along with 24GB of VRAM. More VRAM and faster tensor ops.
Amazon Web Services
Pretty much everyone knows about Amazon Web Services (AWS), which offers K80s, M60s and V100s for their higher end GPU offerings. The K80s are old, M60s are smaller overall, so the most comparable card would be the V100. The options here are:
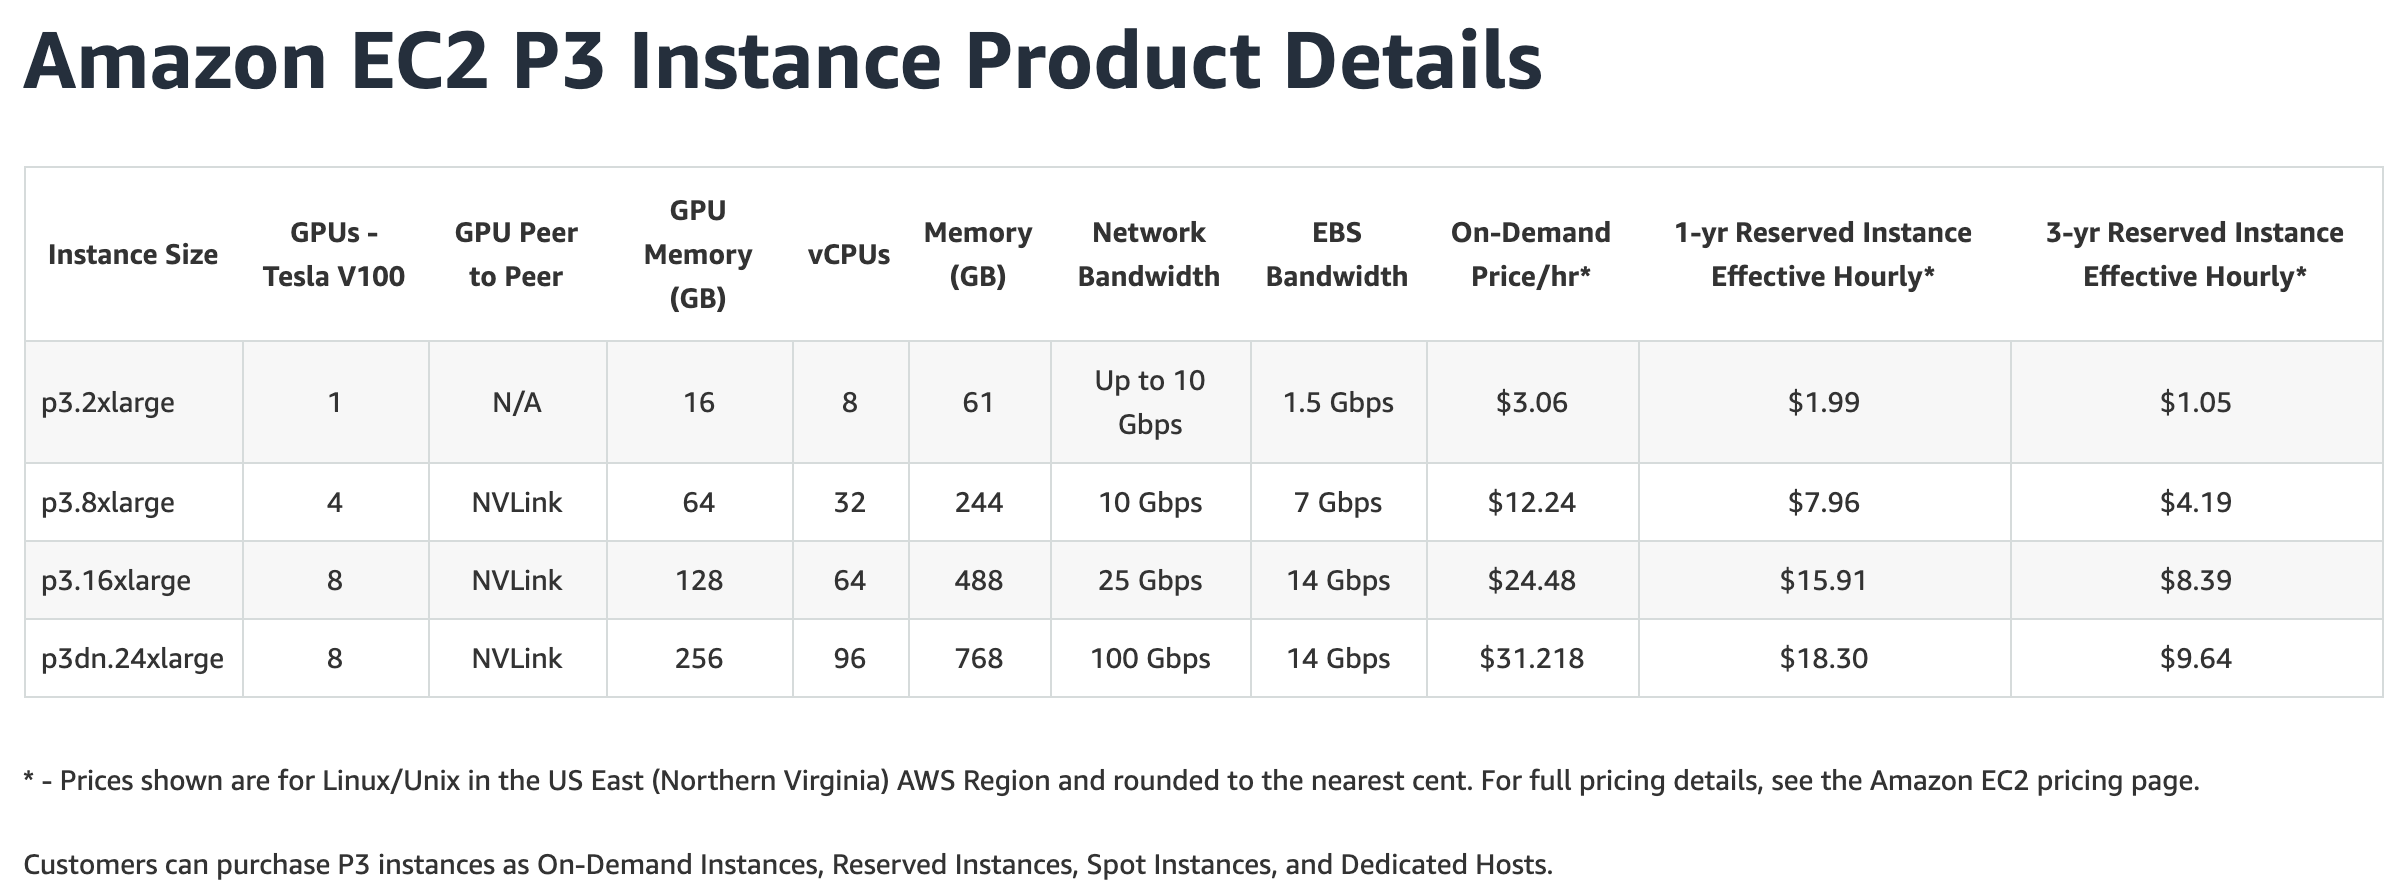
Price per hour is $3.06 for one V100, and it scales up linearly from there except for their largest offering which gives 256GB worth of V100 GPU for basically 8.25GB of vram per dollar. The way they're doing this is by providing 8 of the 32GB RAM variants of the V100, but this leaves you with just slightly more tensorcores than before, so you have more VRAM, but not too much more speed. Still, this is the most VRAM that I know of that you can buy in the cloud (not distributed), which is pretty cool still.
Another thing you'll notice here and with other providers is 1 and 3 year term plans, which offer cheaper prices. I would strongly advise against using these. Locking yourself into the best GPU right now for 3 years means... you'll be on some of the worst GPUs in probably 2 years with still a year to go! So, I am not going to even bother comparing to those, but, even if you consider them, you'll find Linode's on-demand pricing model still is competitive and likely better.
Microsoft Azure
Next up, we have Azure:
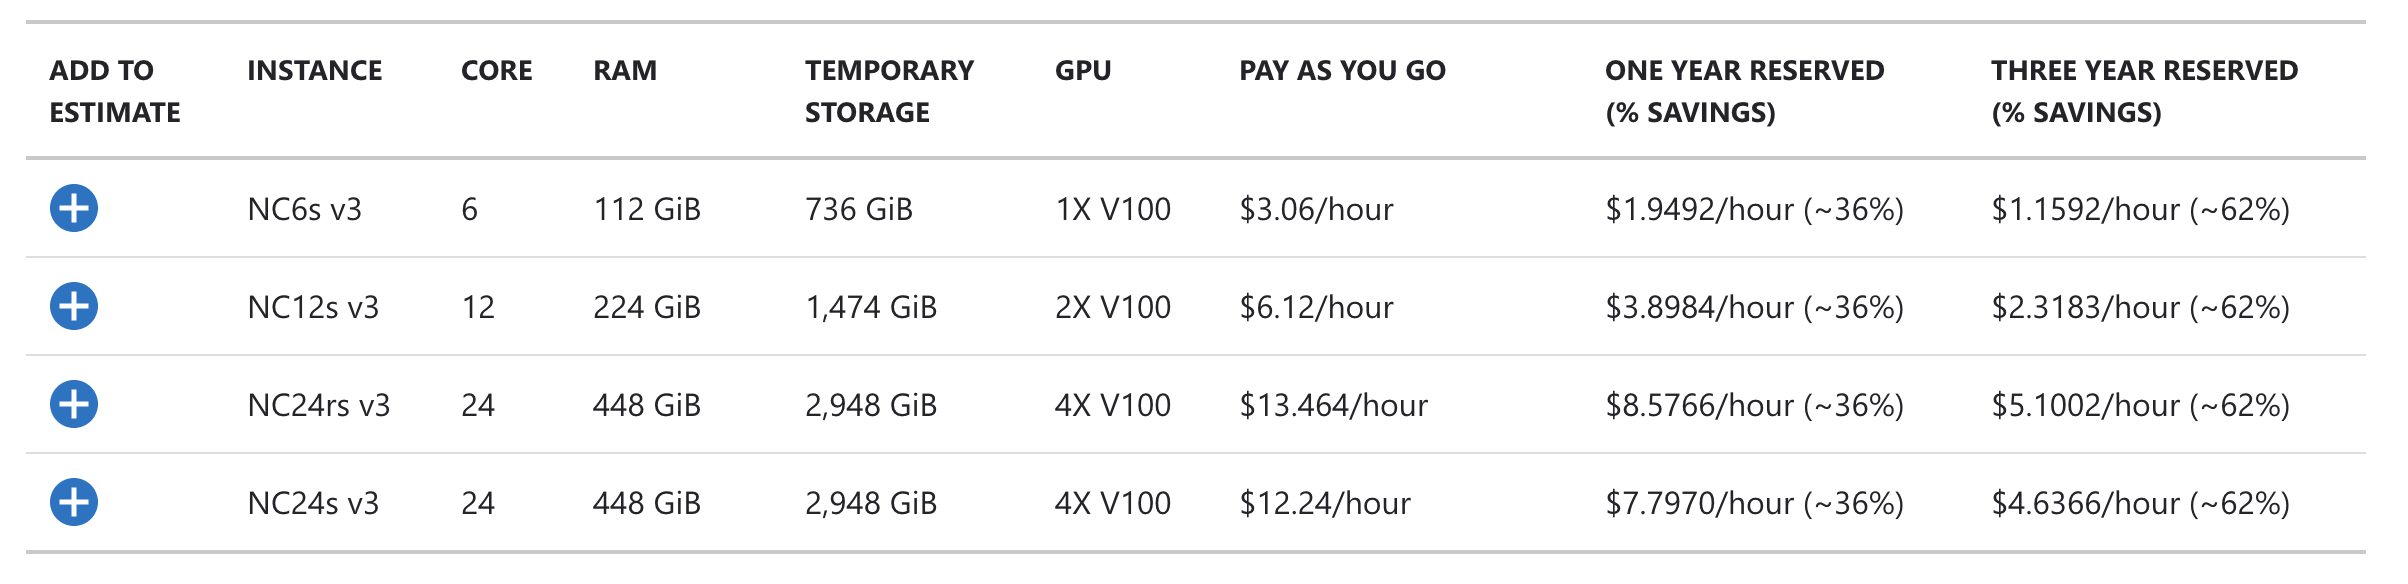
Same pricing for one, similar for the rest, for V100 GPUs as AWS. One thing that *is* worth paying attention to is CPU cores and RAM. Then we'd have to consider *what* CPU is running and even really what RAM...etc. It's going to depend on your task if you need more RAM, for example, or maybe more CPU. If you're doing traditional supervised deep learning, you probably don't care too much about CPU and RAM and any of these will do. If you're doing reinforcement learning and dealing with things like replay memory, running some environment...etc, suddenly the other stats come into play. Anyway, we'll call it identical pricing to AWS (even though RAM and CPU offerings do differ here), since we're mainly just looking to compare GPUs.
Google Cloud
Next up, we have Google's Cloud-GPU offerings:
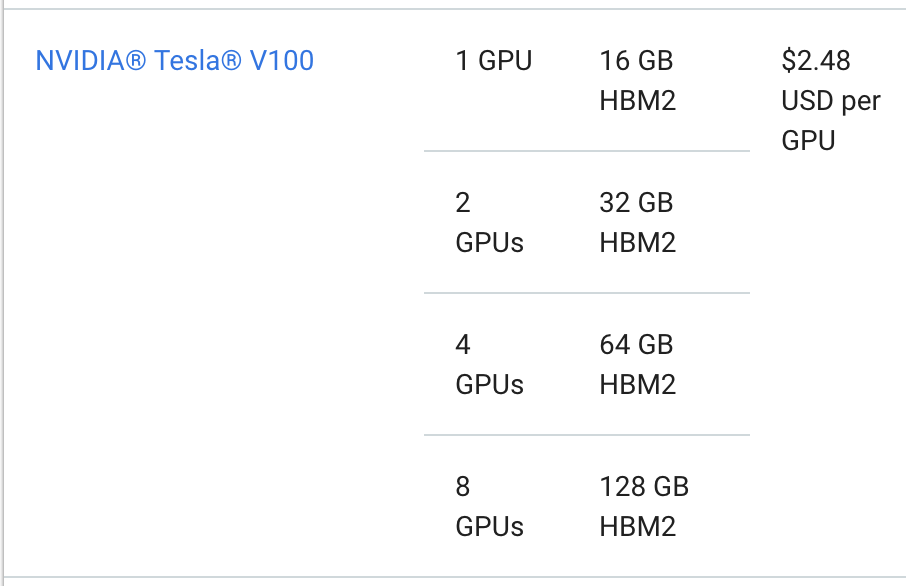
These are the cheapest of the big names (Azure, AWS, and Google), but still the best case scenario is the V100 for $2.48/hr
Linode GPUs
Finally, on to Linode's. While not as big of a name as the Googles, Azures, and AWS', Linode has been a steady and reliable host for longer than all three of those (hosting since 2003). I have been personally a user of Linode now for about 8 years, and they've been a solid host for this website since its inception.
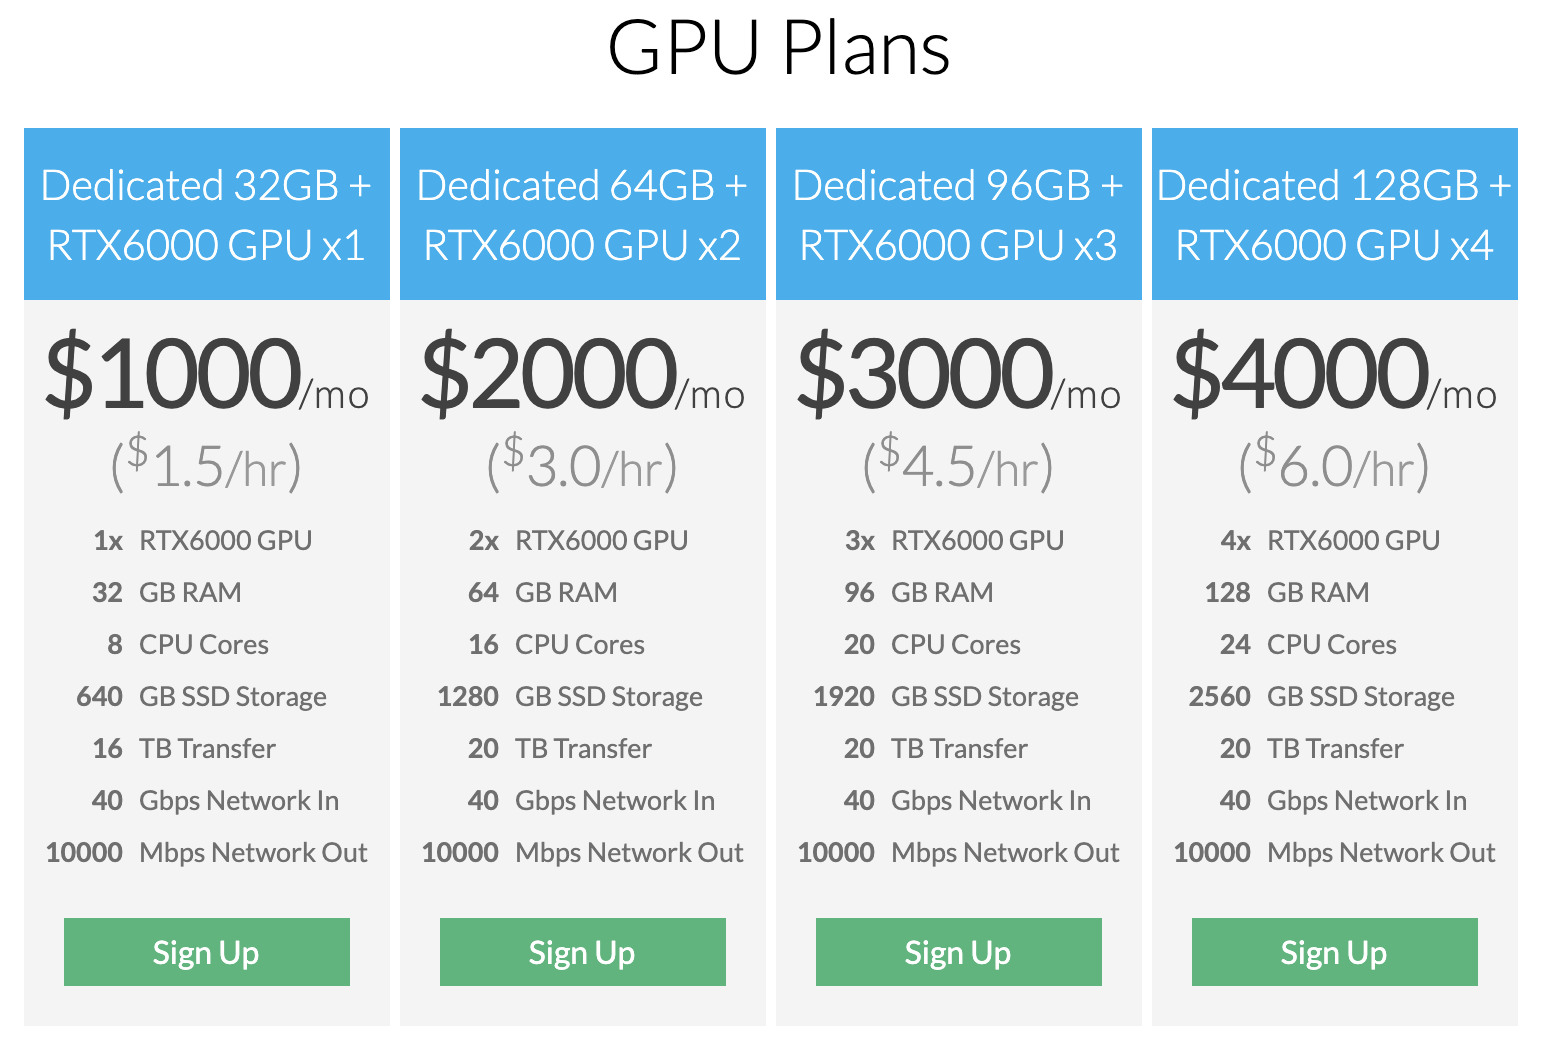
For half the price, you get more TensorTFLOPS and more VRAM, and we can get as much as 96GB of VRAM on one machine.
With Linode, and the other cloud-GPU providers, you must destroy the machine in order to not be billed. You will still be billed your full rate even if the machine is powered down. On Paperspace, it's possible that you go to try to power on your machine, and no GPUs are available for you at the moment, and you cannot power up the machine. On the other providers, this isn't the case. Once you buy that GPU, it's yours, until you destroy your machine. There are pros and cons here, but, given the GPUs and the cost on Linode... It was worth it to me to at least take a peak.
Linode is a partner with PythonProgramming.net, not just because they pay me, but because I have been a happy customer of theirs for a very very long time (almost a decade now, which is basically forever in internet terms), long before they were a partner. If you do not have a Linode account, you can use my Linode Link to sign up for a $20 credit. If I recall correctly, you still need to setup your billing account and spend $20 before you get the $20 credit, but it's there if you want it and want to support this site.
People get sometimes fidgety when theres a sponsor or partner involved, but, for the sake of transparency, I have relationships and ties with just about every major cloud host, including Linode but also Azure, Google, Amazon, Paperspace, Digital Ocean, IBM, and with the company making the GPUs themselves, NVIDIA. Basically everyone wants me to give them air time, I just choose to go with whoever I think is actually doing something awesome. Right now, that's Linode, with a very powerful offering.
So with providers where you pay so long as the machine exists, we have to get a little more fancy. There are a few ways we waste time with machines for data science. The first is just plain setting them up. Getting all the required packages and libraries can take time. In our case, we'd want things like TensorFlow and CUDA stuff. I don't usually keep these things memorized, so I am always having to re-look up links, and also sometimes downloads take time. It's a tedious and boring task. The next major waste of time is the data you intend to use. Especially for deep learning, you're probably using quite large datasets in many gigabytes or even terabytes of size. Uploading the data from your home machine to your server in the cloud can takes *days* ...so if your machine is costing $1.5-$3/hr or more, this can become quite a waste of money.
Sometimes you might be downloading your dataset from some other online cloud-hosted source, but this can still wind up taking quite a long time.
The fastest speeds you're going to possibly get is if you transfer between two machines that are local to each other (on the same network).
So what we actually want to do, regardless of what cloud GPU provider we choose, is have one machine that is a basic storage machine (without any fancy GPUs at all. This machine's sole purpose in life is to just download and store our datasets. That's it. If you have heavy pre-processing tasks you can either elect to do this on your download server, some other special purpose server, or even do this on your GPU machine, since that machine is likely to come with a healthy portion of CPU cores and RAM. I'll leave it to you to figure out how you want to structure your preprocessing, but the steps will be pretty similar no matter what.
You will want to have a storage machine in the same location as your GPU machine. Then your storage machine will get the data (maybe prepare it, or send to some other server for preparation/pre-processing), then you will just transfer the data to your big box with SCP.
Also, the setup of your GPU machine can be done mostly, if not completely, with a shell script. This is something that will just execute all the commands necessary to get your machine up and running. Linode has a special thing called "stackscripts," which basically are shell scripts, with vars, with a basic GUI. So again, while I will be showing you this on Linode, you could take this principle and practice to any of the big cloud GPU providers.
To begin, we're going to want a basic VPS + a volume. We might even be able to get away with a basic VPS and the storage that comes with it. If that's you, go for that if you want. I am going to show going the custom storage route since it's often the case that you need more storage than the basic VPS gives and the name of this game is saving money!
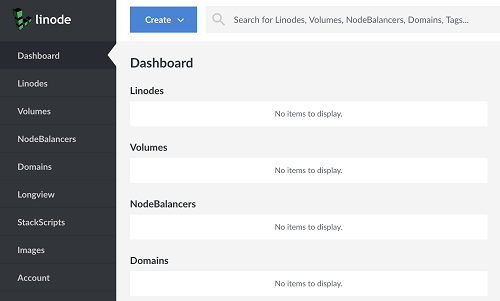
When you first create an account, your dashboard will look something like:
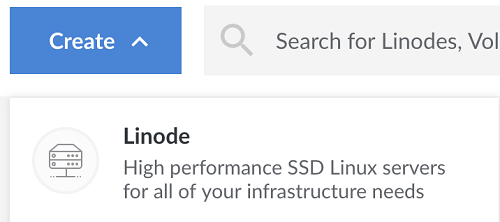
First, we'll need to spin up a super basic VPS. Click on the blue create button and choose "Linode" (this is Linode's name for a VPS)
For distribution, I am going to choose Ubuntu 19.04. Region: Newark NJ. Depending on the host, they may not offer GPU servers in all the same places they offer VPS'...and Linode isn't super clear about which regions have these GPUs. You will want to confirm that could *could* spin up a GPU instance wherever you put your VPS (because we're banking on the high transfer speeds based on these instances being local to each other). The only way I know to confirm is to actually spin up a GPU instance, which is pretty lame. I do know that Newark NJ has these instances.
I'll next choose my linode. I am going to choose the standard 2GB linode for $10/month. You could also try the nanode. It would also probably work just fine and save even more money.
Change the name if you want, then set your root user password, then create! Awesome, next we want to create a volume (storage). Again, your VPS should come with some storage. The bigger the VPS you create, the more storage it has, but our tiny VPS that we just made has only 50GB of storage. Even the smallest GPU instance still has 640GB of storage. Some of that will be taken up by things like model checkpoints...etc, but in theory you might want to allow for 500GB (or you could attach a storage volume to this linode!).
Going to create > volume, which should pop up a window that looks like:
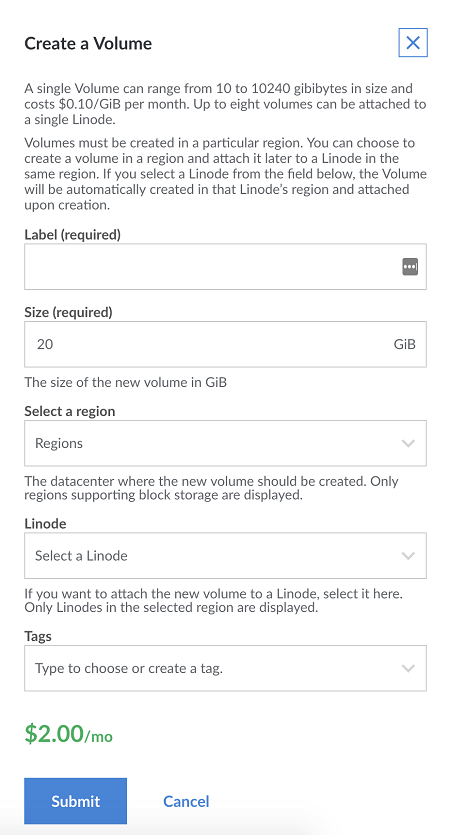
Fill in everything, choose the name of the label (I went with the name "storage," so take note because your commands will be slightly different if you use a different name.), where it will be (same region as your VPS and GPU server), pick how much storage you want, select the linode that you wish to attach it to (this should be your small/basic VPS that you just made), then submit. Once you do that, you'll get another window which shows you some quick commands that you'll need to setup this volume for use on your Linode. Something like:
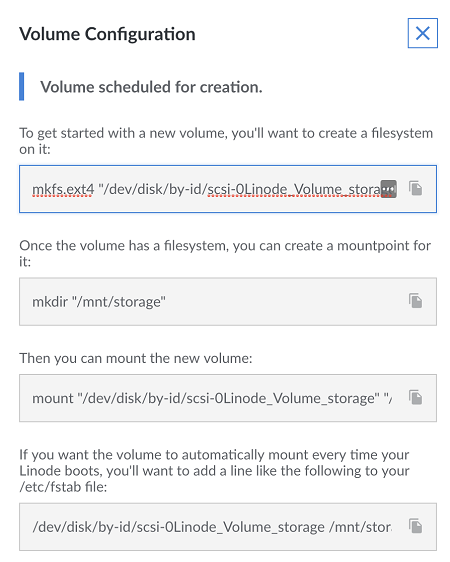
Copy and paste those commands into a notepad file, or just leave it up, and we can issue them right now to our server.
If you're on a Mac or Linux machine, you can access your VPS which we just attached this volume to by doing ssh root@THAT.IP.ADDR. On Windows, you will need an SSH client, or you can use something like bash on ubuntu on windows. If you want to use an SSH client, PuTTy is a good one. I don't recall if bash on ubuntu on windows is always there, or you need to grab it from the app store. Anyway, connect using whatever silly method you want!
To get your small VPS' IP address, go to your dashboard, click on that vps, and then your IP should be there. Mine currently is off to the right a bit:
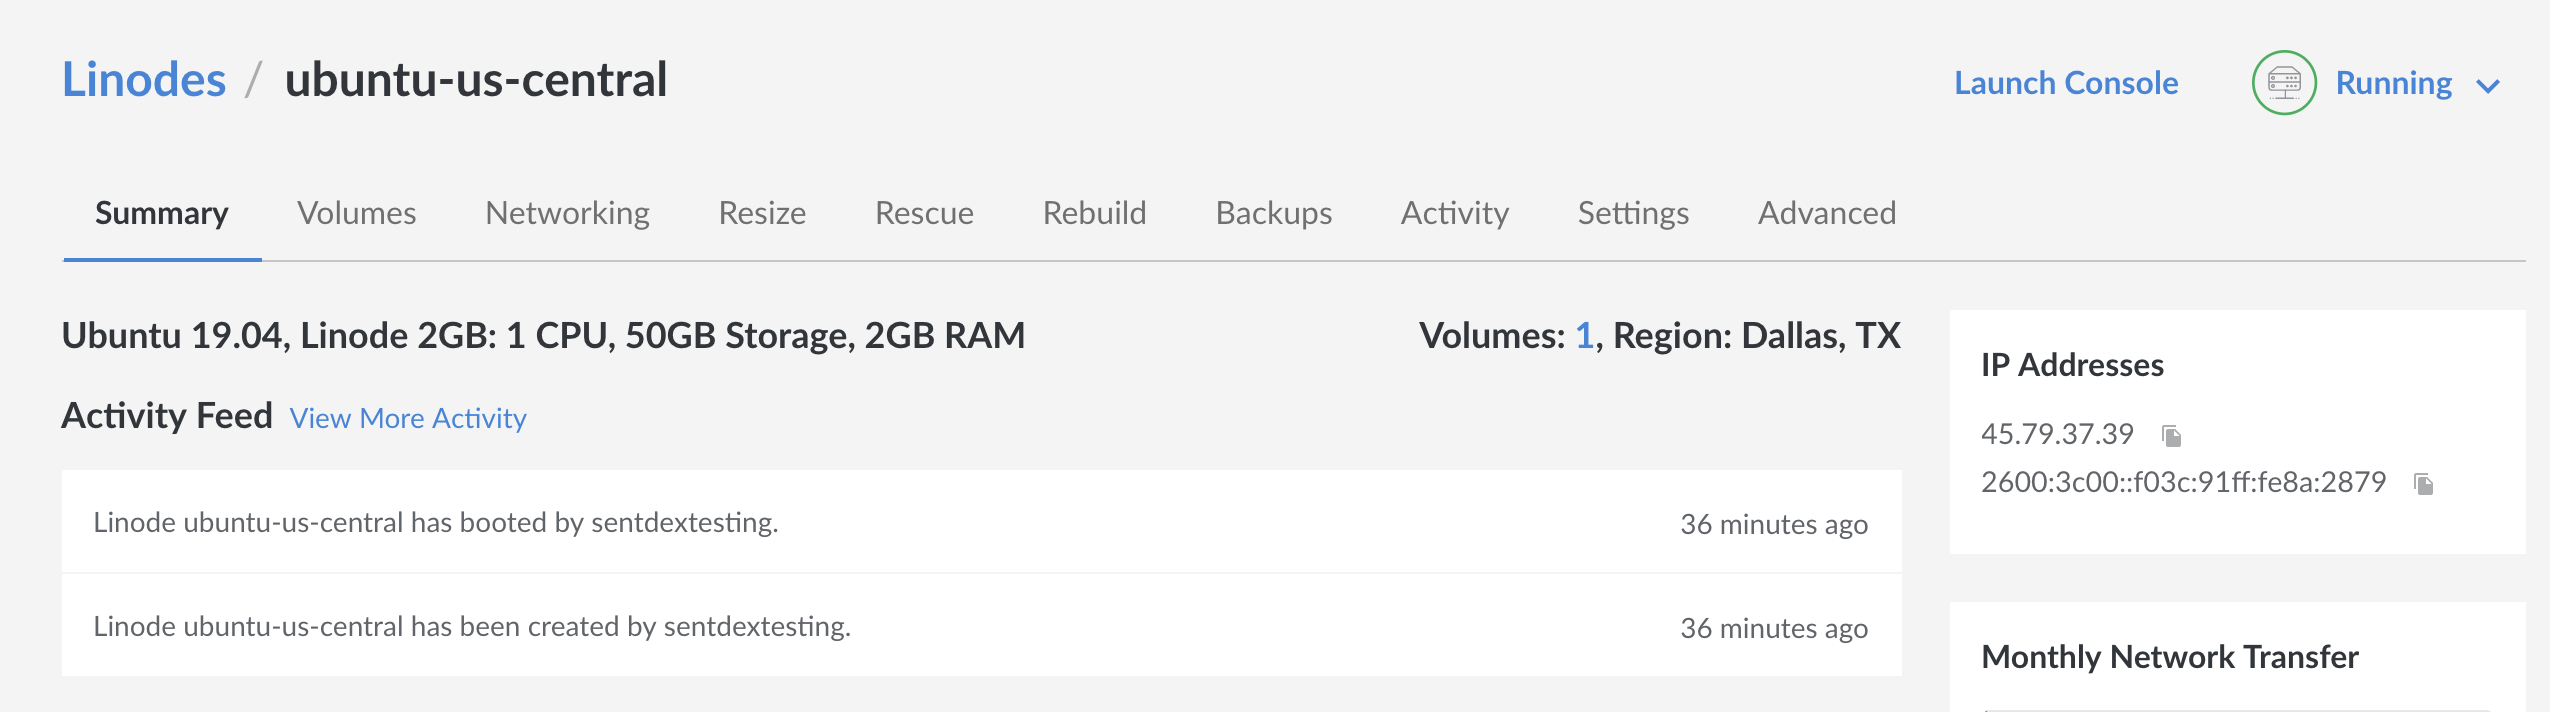
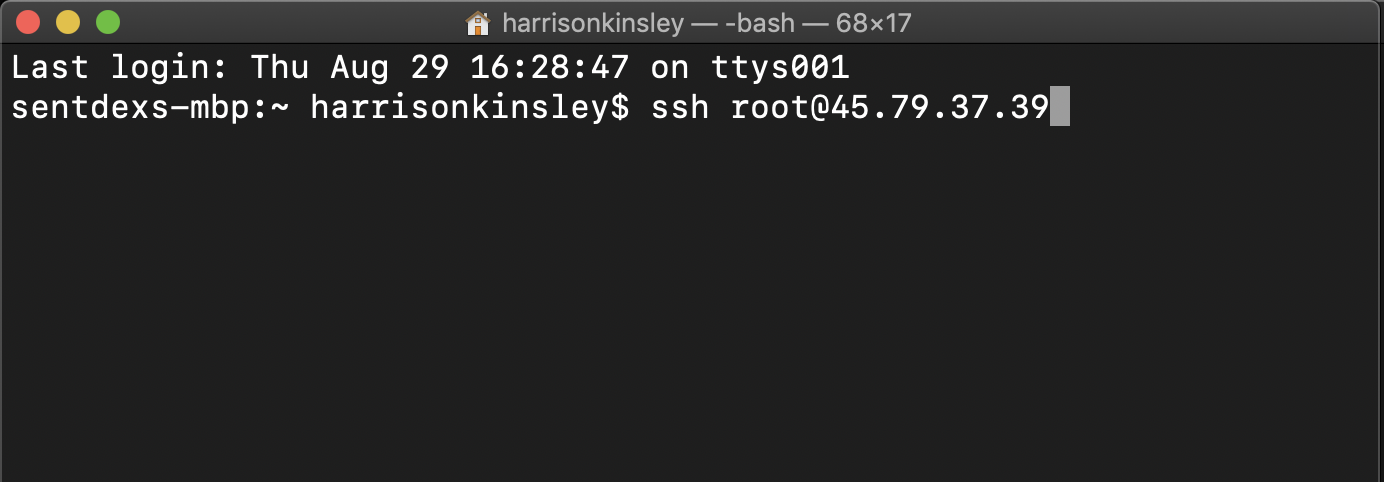
So I'll copy mine (45.79.37.39) then do ssh root@45.79.37.39 (via terminal on either mac or linux.... or via bash on ubuntu on windows ...on windows!). If you're wanting to use PuTTy, then you put the IP in the host name field, make sure the port is 22, and hit enter.
I'm doing:
The very first time that you connect to a server, you will see something like:
The authenticity of host '45.79.37.39 (45.79.37.39)' can't be established.
ECDSA key fingerprint is SHA256:N+frn07DIZ5afgasfsafsaoFDSxXsz0xGQSMcMvo.
Are you sure you want to continue connecting (yes/no)?
This is just letting you know that "hey, you've never connected to this machine before! If it's your first time, then great. If you don't think it's your first time, but you see this, it should be a red flag. For now, say yes
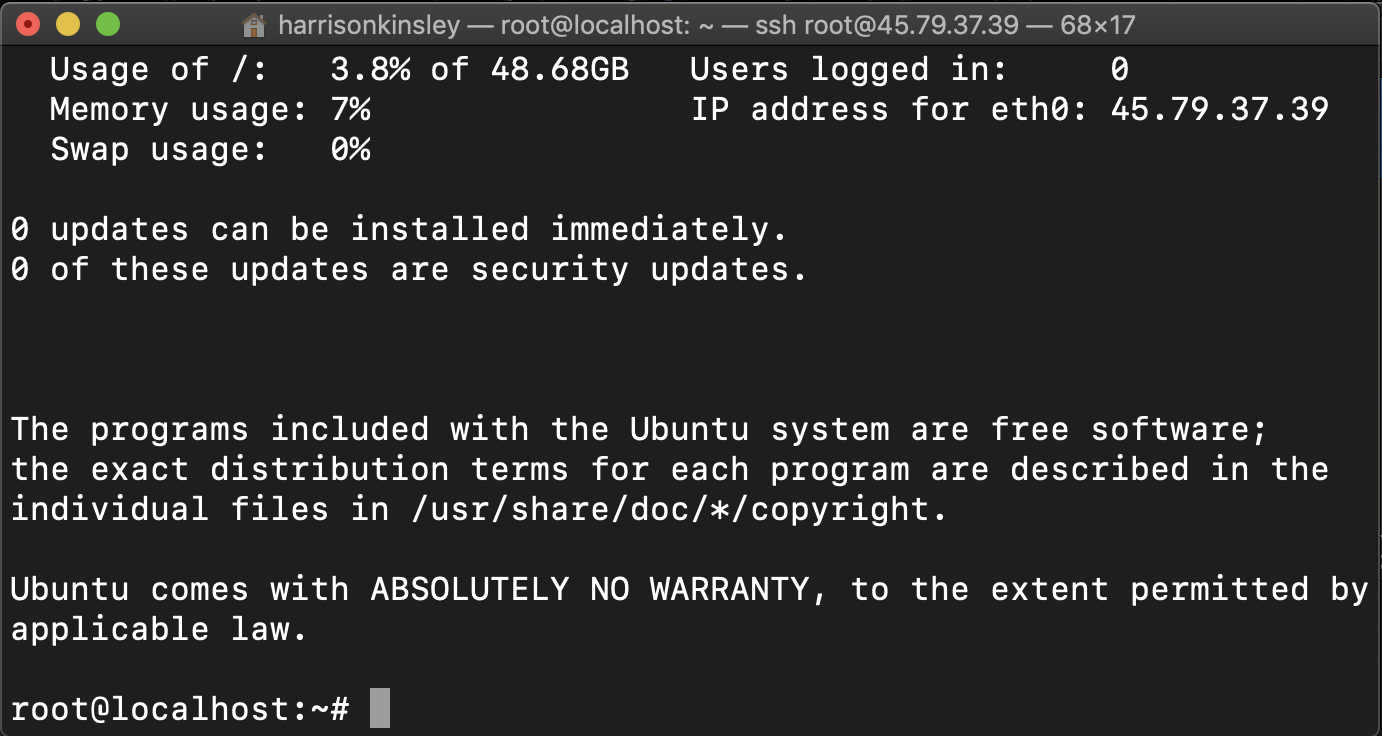
You will be asked for your password, this is that "root user password" that you set for your small VPS. Enter that, and you should be logged in!
Now, we're ready for those volume commands. Just copy and paste those into the terminal one by one and hit enter after each one.
mkfs.ext4 "/dev/disk/by-id/scsi-0Linode_Volume_storage"
mkdir "/mnt/storage"
mount "/dev/disk/by-id/scsi-0Linode_Volume_storage" "/mnt/storage"
Then we can do:
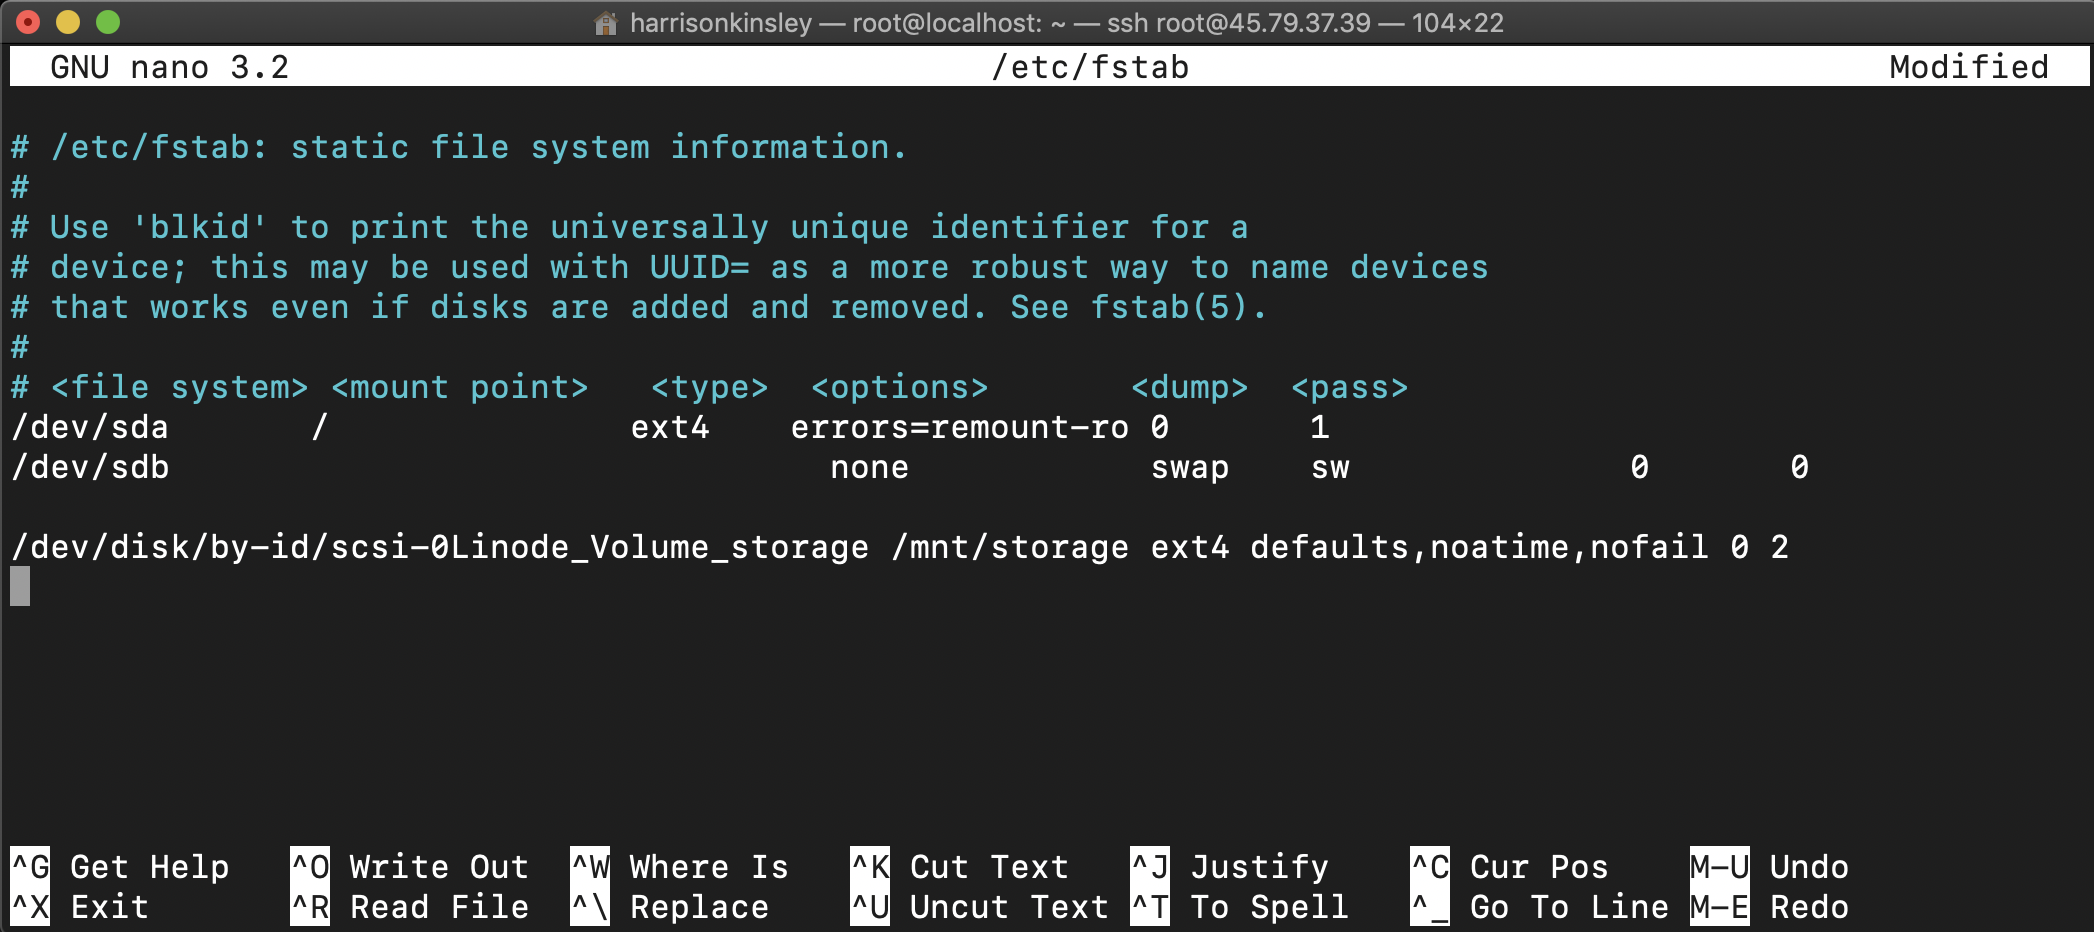
nano /etc/fstab
Then add the following line to the end (use your arrow keys to navigate to the end and start a new line with the enter key:
/dev/disk/by-id/scsi-0Linode_Volume_storage /mnt/storage ext4 defaults,noatime,nofail 0 2
It should look something like:
So now, we can store all of our training data to /mnt/storage. Now we need some data.
I am going to have us grab something relatively simple just for testing purposes and so everyone can follow along without needing to wait to download terabytes of data or to train the types of models that you're likely to train on high end GPUs like this.
The dataset I am going to have us use is the Dogs vs Cats dataset. Should this dataset ever disappear from being hosted by Microsoft, someone just let me know and I'll host it.
If you already have a dataset in mind that you'd rather be using (as I am sure many of you might since you're watching this), then feel free to use your dataset instead of course!
To use the dataset I am providing for example, we just want to copy it into our storage. To do this, go to your small VPS and do:
cd /mnt/storage
Now we're where we want to be, and we just need to grab this dataset, using wget
wget https://download.microsoft.com/download/3/E/1/3E1C3F21-ECDB-4869-8368-6DEBA77B919F/kagglecatsanddogs_3367a.zip
Hopefully that download will only take about 30 seconds, but you should also take this time to move your data to your server using something like SCP, or downloading your data from some other source. If you're data is local, then you'll want to use SCP to move it. Again, to use SCP, you will want to use your terminal, or an SCP client on Windows (though you can again also use bash on ubuntu on windows to use scp commands).
Should you need to use SCP, you can use the same sort of structure/syntax that we'll be using here in just 1 moment with our GPU server. Feel free to scroll down to see how it's done. Otherwise, the next thing I am going to do is have us actually spin up the GPU server!
For this, we're going to make use of Linode's stackscripts, which will automatically setup our GPU server for us, saving us time and money. If you're NOT on Linode, you can just take the stack script and treat it like a shell script, running it once your server is online. To find the stackscript, go to the left-hand side and find the stackscripts label:
From there, search for Sentdex TensorFlow-GPU and PyTorch Setup
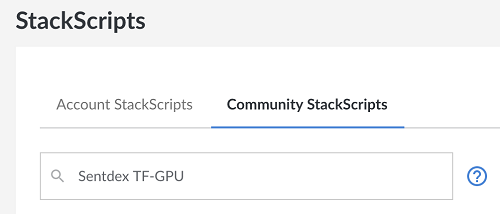
Then click on the 3 dots, and choose the deploy linode option.
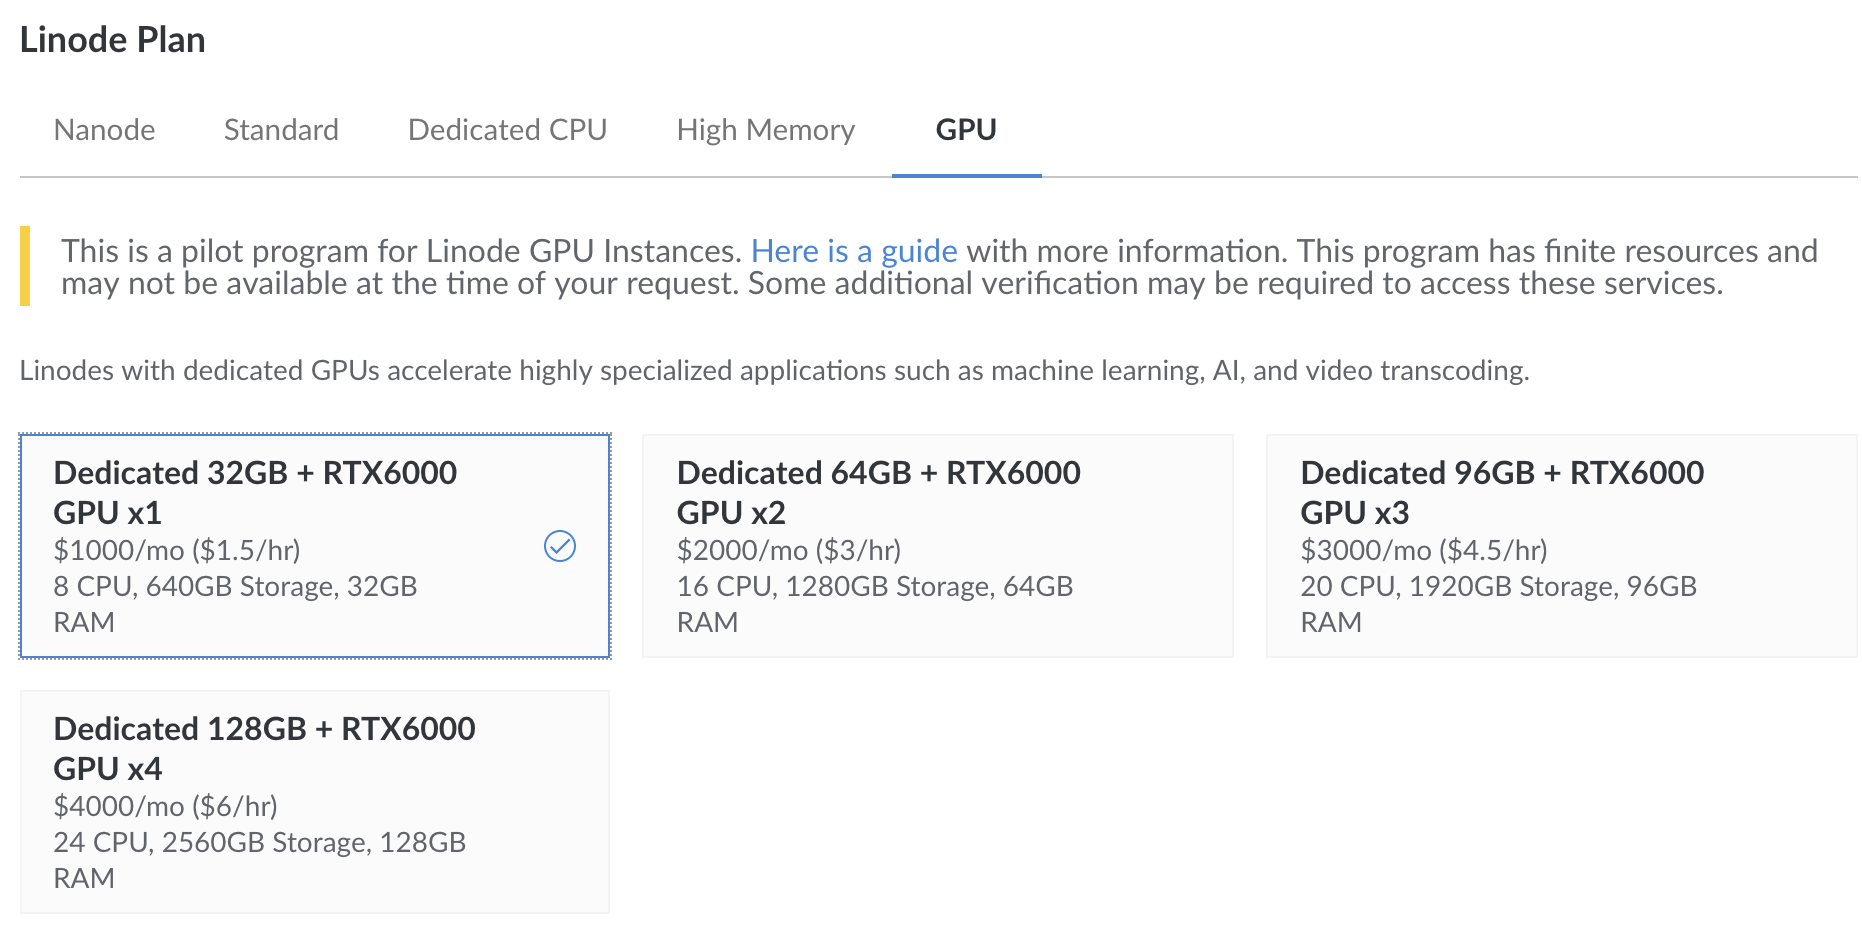
From here, pick a valid region, again, I will go with Newark NJ, then choose the GPU option tab:

Then choose how many of these RTX 6000 GPUs that you want. I will go with just one:
Again, choose a label if you'd like, set your root user password, and click "create" .... and now the clock starts!
If you see a message like:
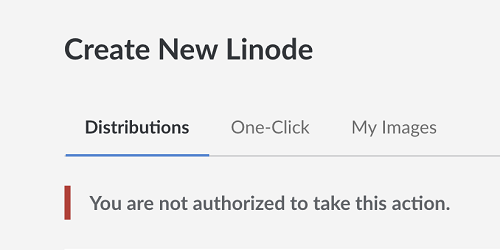
It likely means that there are no GPU instances in that region.
As you've spun up, the stackscript did its magic. If you are on some other provider, here's the stackscript code:
#!/bin/bash

# Update packages
apt-get update

# Non-interactive mode, use default answers
export DEBIAN_FRONTEND=noninteractive

# Workaround for libc6 bug - asking about service restart in non-interactive mode
# https://bugs.launchpad.net/ubuntu/+source/eglibc/+bug/935681
echo 'libc6 libraries/restart-without-asking boolean true' | debconf-set-selections

# Install Python 3.7
sudo add-apt-repository -y ppa:deadsnakes/ppa
sudo apt-get -y install python3.7 python3.7-dev
curl https://bootstrap.pypa.io/get-pip.py | sudo python3.7

# Add Nvidia repositories
wget https://developer.download.nvidia.com/compute/cuda/repos/ubuntu1804/x86_64/cuda-repo-ubuntu1804_10.0.130-1_amd64.deb
dpkg -i cuda-repo-ubuntu1804_10.0.130-1_amd64.deb
apt-key adv --fetch-keys https://developer.download.nvidia.com/compute/cuda/repos/ubuntu1804/x86_64/7fa2af80.pub
apt-get update
wget http://developer.download.nvidia.com/compute/machine-learning/repos/ubuntu1804/x86_64/nvidia-machine-learning-repo-ubuntu1804_1.0.0-1_amd64.deb
dpkg -i nvidia-machine-learning-repo-ubuntu1804_1.0.0-1_amd64.deb
apt-get update

# Install drivers, CUDA and cuDNN
apt-get -y install --no-install-recommends nvidia-driver-418
apt-get -y install --no-install-recommends cuda-10-0 libcudnn7=\*+cuda10.0 libcudnn7-dev=\*+cuda10.0
apt-get -y install --no-install-recommends libnvinfer5=5.\*+cuda10.0 libnvinfer-dev=5.\*+cuda10.0

# Install TensorFlow
pip3.7 install tensorflow-gpu

# Install PyTorch
#pip3.7 install $(curl https://pytorch.org/assets/quick-start-module.js | grep -A1 "stable,pip,linux,cuda10.0,python3.7" | grep -oP 'https.*?\.whl')
pip3.7 install torch torchvision

# Install other Python packages
pip3.7 install numpy pandas matplotlib tqdm pexpect opencv-python

# Reboot
reboot
If you've deployed via stackscript, you wont need to do anything more with the above. If you have not, then you will want to take the above code and save it to a shell file. To do that, ssh into your GPU VPS, then do:
nano setup.sh
Paste in the above, ctrl+x, yes, enter.
Then you'd want to make it executable: chmod +x setup.sh
Then run it, doing ./setup.sh
Okay, so now we've got our data server, and our GPU server. Now we want the data on our GPU server. We want to SCP it over.
SSH into your data VPS (the one with the volume attached to it).
ssh root@172.104.213.113
cd /mnt/storage (or whatever you named your dir)
Now, you can send the data, but you will need to know the IP address for your GPU server. Get this the same way you got it for your data vps.
You may also want to create some directory in your GPU server where you intend to work. For me, I will log into my GPU server, and do:
mkdir /deeplearning/
In my case, my data vps IP is: 172.104.213.113
My GPU server IP is: 45.33.87.32
So now, I want to move this one zip file, so I can just use SCP to do this. If I wanted to move an entire directory, then I would use the -r flag. Example of what I'll be doing:
scp kagglecatsanddogs_3367a.zip root@45.33.87.32:/deeplearning/
That transferred in 7 seconds for me, and that was on the slow end, since the transfer speed was slowly picking up. You should see 100mbps easily.
Again, you can also move entire directories with SCP as well, you just do scp -r /the/directory ...etc
Okay great, so now we've got our data on our GPU machine. Let's extract that data. So going to our terminal for the GPU machine:
I always forget the built in way to do this. So let's just do a:
sudo apt-get install unzip
Then we can just do:
unzip kagglecatsanddogs_3367a.zip
Alright, we've got data, we've got GPUs, let's do something! Here's a quick script that will load in the cats and dogs imagery and train a model. I just threw this together right quick, so there's nothing fancy here, but it will help us to make sure our installation and setup is all working as intended.
On the GPU server, let's do a nano modelfit.py and slap in the following code:
modelfit.py:
#import tensorflow as tf
import os
import cv2
import numpy as np
from tensorflow.keras.models import Sequential
from tensorflow.keras.layers import Conv2D, Activation, MaxPooling2D, Flatten, Dense

class DogsVSCats():
    IMG_SIZE = 50
    LR = 1e-3
    MODEL_NAME = f'dogsvscats-{LR}-CNN.model'
    CATS = "PetImages/Cat"
    DOGS = "PetImages/Dog"
    TESTING = "PetImages/Testing"
    LABELS = {CATS: 0, DOGS: 1}

    training_data = []

    def make_training_data(self):
        for label in self.LABELS:
            for f in os.listdir(label):
                if "jpg" in f:
                    try:
                        path = os.path.join(label, f)
                        img = cv2.imread(path, cv2.IMREAD_GRAYSCALE)
                        img = cv2.resize(img, (self.IMG_SIZE, self.IMG_SIZE))
                        self.training_data.append([np.array(img), self.LABELS[label]])
                    except Exception as e:
                        print(label, f, str(e))

        np.random.shuffle(self.training_data)
        np.save("training_data.npy", self.training_data)


dogsvcats = DogsVSCats()
dogsvcats.make_training_data()
print(len(dogsvcats.training_data))

training_data = np.load("training_data.npy", allow_pickle=True)
print(len(training_data))

X = np.array([i[0] for i in training_data]).reshape(-1, dogsvcats.IMG_SIZE, dogsvcats.IMG_SIZE, 1)
X = X/255.0
y = [i[1] for i in training_data]

model = Sequential()

model.add(Conv2D(32, (5, 5), input_shape=X.shape[1:]))
model.add(Activation('relu'))
model.add(MaxPooling2D(pool_size=(2, 2)))

model.add(Conv2D(64, (5, 5)))
model.add(Activation('relu'))
model.add(MaxPooling2D(pool_size=(2, 2)))

model.add(Conv2D(128, (5, 5)))
model.add(Activation('relu'))
model.add(MaxPooling2D(pool_size=(2, 2)))

model.add(Flatten())  # this converts our 3D feature maps to 1D feature vectors

model.add(Dense(512))

model.add(Dense(1))
model.add(Activation('sigmoid'))

model.compile(loss='binary_crossentropy',
              optimizer='adam',
              metrics=['accuracy'])

model.fit(X, y, batch_size=64, epochs=10, validation_split=0.3)
Save that, then we can run it with:
python3.7 modelfit.py

And yep....lightning fast...and actually far faster than my local Titan RTX card. Not sure how or why. Locally, I get 24 seconds per epoch, so this is considerably faster. Going to have to see if I can figure that one out!
Anyway, there you have it!
So what else? Well, you would probably want to train, save things like logs, your files...etc, and then you'd want to SCP your files off to your data server, shut down your GPU server, and then nuke it (destroy it).
One last thing is, if you plan to use Linode, you may have noticed that you can seemingly freely attach/detach your volumes. So one thing you can do, at least on linode, is actually have your volume that you just move to your GPU server, use the GPUs, then detach the volume, nuke the GPU server, and done. This way, there's no SCPing, and your files can basically be always where you think, you can just keep moving this volume around.
So basically, you start by attaching the volume storage to your data vps, you get your data, do whatever preprocessing you need to do, then detach the volume from your datavps, attach it to your GPU instance, and then do all your file-running and such there.
You can try this by shutting down both of your VPS machines, then simply going to your volumes, click the 3 dots, and choose detach. Wait for that to complete, click those 3 dots again, choose "attach" and then choose your GPU instance.
Now, we need to just run those 2 commands again to mount that disk.
But do not re-run the first command!! The first command creates a filesystem on the volume. If you re-do that, you'll not have your data from the previous machine!!!!!
Click those 3 dots one more time and click on the "configuration" option to get those commands that you need to copy and paste. You want to do the mkdir and mount commands. Then, change directory to those, and you can just work there. Then, when you're done, detach...and repeat as needed.
Should you decide to use this method, I still recommend having a backup, just in case you do goof. Backups are cheap. Just make one.
If you use the SCP method, just SCP your model saves and log files and whatever you want back and forth. Either way works. The SCP method will work well everywhere. The volume/attaching method is going to vary and/or not even be possible, depending on your host of choice.
Alright, that's it! I hope this was helpful and you can be up and running on some lightning fast GPUs with all the VRAM your heart desires.
My linode referral link: $20 Linode Credit.
If you have questions or need help, feel free to come join us in discord: Discord.gg/sentdex.