Kivy .kv Language cont'd
In this tutorial, we cover how to organize your presentation structure. So far, we've just shown how to add a label, but there is much more to the Kivy language than this. For example, you can either dictate what all buttons will look like, for what specific buttons in specific widgets look like, or both!
To show this, we're going to add another class, Widgets, and then we'll see how to describe what a button within a specific class should look like:
KivyVideo4.py file:
from kivy.app import App
#kivy.require("1.8.0")
from kivy.uix.label import Label
from kivy.uix.widget import Widget


class Widgets(Widget):
    pass


class SimpleKivy2(App):
    def build(self):
        return Widgets()


if __name__ == "__main__":
    SimpleKivy2().run()
We're now importing Widget, and then we're making this Widgets class, which is inheriting from the Widget class from Kivy.
Now, where we used to return a different Kivy class, we're going to instead have SimpleKivy (now called SimpleKivy2, which will correspond to my SimpleKivy2.kv file) now returning the Widgets class.
That's all for the Python code. We pass with the Widgets class because the only "code" that we want for now is just presentation code. Since we're currently using .kv files for the presentation, that's where the rest of our code will be going.
SimpleKivy2.kv file:
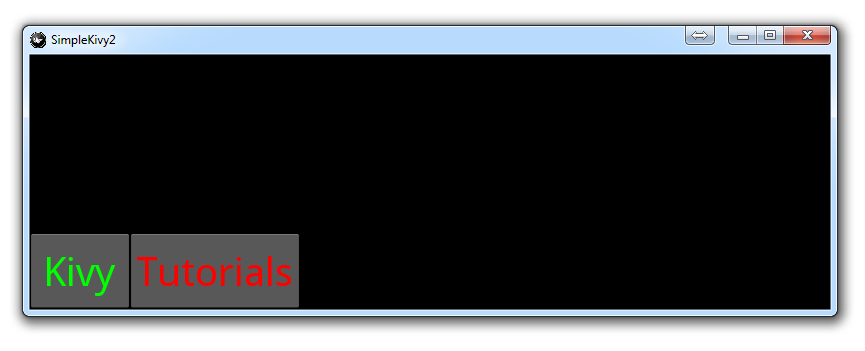
<Widgets>:
	Button:
		size: 100,75
		pos: 0,0
		text: "Kivy"
		color: 0,1,0,1
		font_size: 40

	Button:
		size: 170,75
		pos: 100,0
		text: "Tutorials"
		color: 1,0,0,1
		font_size: 40
Now, what is happening here is that
First, we see two button children. After that, we see another tab with a some parameters for those buttons.
It will be very easy to forget the required colons after the parents, and you won't really be served any explicit errors because of it.
The outcome for this:
For the buttons: Size is the width and height of the button in pixels. Then, pos is the position of the element, using the top left point as the guide. Next, "Text" is whatever we want the button to say. Then we have color, which is measured as RGB-A, or red, green, blue, alpha, and these are in values between 0 and 1. So, 0,1,0,1 is no red, full green, no blue, and full alpha (meaning the color is solid). Finally, "font_size" is the size of the font. I know you didn't see that coming!
There exists 2 quiz/question(s) for this tutorial. for access to these, video downloads, and no ads.
-
Kivy with Python tutorial for Mobile Application Development Part 1
-
Kivy Widgets and Labels
-
The Kivy .kv Language
-
Kivy .kv Language cont'd
-
Dynamic Resizable Placement
-
Layouts: Float Layout
-
Getting Mouse / Press / Touch Input
-
Simple Drawing Application
-
Builder for loading .kv Files
-
Screen Manager for Multiple Screens
-
Drawing Application with Screen Manager
-
Adding better Navigation
