Controlling the Car and getting sensor data - Self-driving cars with Carla and Python part 2
Welcome to part 2 of the Carla self-driving car tutorial series. In this tutorial, we're going to introduce you to the Python API side of Carla.
To begin, there are several types of objects in Carla. First, you of course have the "world." This is your environment. Then, you have the actors within this world. Actors are things like your car, the sensors on your car, pedestrians, and so on. Finally, we have blueprints. The blueprints are the attributes of our actors.
With this information, let's start writing some actual code. To begin, let's just make a car that spawns in and simply drives forward and then we want to see the information from a regular RGB camera that we'll place on the hood of the car.
The first few lines of code, I am just going to copy and paste from one of the other scripts in the examples directory, and I am going to be writing this code in the examples directory as well.
import glob
import os
import sys

try:
    sys.path.append(glob.glob('../carla/dist/carla-*%d.%d-%s.egg' % (
        sys.version_info.major,
        sys.version_info.minor,
        'win-amd64' if os.name == 'nt' else 'linux-x86_64'))[0])
except IndexError:
    pass

import carla
The above code is pretty simple except for the try/except bit. All this is doing here is finding the carla egg file, which is what we're using for the Carla package itself. In order to actually import carla, we need to find it, which is also why we're just throwing our file for now in the examples directory. You could also just move the required Carla files do your site-packages of Python and import this way as well.
Next, we will do a few more imports:
import random
import time
import numpy as np
import cv2
If you need to, you can install numpy and cv2:
pip install opencv-python
pip install numpy
The first thing we'll take care of immediately is the list of actors, and cleaning them up when we're done. Recall that we have both a client and server. When we start running a client on the server, we create actors on the server. If we just exit, without cleaning up, our actors will still be on the server.
actor_list = []
try:


finally:

    print('destroying actors')
    for actor in actor_list:
        actor.destroy()
    print('done.')
Here, we'll encase the main bulk of code in a try/finally. We'll put all of our logic and actor creation in the try, and then the finally bit will clean it up for us.
Next, recall we have 3 major "things" in Carla: World, blueprint, and actors. To begin, we'll connect to our server, get the world, and then access the blueprints.
actor_list = []
try:
    client = carla.Client('localhost', 2000)
    client.set_timeout(2.0)

    world = client.get_world()

    blueprint_library = world.get_blueprint_library()
Note that you need to have carla running (the shell or .exe) in order to connect.
Now that we have the blueprints, we can filter for something. For example:
bp = blueprint_library.filter('model3')[0]
This would give us the default blueprint for the Tesla model 3. Now that we have the blueprint, we could spawn this vehicle, but where? Carla comes with something like 200 spawn points, so we can just pick one of those randomly:
spawn_point = random.choice(world.get_map().get_spawn_points())
Now we can spawn that car:
vehicle = world.spawn_actor(bp, spawn_point)
We can also control the car with:
vehicle.apply_control(carla.VehicleControl(throttle=1.0, steer=0.0))
Finally, let's not forget to add this vehicle to our list of actors that we need to track and clean up:
actor_list.append(vehicle)
Great, we have a car, and we could actually run with this. Let's just run this for 5 seconds and then clean up:
time.sleep(5)
So full code up to this point:
import glob
import os
import sys
try:
    sys.path.append(glob.glob('../carla/dist/carla-*%d.%d-%s.egg' % (
        sys.version_info.major,
        sys.version_info.minor,
        'win-amd64' if os.name == 'nt' else 'linux-x86_64'))[0])
except IndexError:
    pass
import carla

import random
import time
import numpy as np
import cv2

im_width = 640
im_height = 480


def process_img(image):
    i = np.array(image.raw_data)
    i2 = i.reshape((im_height, im_width, 4))
    i3 = i2[:, :, :3]
    cv2.imshow("", i3)
    cv2.waitKey(1)
    return i3/255.0


actor_list = []
try:
    client = carla.Client('localhost', 2000)
    client.set_timeout(2.0)

    world = client.get_world()

    blueprint_library = world.get_blueprint_library()

    bp = blueprint_library.filter('model3')[0]
    print(bp)

    spawn_point = random.choice(world.get_map().get_spawn_points())

    vehicle = world.spawn_actor(bp, spawn_point)
    vehicle.apply_control(carla.VehicleControl(throttle=1.0, steer=0.0))
    actor_list.append(vehicle)

    # sleep for 5 seconds, then finish:
    time.sleep(5)

finally:

    print('destroying actors')
    for actor in actor_list:
        actor.destroy()
    print('done.')
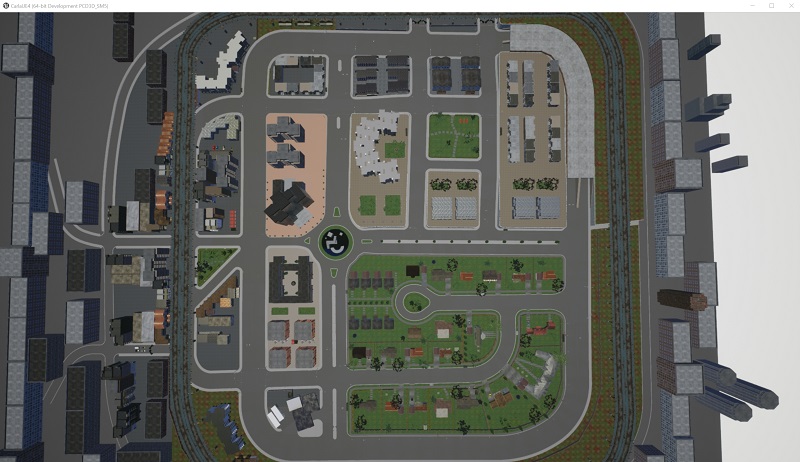
Now, you might have a hard time finding your car in 5 seconds, but you could go to the server bit visualizing the carla environment, use the mouse to look down, and then s to start zooming up. You should have an overhead look over the environment like:
We can run our script so far and, looking from above, we can probably catch it driving straight:
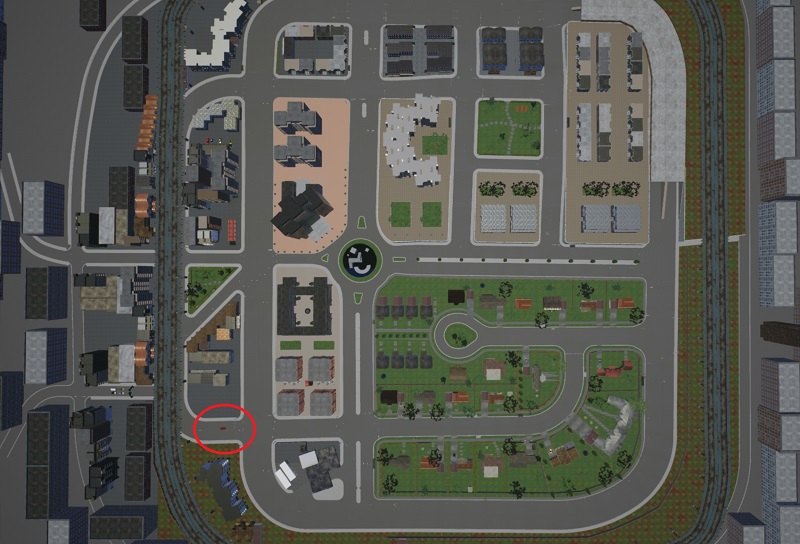
Hard to see, but, when it's moving, it's fairly easy to spot. Take note, the car *could* spawn in the tunnel. If you don't happen to see your vehicle, just run the script again.
Okay, great, things are working so far. What we want next is a camera on our car, and to figure out how to access that data. This hood camera would ideally be our main sensor. We could later incorporate other sensors too, but a hood camera seems to be a good start.
You can learn more about the large variety of sensors available and how to work with them here: Carla Sensors. For now, I'll just show how to work with the RGB camera:
At the top of our script, let's set a couple of constants:
IM_WIDTH = 640
IM_HEIGHT = 480
Now, we load in the blueprint for the sensor and set some of the attributes:
    # https://carla.readthedocs.io/en/latest/cameras_and_sensors
    # get the blueprint for this sensor
    blueprint = blueprint_library.find('sensor.camera.rgb')
    # change the dimensions of the image
    blueprint.set_attribute('image_size_x', f'{IM_WIDTH}')
    blueprint.set_attribute('image_size_y', f'{IM_HEIGHT}')
    blueprint.set_attribute('fov', '110')
Next, we need to add this to our car. First, we'll adjust the sensor from a relative position, then we'll attach this to our car. So we'll say this sensor, from it's relative position (the car), we want to move forward 2.5 and up 0.7. I don't know if this is in meters or what. Feel free to adjust these values based on the vehicle you choose, or just use mine.
    # Adjust sensor relative to vehicle
    spawn_point = carla.Transform(carla.Location(x=2.5, z=0.7))

    # spawn the sensor and attach to vehicle.
    sensor = world.spawn_actor(blueprint, spawn_point, attach_to=vehicle)
Now we want to add this sensor to our list of actors:
    # add sensor to list of actors
    actor_list.append(sensor)
Finally, we want to do something with this sensor. We want to get the imagery from it, so we want to listen.
To do something with the data that we get from the sensor, we can use a lambda function:
sensor.listen(lambda data: process_img(data))
In this case, we're going to take the data from the sensor, and pass it through some function called process_img. This doesn't exist yet, so let's make it:
def process_img(image):
    i = np.array(image.raw_data)  # convert to an array
    i2 = i.reshape((IM_HEIGHT, IM_WIDTH, 4))  # was flattened, so we're going to shape it.
    i3 = i2[:, :, :3]  # remove the alpha (basically, remove the 4th index  of every pixel. Converting RGBA to RGB)
    cv2.imshow("", i3)  # show it.
    cv2.waitKey(1)
    return i3/255.0  # normalize
Full code now is:
import glob
import os
import sys
try:
    sys.path.append(glob.glob('../carla/dist/carla-*%d.%d-%s.egg' % (
        sys.version_info.major,
        sys.version_info.minor,
        'win-amd64' if os.name == 'nt' else 'linux-x86_64'))[0])
except IndexError:
    pass
import carla

import random
import time
import numpy as np
import cv2

IM_WIDTH = 640
IM_HEIGHT = 480


def process_img(image):
    i = np.array(image.raw_data)
    i2 = i.reshape((IM_HEIGHT, IM_WIDTH, 4))
    i3 = i2[:, :, :3]
    cv2.imshow("", i3)
    cv2.waitKey(1)
    return i3/255.0


actor_list = []
try:
    client = carla.Client('localhost', 2000)
    client.set_timeout(2.0)

    world = client.get_world()

    blueprint_library = world.get_blueprint_library()

    bp = blueprint_library.filter('model3')[0]
    print(bp)

    spawn_point = random.choice(world.get_map().get_spawn_points())

    vehicle = world.spawn_actor(bp, spawn_point)
    vehicle.apply_control(carla.VehicleControl(throttle=1.0, steer=0.0))
    # vehicle.set_autopilot(True)  # if you just wanted some NPCs to drive.

    actor_list.append(vehicle)

    # https://carla.readthedocs.io/en/latest/cameras_and_sensors
    # get the blueprint for this sensor
    blueprint = blueprint_library.find('sensor.camera.rgb')
    # change the dimensions of the image
    blueprint.set_attribute('image_size_x', f'{IM_WIDTH}')
    blueprint.set_attribute('image_size_y', f'{IM_HEIGHT}')
    blueprint.set_attribute('fov', '110')

    # Adjust sensor relative to vehicle
    spawn_point = carla.Transform(carla.Location(x=2.5, z=0.7))

    # spawn the sensor and attach to vehicle.
    sensor = world.spawn_actor(blueprint, spawn_point, attach_to=vehicle)

    # add sensor to list of actors
    actor_list.append(sensor)

    # do something with this sensor
    sensor.listen(lambda data: process_img(data))

    time.sleep(5)

finally:
    print('destroying actors')
    for actor in actor_list:
        actor.destroy()
    print('done.')
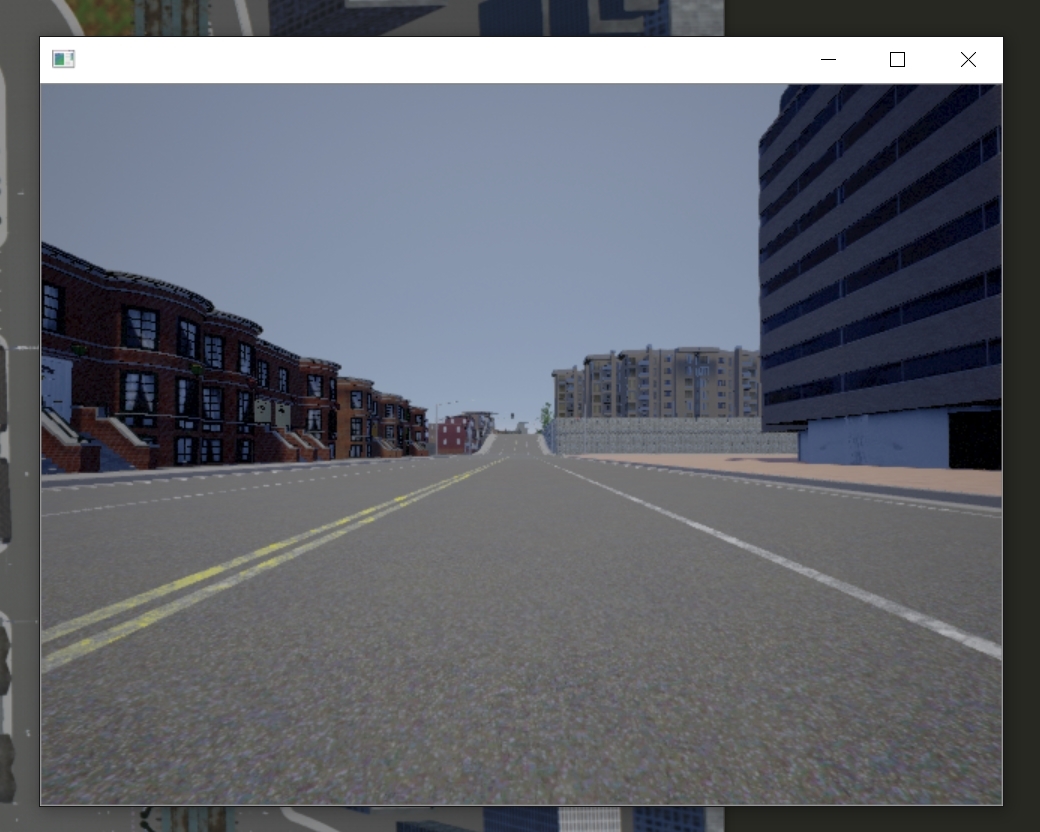
This should pop up a new window to display the camera sensor:
Great! Now, let's just slap some reinforcement learning on here! Should be easy enough...right?
-
Introduction - Self-driving cars with Carla and Python part 1
-
Controlling the Car and getting sensor data - Self-driving cars with Carla and Python part 2
-
Reinforcement Learning Environment - Self-driving cars with Carla and Python part 3
-
Reinforcement Learning Agent - Self-driving cars with Carla and Python part 4
-
Reinforcement Learning in Action - Self-driving cars with Carla and Python part 5
-
Longer-term model results - Self-driving cars with Carla and Python
