Chat Application Page - Kivy with Python Tutorials
Welcome to part 5 of the Kivy tutorials, where we're making a chatroom application. Leading up to this point, we've built out our GUI to connect to the chat room server, and now we're ready to build out this final page to display messages and send new ones!
Code up to this point:
import kivy
from kivy.app import App
from kivy.uix.label import Label
from kivy.uix.gridlayout import GridLayout
from kivy.uix.textinput import TextInput
# to use buttons:
from kivy.uix.button import Button
from kivy.uix.screenmanager import ScreenManager, Screen
import socket_client
from kivy.clock import Clock


kivy.require("1.10.1")


class ConnectPage(GridLayout):
    # runs on initialization
    def __init__(self, **kwargs):
        super().__init__(**kwargs)

        self.cols = 2  # used for our grid

        with open("prev_details.txt","r") as f:
            d = f.read().split(",")
            prev_ip = d[0]
            prev_port = d[1]
            prev_username = d[2]

        self.add_widget(Label(text='IP:'))  # widget #1, top left
        self.ip = TextInput(text=prev_ip, multiline=False)  # defining self.ip...
        self.add_widget(self.ip) # widget #2, top right

        self.add_widget(Label(text='Port:'))
        self.port = TextInput(text=prev_port, multiline=False)
        self.add_widget(self.port)

        self.add_widget(Label(text='Username:'))
        self.username = TextInput(text=prev_username, multiline=False)
        self.add_widget(self.username)

        # add our button.
        self.join = Button(text="Join")
        self.join.bind(on_press=self.join_button)
        self.add_widget(Label())  # just take up the spot.
        self.add_widget(self.join)

    def join_button(self, instance):
        port = self.port.text
        ip = self.ip.text
        username = self.username.text
        with open("prev_details.txt","w") as f:
            f.write(f"{ip},{port},{username}")
        #print(f"Joining {ip}:{port} as {username}")
        # Create info string, update InfoPage with a message and show it
        info = f"Joining {ip}:{port} as {username}"
        chat_app.info_page.update_info(info)
        chat_app.screen_manager.current = 'Info'
        Clock.schedule_once(self.connect, 1)

    # Connects to the server
    # (second parameter is the time after which this function had been called,
    #  we don't care about it, but kivy sends it, so we have to receive it)
    def connect(self, _):

        # Get information for sockets client
        port = int(self.port.text)
        ip = self.ip.text
        username = self.username.text

        if not socket_client.connect(ip, port, username, show_error):
            return

        # Create chat page and activate it
        chat_app.create_chat_page()
        chat_app.screen_manager.current = 'Chat'


class ChatPage(GridLayout):
    def __init__(self, **kwargs):
        super().__init__(**kwargs)

        self.cols = 1

        # We are going to use 1 column and 2 rows
        self.add_widget(Label(text='Fancy stuff here to come!!!', font_size=30))


# Simple information/error page
class InfoPage(GridLayout):
    def __init__(self, **kwargs):
        super().__init__(**kwargs)

        # Just one column
        self.cols = 1

        # And one label with bigger font and centered text
        self.message = Label(halign="center", valign="middle", font_size=30)

        # By default every widget returns it's side as [100, 100], it gets finally resized,
        # but we have to listen for size change to get a new one
        # more: https://github.com/kivy/kivy/issues/1044
        self.message.bind(width=self.update_text_width)

        # Add text widget to the layout
        self.add_widget(self.message)

    # Called with a message, to update message text in widget
    def update_info(self, message):
        self.message.text = message

    # Called on label width update, so we can set text width properly - to 90% of label width
    def update_text_width(self, *_):
        self.message.text_size = (self.message.width * 0.9, None)


class EpicApp(App):
    def build(self):

        # We are going to use screen manager, so we can add multiple screens
        # and switch between them
        self.screen_manager = ScreenManager()

        # Initial, connection screen (we use passed in name to activate screen)
        # First create a page, then a new screen, add page to screen and screen to screen manager
        self.connect_page = ConnectPage()
        screen = Screen(name='Connect')
        screen.add_widget(self.connect_page)
        self.screen_manager.add_widget(screen)

        # Info page
        self.info_page = InfoPage()
        screen = Screen(name='Info')
        screen.add_widget(self.info_page)
        self.screen_manager.add_widget(screen)

        return self.screen_manager

    # We cannot create chat screen with other screens, as it;s init method will start listening
    # for incoming connections, but at this stage connection is not being made yet, so we
    # call this method later
    def create_chat_page(self):
        self.chat_page = ChatPage()
        screen = Screen(name='Chat')
        screen.add_widget(self.chat_page)
        self.screen_manager.add_widget(screen)


# Error callback function, used by sockets client
# Updates info page with an error message, shows message and schedules exit in 10 seconds
# time.sleep() won't work here - will block Kivy and page with error message won't show up
def show_error(message):
    chat_app.info_page.update_info(message)
    chat_app.screen_manager.current = 'Info'
    Clock.schedule_once(sys.exit, 10)

if __name__ == "__main__":
    chat_app = EpicApp()
    chat_app.run()
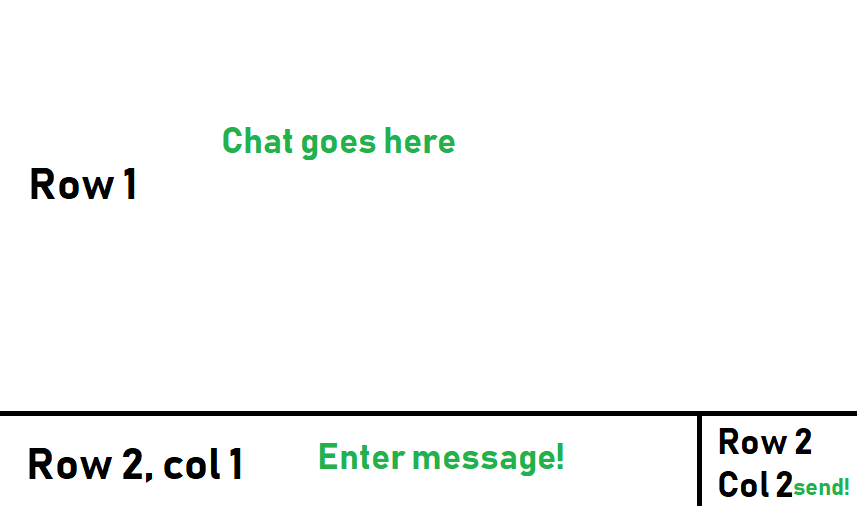
Now we want to build out the ChatPage. To begin, we want 2 rows, where the first row is most of the page, then the 2nd row is where we'll input text and then have 2 columns, where the first column takes up most of the space and the 2nd column is the submit button. Here's a beautiful paint example:
Cool, so we'll start with:
class ChatPage(GridLayout):
    def __init__(self, **kwargs):
        super().__init__(**kwargs)

        # We are going to use 1 column and 2 rows
        self.cols = 1
        self.rows = 2
Easy enough. The first row is all message history, so as messages come in, we'll update them here. For now, we'll call this a Label:
        # First row is going to be occupied by our scrollable label
        # We want it be take 90% of app height
        self.history = Label(height=Window.size[1]*0.9, size_hint_y=None)
        self.add_widget(self.history)
Here, we just set the size of this label to be 90% of the entire screen's height (Window.size[1] is the y amount, the height), reserving the other 10% for row #2. Now, for row #2:
        self.new_message = TextInput(width=Window.size[0]*0.8, size_hint_x=None, multiline=False)
        self.send = Button(text="Send")
        self.send.bind(on_press=self.send_message)
Similar logic here. For row 2, the message input takes up 80% of the width of the window, leaving the remainder of the space for our send button. Now, we have to actually add these things to our layout. Recall our main layout is 2 rows and 1 column. Thus, we actually need to add a 2 column layout to row 2. I mentioned this earlier in the series, and here's exactly how and why you might do it!
        bottom_line = GridLayout(cols=2)
        bottom_line.add_widget(self.new_message)
        bottom_line.add_widget(self.send)
        self.add_widget(bottom_line)
Easy enough! Finally, since we bound some method called send_message, we better make that before we can test things up to now:
    def send_message(self, _):
        print("send a message!!!")
Full code for ChatPage class:
class ChatPage(GridLayout):
    def __init__(self, **kwargs):
        super().__init__(**kwargs)

        # We are going to use 1 column and 2 rows
        self.cols = 1
        self.rows = 2

        # First row is going to be occupied by our scrollable label
        # We want it be take 90% of app height
        self.history = Label(height=Window.size[1]*0.9, size_hint_y=None)
        self.add_widget(self.history)

        # In the second row, we want to have input fields and Send button
        # Input field should take 80% of window width
        # We also want to bind button click to send_message method
        self.new_message = TextInput(width=Window.size[0]*0.8, size_hint_x=None, multiline=False)
        self.send = Button(text="Send")
        self.send.bind(on_press=self.send_message)

        # To be able to add 2 widgets into a layout with just one collumn, we use additional layout,
        # add widgets there, then add this layout to main layout as second row
        bottom_line = GridLayout(cols=2)
        bottom_line.add_widget(self.new_message)
        bottom_line.add_widget(self.send)
        self.add_widget(bottom_line)

    # Gets called when either Send button or Enter key is being pressed
    # (kivy passes button object here as well, but we don;t care about it)
    def send_message(self, _):
        print("send a message!!!")
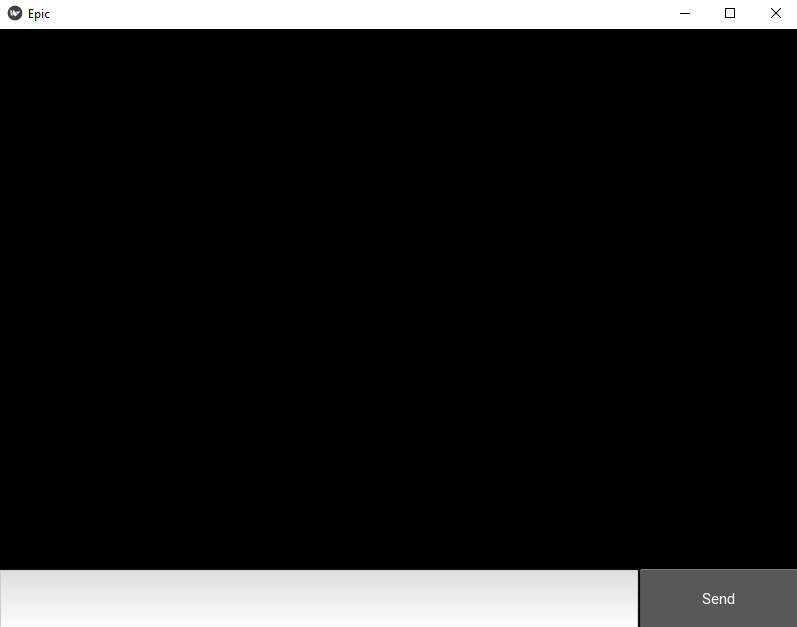
Running this and joining the server, we see:
Okay so we want to start updating the first row with actual chat messages. We can totally update a regular label, but the problem is what happens when .... we have many messages! Eventually we will overflow this label and we'd rather there be a scroll capability. So, instead of extending a Label, we will just make our own from the ScrollView from from kivy.uix.scrollview
from kivy.uix.scrollview import ScrollView
# This class is an improved version of Label
# Kivy does not provide scrollable label, so we need to create one
class ScrollableLabel(ScrollView):

    def __init__(self, **kwargs):
        super().__init__(**kwargs)

        # ScrollView does not allow us to add more than one widget, so we need to trick it
        # by creating a layout and placing two widgets inside it
        # Layout is going to have one collumn and and size_hint_y set to None,
        # so height wo't default to any size (we are going to set it on our own)
        self.layout = GridLayout(cols=1, size_hint_y=None)
        self.add_widget(self.layout)

        # Now we need two widgets - Label for chat history and 'artificial' widget below
        # so we can scroll to it every new message and keep new messages visible
        # We want to enable markup, so we can set colors for example
        self.chat_history = Label(size_hint_y=None, markup=True)
        self.scroll_to_point = Label()

        # We add them to our layout
        self.layout.add_widget(self.chat_history)
        self.layout.add_widget(self.scroll_to_point)

    # Method called externally to add new message to the chat history
    def update_chat_history(self, message):

        # First add new line and message itself
        self.chat_history.text += '\n' + message

        # Set layout height to whatever height of chat history text is + 15 pixels
        # (adds a bit of space at teh bottom)
        # Set chat history label to whatever height of chat history text is
        # Set width of chat history text to 98 of the label width (adds small margins)
        self.layout.height = self.chat_history.texture_size[1] + 15
        self.chat_history.height = self.chat_history.texture_size[1]
        self.chat_history.text_size = (self.chat_history.width * 0.98, None)

        # As we are updating above, text height, so also label and layout height are going to be bigger
        # than the area we have for this widget. ScrollView is going to add a scroll, but won't
        # scroll to the botton, nor is there a method that can do that.
        # That's why we want additional, empty widget below whole text - just to be able to scroll to it,
        # so scroll to the bottom of the layout
        self.scroll_to(self.scroll_to_point)
The comments should suffice here. Run the kivy file (with the server still running) to make sure things are still working. The methods for updating wont yet work, since we aren't calling them to yet.
Looks good for me, in the next tutorial we'll finish up this page and hopefully have a nice, pretty, working, chat application!
Full code up to this point:
import kivy
from kivy.app import App
from kivy.uix.label import Label
from kivy.uix.gridlayout import GridLayout
from kivy.uix.textinput import TextInput
# to use buttons:
from kivy.uix.button import Button
from kivy.uix.screenmanager import ScreenManager, Screen
import socket_client
from kivy.clock import Clock
from kivy.core.window import Window
from kivy.uix.scrollview import ScrollView


kivy.require("1.10.1")


class ConnectPage(GridLayout):
    # runs on initialization
    def __init__(self, **kwargs):
        super().__init__(**kwargs)

        self.cols = 2  # used for our grid

        with open("prev_details.txt","r") as f:
            d = f.read().split(",")
            prev_ip = d[0]
            prev_port = d[1]
            prev_username = d[2]

        self.add_widget(Label(text='IP:'))  # widget #1, top left
        self.ip = TextInput(text=prev_ip, multiline=False)  # defining self.ip...
        self.add_widget(self.ip) # widget #2, top right

        self.add_widget(Label(text='Port:'))
        self.port = TextInput(text=prev_port, multiline=False)
        self.add_widget(self.port)

        self.add_widget(Label(text='Username:'))
        self.username = TextInput(text=prev_username, multiline=False)
        self.add_widget(self.username)

        # add our button.
        self.join = Button(text="Join")
        self.join.bind(on_press=self.join_button)
        self.add_widget(Label())  # just take up the spot.
        self.add_widget(self.join)

    def join_button(self, instance):
        port = self.port.text
        ip = self.ip.text
        username = self.username.text
        with open("prev_details.txt","w") as f:
            f.write(f"{ip},{port},{username}")
        #print(f"Joining {ip}:{port} as {username}")
        # Create info string, update InfoPage with a message and show it
        info = f"Joining {ip}:{port} as {username}"
        chat_app.info_page.update_info(info)
        chat_app.screen_manager.current = 'Info'
        Clock.schedule_once(self.connect, 1)

    # Connects to the server
    # (second parameter is the time after which this function had been called,
    #  we don't care about it, but kivy sends it, so we have to receive it)
    def connect(self, _):

        # Get information for sockets client
        port = int(self.port.text)
        ip = self.ip.text
        username = self.username.text

        if not socket_client.connect(ip, port, username, show_error):
            return

        # Create chat page and activate it
        chat_app.create_chat_page()
        chat_app.screen_manager.current = 'Chat'


# This class is an improved version of Label
# Kivy does not provide scrollable label, so we need to create one
class ScrollableLabel(ScrollView):

    def __init__(self, **kwargs):
        super().__init__(**kwargs)

        # ScrollView does not allow us to add more than one widget, so we need to trick it
        # by creating a layout and placing two widgets inside it
        # Layout is going to have one collumn and and size_hint_y set to None,
        # so height wo't default to any size (we are going to set it on our own)
        self.layout = GridLayout(cols=1, size_hint_y=None)
        self.add_widget(self.layout)

        # Now we need two wodgets - Label for chat history and 'artificial' widget below
        # so we can scroll to it every new message and keep new messages visible
        # We want to enable markup, so we can set colors for example
        self.chat_history = Label(size_hint_y=None, markup=True)
        self.scroll_to_point = Label()

        # We add them to our layout
        self.layout.add_widget(self.chat_history)
        self.layout.add_widget(self.scroll_to_point)

    # Methos called externally to add new message to the chat history
    def update_chat_history(self, message):

        # First add new line and message itself
        self.chat_history.text += '\n' + message

        # Set layout height to whatever height of chat history text is + 15 pixels
        # (adds a bit of space at teh bottom)
        # Set chat history label to whatever height of chat history text is
        # Set width of chat history text to 98 of the label width (adds small margins)
        self.layout.height = self.chat_history.texture_size[1] + 15
        self.chat_history.height = self.chat_history.texture_size[1]
        self.chat_history.text_size = (self.chat_history.width * 0.98, None)

        # As we are updating above, text height, so also label and layout height are going to be bigger
        # than the area we have for this widget. ScrollView is going to add a scroll, but won't
        # scroll to the botton, nor there is a method that can do that.
        # That's why we want additional, empty wodget below whole text - just to be able to scroll to it,
        # so scroll to the bottom of the layout
        self.scroll_to(self.scroll_to_point)


class ChatPage(GridLayout):
    def __init__(self, **kwargs):
        super().__init__(**kwargs)

        # We are going to use 1 column and 2 rows
        self.cols = 1
        self.rows = 2

        # First row is going to be occupied by our scrollable label
        # We want it be take 90% of app height
        self.history = ScrollableLabel(height=Window.size[1]*0.9, size_hint_y=None)
        self.add_widget(self.history)

        # In the second row, we want to have input fields and Send button
        # Input field should take 80% of window width
        # We also want to bind button click to send_message method
        self.new_message = TextInput(width=Window.size[0]*0.8, size_hint_x=None, multiline=False)
        self.send = Button(text="Send")
        self.send.bind(on_press=self.send_message)

        # To be able to add 2 widgets into a layout with just one collumn, we use additional layout,
        # add widgets there, then add this layout to main layout as second row
        bottom_line = GridLayout(cols=2)
        bottom_line.add_widget(self.new_message)
        bottom_line.add_widget(self.send)
        self.add_widget(bottom_line)

    # Gets called when either Send button or Enter key is being pressed
    # (kivy passes button object here as well, but we don;t care about it)
    def send_message(self, _):
        print("send a message!!!")


# Simple information/error page
class InfoPage(GridLayout):
    def __init__(self, **kwargs):
        super().__init__(**kwargs)

        # Just one column
        self.cols = 1

        # And one label with bigger font and centered text
        self.message = Label(halign="center", valign="middle", font_size=30)

        # By default every widget returns it's side as [100, 100], it gets finally resized,
        # but we have to listen for size change to get a new one
        # more: https://github.com/kivy/kivy/issues/1044
        self.message.bind(width=self.update_text_width)

        # Add text widget to the layout
        self.add_widget(self.message)

    # Called with a message, to update message text in widget
    def update_info(self, message):
        self.message.text = message

    # Called on label width update, so we can set text width properly - to 90% of label width
    def update_text_width(self, *_):
        self.message.text_size = (self.message.width * 0.9, None)


class EpicApp(App):
    def build(self):

        # We are going to use screen manager, so we can add multiple screens
        # and switch between them
        self.screen_manager = ScreenManager()

        # Initial, connection screen (we use passed in name to activate screen)
        # First create a page, then a new screen, add page to screen and screen to screen manager
        self.connect_page = ConnectPage()
        screen = Screen(name='Connect')
        screen.add_widget(self.connect_page)
        self.screen_manager.add_widget(screen)

        # Info page
        self.info_page = InfoPage()
        screen = Screen(name='Info')
        screen.add_widget(self.info_page)
        self.screen_manager.add_widget(screen)

        return self.screen_manager

    # We cannot create chat screen with other screens, as it;s init method will start listening
    # for incoming connections, but at this stage connection is not being made yet, so we
    # call this method later
    def create_chat_page(self):
        self.chat_page = ChatPage()
        screen = Screen(name='Chat')
        screen.add_widget(self.chat_page)
        self.screen_manager.add_widget(screen)


# Error callback function, used by sockets client
# Updates info page with an error message, shows message and schedules exit in 10 seconds
# time.sleep() won't work here - will block Kivy and page with error message won't show up
def show_error(message):
    chat_app.info_page.update_info(message)
    chat_app.screen_manager.current = 'Info'
    Clock.schedule_once(sys.exit, 10)

if __name__ == "__main__":
    chat_app = EpicApp()
    chat_app.run()
-
Introduction to Kivy, a multi-platform GUI library for computers (Windows, Linux, Mac) and Mobile (iOS, Android) - Kivy with Python Tutorials
-
Buttons and Events - Kivy with Python Tutorials
-
Changing screens/views/pages with ScreenManager - Kivy with Python Tutorials
-
Scheduling tasks/functions/methods- Kivy with Python Tutorials
-
Chat Application Page - Kivy with Python Tutorials
-
Finishing Chat Application - Kivy with Python Tutorials
-
Packaging and Deployment (PyInstaller, Buildozer) - Kivy with Python Tutorials
