Vision API continued - Google Cloud Tutorial
Welcome to part 3 of the Google Cloud tutorial series. In this tutorial, we're going to address more about the vision API.
What we've seen so far is just a quick, general, "idea" of what our image contains, but the vision API gives us quite a bit more. To begin, again, you can use any image you like for this, but I would like to illustrate a quick method for just seeing if your image happens to have any text and, if so, what that text is. To do this, we'll use the following image:
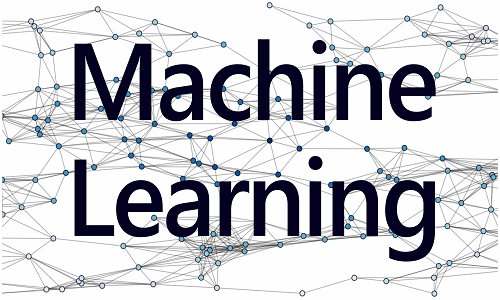
To get this, do wget https://pythonprogramming.net/static/images/categories/machine-learning-playlist.png.
Running similar code to before, only changing the image:
import io
from google.cloud import vision

vision_client = vision.Client()
file_name = 'machine-learning-playlist.png'

with io.open(file_name, 'rb') as image_file:
    content = image_file.read()
    image = vision_client.image(
        content=content, )
We could investigate our image object a bit further:
dir(image)
['__class__', '__delattr__', '__dict__', '__doc__', '__format__', '__getattribute__', '__hash__', '__init__', '__module__', '__new__', '__reduce__', '__reduce_ex__', '__repr__', '__setattr__', '__sizeof__', '__str__', '__subclasshook__', '__weakref__', '_content', '_detect_annotation', '_detect_annotation_from_pb', '_source', 'as_dict', 'client', 'content', 'detect', 'detect_crop_hints', 'detect_faces', 'detect_full_text', 'detect_labels', 'detect_landmarks', 'detect_logos', 'detect_properties', 'detect_safe_search', 'detect_text', 'detect_web', 'source']
This will give us all of the methods (if you're in an interactive mode, if not, then you would do print(dir(image))). As you can see, there are quite a few, and I imagine more might get added over time. Regardless, there are a few interesting ones like detect_logos, detect_landmarks, and detect_text. Let's try that last one for now, but also lets see what we'd get from that:
dir(image.detect_text())
>>> dir(image.detect_text())

['__add__', '__class__', '__contains__', '__delattr__', '__delitem__', '__delslice__', '__doc__', '__eq__', '__format__', '__ge__', '__getattribute__', '__getitem__', '__getslice__', '__gt__', '__hash__', '__iadd__', '__imul__', '__init__', '__iter__', '__le__', '__len__', '__lt__', '__mul__', '__ne__', '__new__', '__reduce__', '__reduce_ex__', '__repr__', '__reversed__', '__rmul__', '__setattr__', '__setitem__', '__setslice__', '__sizeof__', '__str__', '__subclasshook__', 'append', 'count', 'extend', 'index', 'insert', 'pop', 'remove', 'reverse', 'sort']
Interesting, we see a bunch of methods that clearly suggest this is an iterable. Let's check it out:
for text in image.detect_text():
    print(text.description)
u'Machine\nLearning\n'
u'Machine'
u'Learning'
As you can see, the first found text is the full text, then we have each word separately. In this case, we'd use this method moreso if our image might just happen to have some text, but we might also have an image that we know is just a bunch of text, like a scanned page...etc. To do this, let's consider a new image:
To get this, do wget https://pythonprogramming.net/static/downloads/google-cloud-tutorials/block-of-text.png.
import io
from google.cloud import vision

vision_client = vision.Client()
file_name = 'block-of-text.png'

with io.open(file_name, 'rb') as image_file:
    content = image_file.read()
    image = vision_client.image(
        content=content, )

print(image.detect_full_text().text)
What you should get back here is the text that is contained in the image (including new lines even).
There are many other methods here, and I can't go through all of them, but I encourage you to investigate with dir() to find other interesting things. One more thing I'll point out is the .score attribute that quite a few methods will produce. For example, when we do:
import io
from google.cloud import vision

vision_client = vision.Client()
file_name = '375px-Guido_van_Rossum_OSCON_2006_cropped.png'

with io.open(file_name, 'rb') as image_file:
    content = image_file.read()
    image = vision_client.image(
        content=content, )

labels = image.detect_labels()
for label in labels:
    print(label.description, label.score)
(u'hair', 0.9756743907928467)
(u'face', 0.9537844657897949)
(u'person', 0.9195896983146667)
(u'facial hair', 0.9065206050872803)
(u'nose', 0.8576061725616455)
(u'chin', 0.8183086514472961)
(u'hairstyle', 0.8074049353599548)
(u'beard', 0.7863172292709351)
(u'head', 0.7453241944313049)
(u'senior citizen', 0.7407116889953613)
We could also include label.score, which will give us a sort of "confidence" about whether or not that label is actually present in the image. Doing this also suggests to us that the labels are provided to us based on descending scores.
For now, however, we're going to move on to another API, the Natural Language API.
