OpenGL with PyOpenGL introduction and creation of Rotating Cube
When I first began looking into OpenGL with Python, my main goal was to figure out how to make a rotating cube. I don't think I am alone, since this seems to be the pinnacle of understanding the basics of OpenGL. As such, I have compiled this first video to include everything from acquiring Python, PyOpenGL, and PyGame, to creating the necessary code to make a rotating cube. This first tutorial is quite long, but I wanted to go ahead and put everything into this video. I had a very hard time figuring out OpenGL, mainly because most of the OpenGL with PyOpenGL tutorials that I could find were clearly written for someone who already knew OpenGL. I did not, so this was a massive hurdle for me. Hopefully I can help you all learn it much faster than I did.
First off, PyOpenGL is just some Python bindings (some Python code that acts like a sort of wrapper around native code), so you can manipulate OpenGL within the context of Python. OpenGL is a cross-language API, so you can take your knowledge of OpenGL to other languages.
So, the way OpenGL works is you just specify the objects within space. For a cube, for example, you specify the "corners." Corners are referred to as vertices (plural) or as a vertex (singular). You may also see them referred to as a node (singular) or nodes (plural).
Once you define the vertices, you can then do things with them. In this example, we want to draw lines between them. Defining the vertices is done with a simple list or tuple in Python. You can then pre-define some rules like what vertices make up a "surface" and between what vertices are the "edges," or lines that we want to have drawn between the vertices.
Once you do that, then you're ready to write the OpenGL code. To do this, you have glBegin and glEnd statements that you call, and between these is where the OpenGL-specific code goes. In the glBegin statement, you specify the "type" of code that you are about to pass. These are constants, and contain things like GL_QUADS or GL_LINES. This basically notifies OpenGL how you want it to handle your statements.
So that's the abstract concept of how OpenGL works, let's go ahead and do it!
First, you will need to have the following:
Python PyOpenGL PyGameIf you are a Windows user, then I highly recommend downloading PyGame and PyOpenGL from this source of Windows binaries for Python Modules. Just save that link to your bookmarks. Super useful website.
Once you have everything, go ahead and open up IDLE and type in:
import pygame
import OpenGL
If you can type those statements and run them without any errors, then you are ready to proceed. If you are getting errors, something went wrong. Most of the time, the error is either you've downloaded the wrong Python version of PyGame or OpenGL, or the wrong bit version. So, if you are using 32 bit Python, you need to use 32 bit modules, and so on. Even if your operating system is a 64 bit OS, you may still find you're running a 32 bit version of Python. I highly recommend using 64 bit Python if you can, 32 bit is limited to 2GB of ram, which is quite the limitation. If you have a 32 bit OS, then you cannot use 64 bit.
Alright, now let's get into the code! If you still have the import pygame and import OpenGL code, erase that and start completely blank.
First, we're going to do some imports:
import pygame
from pygame.locals import *
from OpenGL.GL import *
from OpenGL.GLU import *
We're importing all of PyGame here, and then all of the PyGame.locals. This is some typical PyGame code. If you want to learn a bunch more about PyGame, check out the PyGame Python programming series I offer here.
Next, we import OpenGL.GL and OpenGL.GLU. OpenGL.GL is just your typical OpenGL functions, then OpenGL.GLU is some of the more "fancy" OpenGL functions.
For the first few videos, I go ahead and miss-spell vertices. Oops.
vertices= (
    (1, -1, -1),
    (1, 1, -1),
    (-1, 1, -1),
    (-1, -1, -1),
    (1, -1, 1),
    (1, 1, 1),
    (-1, -1, 1),
    (-1, 1, 1)
    )
Here, we've defined the location (x,y,z) of each vertex. I think it is best to envision this in "units." Try to think of these locations "spatially." With a cube, there are 8 "nodes" or vertices.
Next, we're ready to define the edges:
edges = (
    (0,1),
    (0,3),
    (0,4),
    (2,1),
    (2,3),
    (2,7),
    (6,3),
    (6,4),
    (6,7),
    (5,1),
    (5,4),
    (5,7)
    )
Each of the above tuples contains two numbers. Those numbers correspond to a vertex, and the "edge" is going to be drawn between those two vertices. We start with 0, since that's how Python and most programming languages work (the first element is 0). So, 0 corresponds to the first vertex we defined (1, -1, -1)... and so on.
Now that we've got that, let's work on the required code to work with OpenGL to actually generate a cube:
def Cube():
    glBegin(GL_LINES)
    for edge in edges:
        for vertex in edge:
            glVertex3fv(vertices[vertex])
    glEnd()
First, we start off our function as we would any other function.
Next, since this is just a function containing OpenGL code, we go ahead and open with a glBegin(GL_LINES), this notifies OpenGL that we're about to throw some code at it, and then the GL_LINES tells OpenGL how to handle that code, which, in this case, means it will treat the code as line-drawing code.
From there, we say for edge in edges, which corresponds to each pair of vertices in our edges list. Since each edge contains 2 vertices, we then say for vertex in edge, do glVertex3fv(vertices[vertex]), which performs the glVertex3fv OpenGL function on the [vertex] element of the vertices tuple.
As such, what ends up being passed through OpenGL with the constant of GL_LINES is:
glVertex3fv((1, -1, -1))
glVertex3fv((1, 1, -1))
...and so on. OpenGL, knowing that we're drawing lines here will draw lines between those points.
After running through all edges, we're done, so we call glEnd() to notify OpenGL that we're done telling it what to do. For each "type" of OpenGL code that you plan to use, you will need opening and closing GL commands like this.
That's it for our cube function. This function will create the cube, but now we want to display the cube and specify our perspective in the environment:
def main():
    pygame.init()
    display = (800,600)
    pygame.display.set_mode(display, DOUBLEBUF|OPENGL)
This is mostly typical PyGame code. If you want to understand it more, check out the PyGame Python programming series.
The only major difference here is we're adding another "parameter" looking thing after "display" in the pygame.display.set_mode. These are actually constants, notifying PyGame that we're going to be feeding it OpenGL code, as well as DOUBLEBUF, which stands for double buffer, and is a type of buffering where there are two buffers to comply with monitor refresh rates. Take note that pipe ("|") that is used to separate constants. It will be used again later to separate constants.
Next, within this main() function:
gluPerspective(45, (display[0]/display[1]), 0.1, 50.0)
gluPerspective is code that determines the perspective, as it sounds. The first value is the degree value of the field of view (fov). The second value is the aspect ratio, which is the display width divided by the display height. The next two values here are the znear and zfar, which are the near and far clipping planes.
What in the heck is a clipping plane? If you're like me, that means nothing to you at this point. Basically, a clipping plane is at what distance does the object appear/disappear. So the object will only be visible between these two values, and both values are supposed to be positive, because they are in relation to your perspective, not in relation to your actual location within the 3D environment.
So, we're having the close clipping happening at 0.1 units and the far clipping plane as 50.0 units away. This will make more sense later, once we've displayed the cube and we can control where we are in the 3D environment, then you will see the clipping planes in action.
Next up, we have:
glTranslatef(0.0,0.0, -5)
glTranslatef, officially "multiplies the current matrix by a translation matrix." OK cool, again that means nothing to me. So, in layman's terms, this basically moves you, and the parameters are x, y and z. So above, we're moving back 5 unites. This is so we can actually see the cube when we bring it up. Otherwise, we'd be a bit too close.
Now let's write our typical event loop for PyGame. Again, if you want to learn more, check out the aforementioned tutorial.
    while True:
        for event in pygame.event.get():
            if event.type == pygame.QUIT:
                pygame.quit()
                quit()
This is a simple PyGame event loop that is only checking for any exit, which is only looking for the literal "x" out. Continuing under this "while" statement:
        glRotatef(1, 3, 1, 1)
        glClear(GL_COLOR_BUFFER_BIT|GL_DEPTH_BUFFER_BIT)
        Cube()
        pygame.display.flip()
        pygame.time.wait(10)
glRotatef multiplies the current matrix by a rotation matrix. The parameters here are angle, x, y and z.
Then we have glClear, which is like any other clearing function. We specify a couple of constants here, which is telling OpenGL what exactly we're clearing.
Once we have a clean "canvas" if you will, we then call our Cube() function.
After that, we call pygame.display.flip(), which updates our display.
Finally we throw in a short wait with pygame.time.wait(10).
That's it for our main function, and now we just call a main() at the end to make it all work. Just in case you got lost somewhere, here's the entire script put together:
import pygame
from pygame.locals import *

from OpenGL.GL import *
from OpenGL.GLU import *

verticies = (
    (1, -1, -1),
    (1, 1, -1),
    (-1, 1, -1),
    (-1, -1, -1),
    (1, -1, 1),
    (1, 1, 1),
    (-1, -1, 1),
    (-1, 1, 1)
    )

edges = (
    (0,1),
    (0,3),
    (0,4),
    (2,1),
    (2,3),
    (2,7),
    (6,3),
    (6,4),
    (6,7),
    (5,1),
    (5,4),
    (5,7)
    )


def Cube():
    glBegin(GL_LINES)
    for edge in edges:
        for vertex in edge:
            glVertex3fv(verticies[vertex])
    glEnd()


def main():
    pygame.init()
    display = (800,600)
    pygame.display.set_mode(display, DOUBLEBUF|OPENGL)

    gluPerspective(45, (display[0]/display[1]), 0.1, 50.0)

    glTranslatef(0.0,0.0, -5)

    while True:
        for event in pygame.event.get():
            if event.type == pygame.QUIT:
                pygame.quit()
                quit()

        glRotatef(1, 3, 1, 1)
        glClear(GL_COLOR_BUFFER_BIT|GL_DEPTH_BUFFER_BIT)
        Cube()
        pygame.display.flip()
        pygame.time.wait(10)


main()
The end result should be:
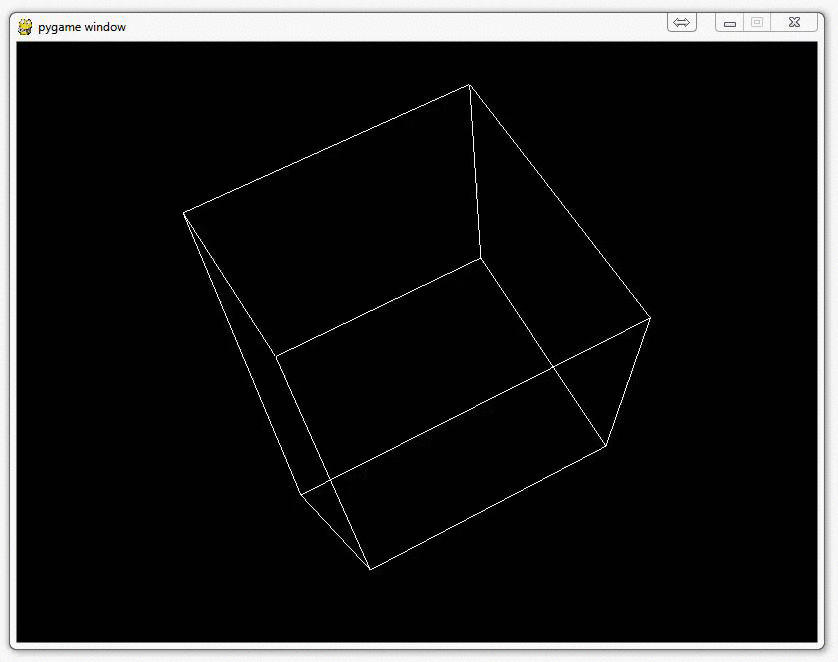
Awesome and congratulations on your PyOpenGL cube! There is obviously a lot more to learn, and some of these functions may not make too much sense just yet. I'll be going over those a bit more in depth soon.
-
OpenGL with PyOpenGL introduction and creation of Rotating Cube
-
Coloring Surfaces as well as understand some of the basic OpenGL code
-
Understanding navigation within the 3D environment via OpenGL
-
Moving the player automatically towards the cube
-
Random Cube Position
-
Adding Many Cubes to our Game
-
Adding a ground in OpenGL
-
Infinite flying cubes
-
Optimizing the processing for infinite cubes
