Garage Stoplight GPIO Project - Raspberry Pi tutorial
Hello and welcome to part 8 of the Raspberry Pi tutorial series. In this tutorial, we're going to put together what we've learned so far to create a garage stop-light.
The idea of a garage stop-light is to show green when you have plenty of room to pull your car forward in your garage, and then turn yellow as you approach the fully forward position, and then red when you should stop. We're going to build this system with our Raspberry Pi, and use some distances that we can easily test.
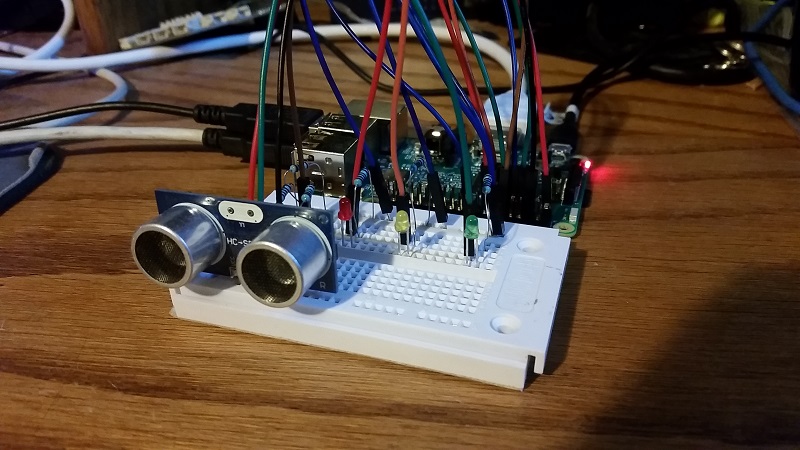
To start, we'll just leave the distance sensor hooked up as is, but now we're going to add the light circuits, only this time we have three. Here's how I set mine up:
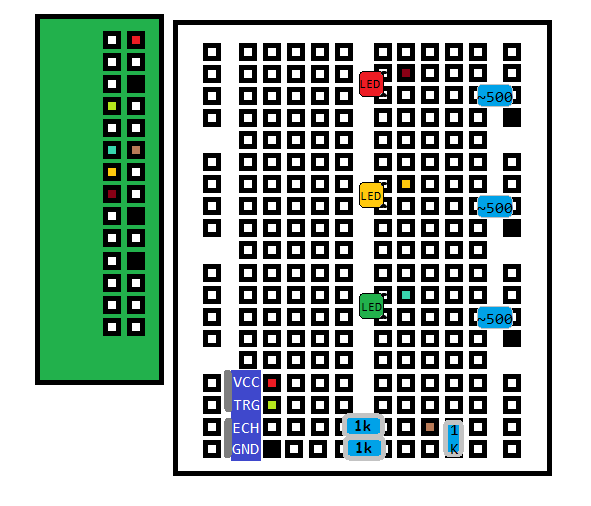
Same as in the previous tutorials, the filled in boxes are the jumper wires by color, and the boxes themselves are the pins on the pi or the openings on the breadboard. The filled in blue blobs are the resistors, the leds are labeled. Black boxes are ground.
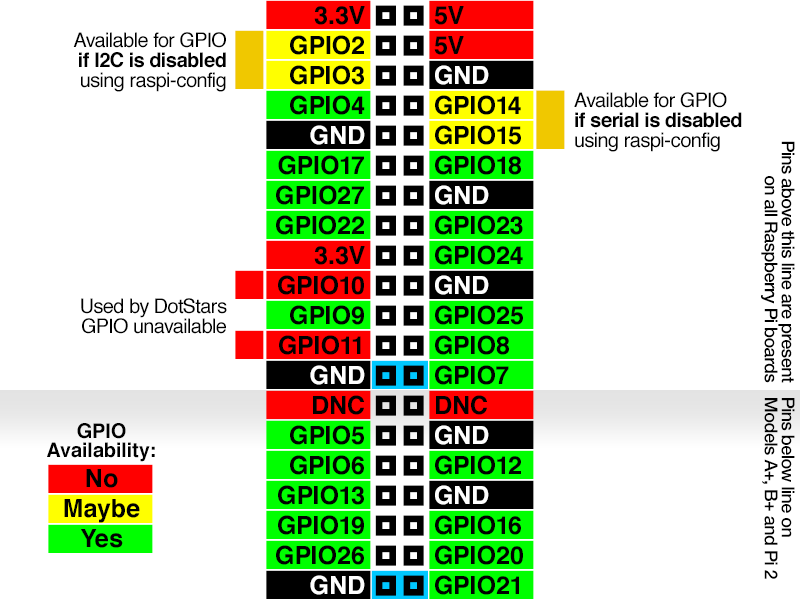
Once you have everything hooked up and you're confident you've not messed anything up, you can power on your Raspberry Pi. You may want to re-reference the Adafruit image shared earlier:
Next, we'll modify our previous distance sensor script a bit, which was:
import RPi.GPIO as GPIO
import time

GPIO.setmode(GPIO.BCM)

TRIG = 4
ECHO = 18

GPIO.setup(TRIG,GPIO.OUT)
GPIO.setup(ECHO,GPIO.IN)

GPIO.output(TRIG, True)
time.sleep(0.00001)
GPIO.output(TRIG, False)

while GPIO.input(ECHO) == False:
    start = time.time()

while GPIO.input(ECHO) == True:
    end = time.time()

sig_time = end-start

#CM:
distance = sig_time / 0.000058

#inches:
#distance = sig_time / 0.000148

print('Distance: {} centimeters'.format(distance))

GPIO.cleanup()
First, let's turn this more into a function:
import RPi.GPIO as GPIO
import time

GPIO.setwarnings(False)
# doing this first, since we're using a while True.
GPIO.cleanup()

GPIO.setmode(GPIO.BCM)
TRIG = 4
ECHO = 18

GPIO.setup(TRIG,GPIO.OUT)
GPIO.setup(ECHO,GPIO.IN)


def get_distance():


    GPIO.output(TRIG, True)
    time.sleep(0.00001)
    GPIO.output(TRIG, False)

    while GPIO.input(ECHO) == False:
        start = time.time()

    while GPIO.input(ECHO) == True:
        end = time.time()

    sig_time = end-start

    #CM:
    distance = sig_time / 0.000058

    #inches:
    #distance = sig_time / 0.000148
    #print('Distance: {} centimeters'.format(distance))

    return distance


while True:
    distance = get_distance()
    time.sleep(0.05)
Make sure you remove the cleanup part from the code that now is in the function, since we're going to run this in a loop. Do note you want at least SOME sleep time between distance checking so the sensor doesn't throwup on itself. If you don't let it sleep for a moment, it will just get overwhelmed and shutdown. Now, we just need some simple code that turns on lights. For example, a green light, assuming you plugged the power for the green light into BCM pin #17:
GREEN = 17
GPIO.setup(GREEN,GPIO.OUT)

def green_light():
    GPIO.output(GREEN, GPIO.HIGH)
Now we could just copy and paste this for the other lights, but nothing is turning them off if we did change lights, so:
GREEN = 17
GPIO.setup(GREEN,GPIO.OUT)

def green_light():
    GPIO.output(GREEN, GPIO.HIGH)
    GPIO.output(YELLOW, GPIO.LOW)
    GPIO.output(RED, GPIO.LOW)
Okay, now we really can just do some copying and pasting and do this for all lights:
GREEN = 17
YELLOW = 27
RED = 22

GPIO.setup(GREEN,GPIO.OUT)
GPIO.setup(YELLOW,GPIO.OUT)
GPIO.setup(RED,GPIO.OUT)


def green_light():
    GPIO.output(GREEN, GPIO.HIGH)
    GPIO.output(YELLOW, GPIO.LOW)
    GPIO.output(RED, GPIO.LOW)

def yellow_light():
    GPIO.output(GREEN, GPIO.LOW)
    GPIO.output(YELLOW, GPIO.HIGH)
    GPIO.output(RED, GPIO.LOW)

def red_light():
    GPIO.output(GREEN, GPIO.LOW)
    GPIO.output(YELLOW, GPIO.LOW)
    GPIO.output(RED, GPIO.HIGH)
Then, our while loop could look something like:
while True:
    distance = get_distance()
    time.sleep(0.05)
    print(distance)

    if distance >= 30:
        green_light()
    elif 30 > distance > 10:
        yellow_light()
    elif distance <= 10:
        red_light()
So, if the distance is greater than or equal to 30 CM, we show a green light. If it's between 10 and 30 CM, we'll turn yellow, and then we'll turn red for less than or equal to 10 CM. All together now:
import RPi.GPIO as GPIO
import time

GPIO.setwarnings(False)
# doing this first, since we're using a while True.
GPIO.cleanup()

GPIO.setmode(GPIO.BCM)
TRIG = 4
ECHO = 18

GREEN = 17
YELLOW = 27
RED = 22

GPIO.setup(TRIG,GPIO.OUT)
GPIO.setup(ECHO,GPIO.IN)

GPIO.setup(GREEN,GPIO.OUT)
GPIO.setup(YELLOW,GPIO.OUT)
GPIO.setup(RED,GPIO.OUT)


def green_light():
    GPIO.output(GREEN, GPIO.HIGH)
    GPIO.output(YELLOW, GPIO.LOW)
    GPIO.output(RED, GPIO.LOW)

def yellow_light():
    GPIO.output(GREEN, GPIO.LOW)
    GPIO.output(YELLOW, GPIO.HIGH)
    GPIO.output(RED, GPIO.LOW)

def red_light():
    GPIO.output(GREEN, GPIO.LOW)
    GPIO.output(YELLOW, GPIO.LOW)
    GPIO.output(RED, GPIO.HIGH)


def get_distance():


    GPIO.output(TRIG, True)
    time.sleep(0.00001)
    GPIO.output(TRIG, False)

    while GPIO.input(ECHO) == False:
        start = time.time()

    while GPIO.input(ECHO) == True:
        end = time.time()

    sig_time = end-start

    #CM:
    distance = sig_time / 0.000058

    #inches:
    #distance = sig_time / 0.000148
    #print('Distance: {} centimeters'.format(distance))

    return distance


while True:
    distance = get_distance()
    time.sleep(0.05)
    print(distance)

    if distance >= 30:
        green_light()
    elif 30 > distance > 10:
        yellow_light()
    elif distance <= 10:
        red_light()
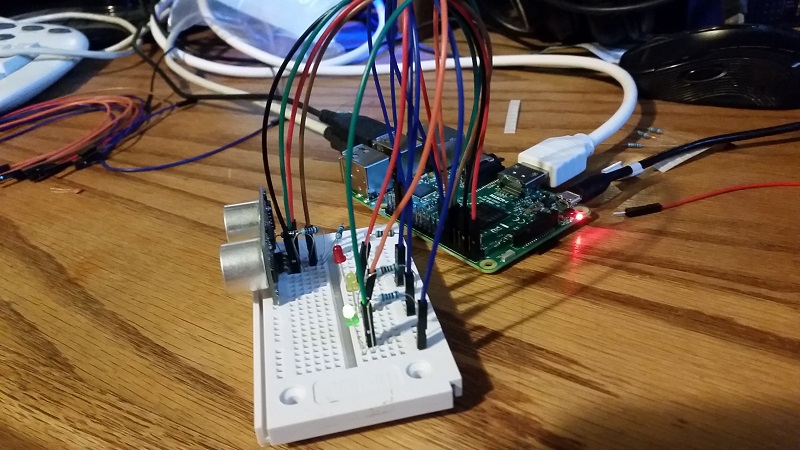
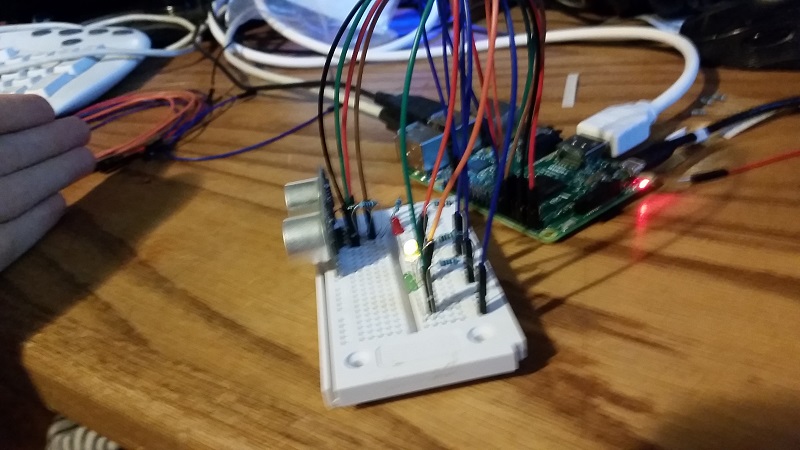
The final product:
Lots of space:
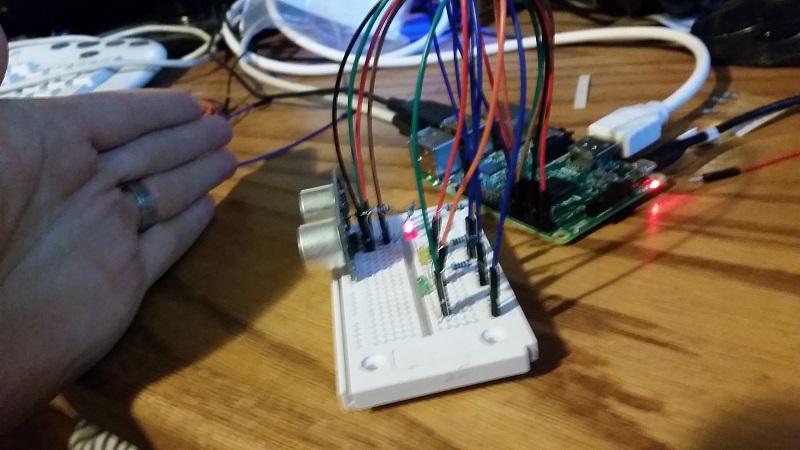
Hand getting close:
STAAAAAWP
-
Introduction - Raspberry Pi tutorial
-
Remote Access with Raspberry Pi tutorial
-
Terminal Navigation - Raspberry Pi tutorial
-
Raspberry Pi Camera Module - Raspberry Pi tutorial
-
GPIO (General Purpose Input Output) Pins - Raspberry Pi tutorial
-
Input from a Sensor via GPIO - Raspberry Pi tutorial
-
Garage Stoplight GPIO Project - Raspberry Pi tutorial
