Programming Robot Basics - Robotics with Python Raspberry Pi and GoPiGo p.3
In this robotics with Python tutorial, we're going to begin actually programming our GoPiGo. That means you have your robot set up, you can connect to it remotely via SSH, and you're ready to rumble.
If you are not already, connect to your GoPiGo via SSH. From here, you can view the contents of the current directory that you're in, by typing ls
You should see something like:

Next, we're going to create our own working directory for the scripts of this tutorial. I am going to go ahead and put this new directory on the Desktop. First, we'll change directory with "cd" to Desktop, by typing cd Desktop/. As you start to type Desktop, you can use tab to auto-complete.
Once in the Desktop, we're goin to make a new directory, using mkdir, like so: mkdir GoPiGoLocal.
Now let's cd GoPiGoLocal
Next up, let's take a peak at the GoPiGo framework. Keep in mind, this requires you to have the GoPiGo software installed.
You may have this software in various locations, but one way where you can find out where the main python package is that you're going to be using is like so:
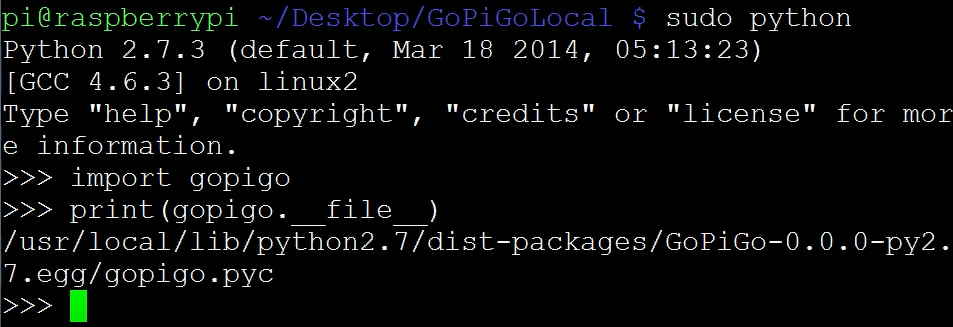
In the console, type in sudo python
This will start up a Python instance for you. Now, we'll write a quick script to tell us the full path to the GoPiGo software:
import gopigo
print(gopigo.__file__)
This will give you the full path to the gopigo.py main file.
Head to that location, either in the console or in some sort of GUI file system viewer/transfer application like WinSCP or Filezilla if you can. This is the main file that contains all sorts of functions that we can invoke. One of those functions, for example is fwd. Here's a snippet of the file:
#Move the GoPiGo forward
def fwd():
	return write_i2c_block(address,fwd_cmd+[0,0,0])

#Move the GoPiGo forward without PID
def motor_fwd():
	return write_i2c_block(address,motor_fwd_cmd+[0,0,0])

#Move GoPiGo backward
def bwd():
	return write_i2c_block(address,bwd_cmd+[0,0,0])

#Move GoPiGo backward without PID control
def motor_bwd():
	return write_i2c_block(address,motor_bwd_cmd+[0,0,0])

#Turn GoPiGo Left slow (one motor off, better control)
def left():
	return write_i2c_block(address,left_cmd+[0,0,0])
We can simply invoke these funtions and boom, our GoPiGo does it. Easy as that! Let's try it. Head back to your GoPiGoLocal directory, and create a new file. I'll call mine tutorial3.py.
from gopigo import *
import time

fwd()
time.sleep(2)
bwd()
time.sleep(2)
stop()
Importing * imports all of the functions from the modules, so we can reference them directly. Confused about this? Check out the module import syntax tutorial.
Now, before you go rush to run this, you may want to consider setting something up for development purposes. It doesn't have to be fancy, but you would ideally let the wheels spin freely, so you're not needing to chase down your robot all the time. Here's what I did:
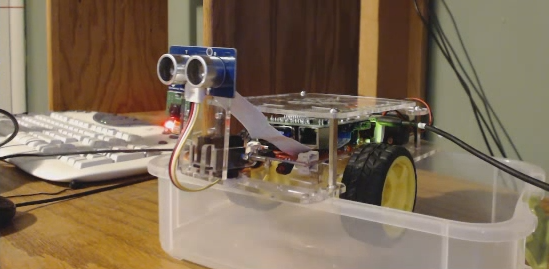
Here, the robot sits on the edges of this container and the wheels can spin freely. This is a storage container, but you could probably get away with some tupperware.
Once you're ready, save the script above, and then execute it. You can do this via SSH, by doing: sudo python tutorial3.py. This tells linux that the super user is going to use the python program to execute the tutorial.py file. When you do this, you should see your wheels spin forward for 2 seconds, then backwards for 2 seconds, then stop.
So, this would be what we call "hard coding," which is not ideal. We want our robot to be dynamic. One way that we can do this is to program the robot to respond to user-input like with the keyboard. In the next tutorial, we'll set up remote control via the keyboard.
-
Robotics with Python Raspberry Pi and GoPiGo Introduction
-
Supplies Needed - Robotics with Python Raspberry Pi and GoPiGo p.2
-
Programming Robot Basics - Robotics with Python Raspberry Pi and GoPiGo p.3
-
Programming Remote Control - Robotics with Python Raspberry Pi and GoPiGo p.4
-
Weaponizing our Robot - Robotics with Python Raspberry Pi and GoPiGo p.5
-
Programming Autonomy - Robotics with Python Raspberry Pi and GoPiGo p.6
-
OpenCV with Raspberry Pi Camera Face Detection Tutorial - Robotics with Python Raspberry Pi and GoPiGo p.7
