Creating your own Haar Cascade OpenCV Python Tutorial
Welcome to an object detection tutorial with OpenCV and Python. In this tutorial, you will be shown how to create your very own Haar Cascades, so you can track any object you want. Due to the nature and complexity of this task, this tutorial will be a bit longer than usual, but the reward is massive.
While you *can* do this in Windows, I would not suggest it. Thus, for this tutorial, I am going to be using a Linux VPS, and I recommend you do the same. You can try to use the free tier from Amazon Web Services, though it may be painfully too slow for you, and you will likely need more RAM. You can also get a VPS from Digital Ocean for as low as $5/month. I would recommend at least 2GB of RAM for what we will be doing. Most hosts nowadays charge by the hour, including Digital Ocean. Thus, you can buy a $20/mo server, use it for a day, take the files you want, and then terminate the server and pay a very small amount of money. Do you need more help setting up the server? If so, check out this specific tutorial.
Once you have your server ready to go, you will want to get the actual OpenCV library.
Change directory to server's root, or wherever you want to place your workspace
cd ~
sudo apt-get update
sudo apt-get upgrade
First, let's make ourselves a nice workspace directory:
mkdir opencv_workspace
cd opencv_workspace
Now that we're in here, let's grab OpenCV:
sudo apt-get install git
git clone https://github.com/Itseez/opencv.git
We've cloned the latest version of OpenCV here. Now let's get some essentials:
Compiler: sudo apt-get install build-essential
Libraries: sudo apt-get install cmake git libgtk2.0-dev pkg-config libavcodec-dev libavformat-dev libswscale-dev
Python bindings and such: sudo apt-get install python-dev python-numpy libtbb2 libtbb-dev libjpeg-dev libpng-dev libtiff-dev libjasper-dev libdc1394-22-dev
Finally, let's grab the OpenCV development library:
sudo apt-get install libopencv-dev
Now, how do we actually go about this process? So when you want to build a Haar Cascade, you need "positive" images, and "negative" images. The "positive" images are images that contain the object you want to find. This can either be images that just mainly have the object, or it can be images that contain the object, and you specify the ROI (region of interest) where the object is. With these positives, we build a vector file that is basically all of these positives put together. One nice thing about the positives is that you can actually just have one image of the object you wish to detect, and then have a few thousand negative images. Yes, a few thousand. The negative images can be anything, except they cannot contain your object.
From here, with your single positive image, you can use the opencv_createsamples command to actually create a bunch of positive examples, using your negative images. Your positive image will be superimposed on these negatives, and it will be angled and all sorts of things. It actually can work pretty well, especially if you are really just looking for one specific object. If you are looking to identify all screwdrivers, however, you will want to have thousands of unique images of screwdrivers, rather than using the opencv_createsamples to generate samples for you. We'll keep it simple and just use one positive image, and then create a bunch of samples with our negatives.
Our positive image:

Here's another scenario where you will likely enjoy this better if you use your own image. If things go wrong, try with mine and see where maybe you went wrong, but I suggest you take your own picture. Keep it small. 50x50 pixels is pushing it.
Ok great, getting a positive image is no problem! There is just one problem. We need thousands of negative images. Possibly in the future, we may want thousands of positive images too. Where in the world can we do that? There's quite a useful site, based on the concept of WordNet, called ImageNet. From here, you can find images of just about anything. In our case, we want watches, so search for watches, and you will find tons of categories of watches. Let's go with analog watches. Awesome! It gets better though. Check out that downloads tab! There's a URL for all of the analog watches!. Very cool. Okay but I said we will just use the one positive, so we just detect the one watch. If you want to detect "all" watches, prepare to get more like 50,000 images of watches, and at least 25,000 "negative" images. After that, prepare to have quite the server, unless you want your Haar Cascade training to take a week. So how might we get negatives? The whole point of ImageNet is for image training, so their images are pretty specific. Thus, if we search for people, cars, boats, planes...whatever, chances are, there will be not watches. You might see some watches on people or something like that, but you get the idea. Since you will likely find watches around or on people, I actually think you might as well get images of people. My idea was to find people doing sports, they probably are not wearing Analog watches. So, let's find some bulk image URL links. I found the sports/athletics link to have a reported 1,888 images, but you will find a lot of these are totally broken. Let's find one more: People.
Alright great, we have all these images, now what? Well, first, we actually want all of these to be the same size, and a whole lot smaller! Gosh if only we knew of a way to manipulate images... hmm... Oh right this is an OpenCV tutorial! We can probably handle it. So, first, what we're going to do here is write a quick script that will visit these URL lists, grab the links, visit the links, pull the images, resize them, save them, and repeat until we're done. When our directories are full of images, we also need a sort of description file that describes the images. For positives, this file is a massive pain to create manually, since you need to specify the exact Region of Interest for your object, per image. Gross. Luckily the create_samples method places the image randomly and does all that work for us. We just need a simple descriptor for the negatives, but that's no problem, we can do that while we pull and manipulate the images.
Feel free to run this code wherever you like. I am going to run it on my main computer, since it should go a bit faster. You can run on your server. If you want the cv2 module, do a sudo apt-get install python-OpenCV. At the moment, I do not know of a good way to get these bindings for Python 3 on Linux. The script I will be writing is for Python 3, so keep this in mind. The main difference will be the Urllib handling.
download-image-by-link.py
import urllib.request
import cv2
import numpy as np
import os

def store_raw_images():
    neg_images_link = '//image-net.org/api/text/imagenet.synset.geturls?wnid=n00523513'
    neg_image_urls = urllib.request.urlopen(neg_images_link).read().decode()
    pic_num = 1

    if not os.path.exists('neg'):
        os.makedirs('neg')

    for i in neg_image_urls.split('\n'):
        try:
            print(i)
            urllib.request.urlretrieve(i, "neg/"+str(pic_num)+".jpg")
            img = cv2.imread("neg/"+str(pic_num)+".jpg",cv2.IMREAD_GRAYSCALE)
            # should be larger than samples / pos pic (so we can place our image on it)
            resized_image = cv2.resize(img, (100, 100))
            cv2.imwrite("neg/"+str(pic_num)+".jpg",resized_image)
            pic_num += 1

        except Exception as e:
            print(str(e))
Simple enough, this script will visit the links, grab the URLs, and proceed to visit them. From here, we grab the image, convert to grayscale, resize it, then save it. We use a simple counter for naming the images. Go ahead and run it. As you can probably see, there are a lot of missing pictures and such. That's okay. More problematic is some of these error pictures. Basically all white with some text that says they are no longer available, rather than serving and HTTP error. Now, we have a couple choices. We can just ignore this, or fix it. Hey, it's an image without a watch, so whatever right? Sure, you could take that opinion, but if you use this pulling method for positive then this is definitely a problem. You could manually delete them... or we can just use our new Image Analysis knowledge to detect these silly images and remove them!
I went ahead and made a new directory, calling it "uglies." Within that directory, I have click and dragged all ugly image versions (just one of each). There's only one major offender that I found with the negatives, so I just have one. Let's write a script to find all instances of this image and delete it.
def find_uglies():
    match = False
    for file_type in ['neg']:
        for img in os.listdir(file_type):
            for ugly in os.listdir('uglies'):
                try:
                    current_image_path = str(file_type)+'/'+str(img)
                    ugly = cv2.imread('uglies/'+str(ugly))
                    question = cv2.imread(current_image_path)
                    if ugly.shape == question.shape and not(np.bitwise_xor(ugly,question).any()):
                        print('That is one ugly pic! Deleting!')
                        print(current_image_path)
                        os.remove(current_image_path)
                except Exception as e:
                    print(str(e))
We just have the negatives for now, but I left room for you to add in 'pos' easily there. You can run it to test, but I wouldn't mind grabbing a few more negatives first. Let's run the image puller one more time, only with the url: //image-net.org/api/text/imagenet.synset.geturls?wnid=n07942152. The last image was #952, so let's start pic_num at 953, and change the url.
def store_raw_images():
    neg_images_link = '//image-net.org/api/text/imagenet.synset.geturls?wnid=n07942152'
    neg_image_urls = urllib.request.urlopen(neg_images_link).read().decode()
    pic_num = 953

    if not os.path.exists('neg'):
        os.makedirs('neg')

    for i in neg_image_urls.split('\n'):
        try:
            print(i)
            urllib.request.urlretrieve(i, "neg/"+str(pic_num)+".jpg")
            img = cv2.imread("neg/"+str(pic_num)+".jpg",cv2.IMREAD_GRAYSCALE)
            # should be larger than samples / pos pic (so we can place our image on it)
            resized_image = cv2.resize(img, (100, 100))
            cv2.imwrite("neg/"+str(pic_num)+".jpg",resized_image)
            pic_num += 1

        except Exception as e:
            print(str(e))
Now we have over 2,000 pictures, so we're cookin. The last step is we need to create the descriptor file for these negative images. Again, we'll use some code!
def create_pos_n_neg():
    for file_type in ['neg']:

        for img in os.listdir(file_type):

            if file_type == 'pos':
                line = file_type+'/'+img+' 1 0 0 50 50\n'
                with open('info.dat','a') as f:
                    f.write(line)
            elif file_type == 'neg':
                line = file_type+'/'+img+'\n'
                with open('bg.txt','a') as f:
                    f.write(line)
Run that, and you have a bg.txt file. Now, I understand some of you may not have the best internet connection, so I will be a good guy greg and upload the negative images and the description file here. You should run through these steps though. If you're bothering at all with this tutorial, you need to know how to do that part. Alright, so we decided we're going to just use the one image for the postive foreground image. Thus, we need to do create_samples. This means, we need to move our neg directory and the bg.txt file to our server. If you ran all this code on your server, don't worry about it.
If you're a wizard and have figured out how to run create_samples and such on Windows, congratulations! Back in server-land, my files are now like:
opencv_workspace

--neg

----negimages.jpg

--opencv

--info

--bg.txt

--watch5050.jpg
You probably don't have the info directory, so go ahead and mkdir info. This is where we will stuff all of the positive images.
We're ready to create some positive samples now, based on the watch5050.jpg image. To do this, run the following via the terminal, while in the workspace:
opencv_createsamples -img watch5050.jpg -bg bg.txt -info info/info.lst -pngoutput info -maxxangle 0.5 -maxyangle 0.5 -maxzangle 0.5 -num 1950What this does is creates samples, based on the img we specifiy, bg is the background information, info where we will put the info.list output (which is a lot like the bg.txt file), then the -pngoutput is wherever we want to place the newly generated images. Finally, we have some optional parameters to make our original image a bit more dynamic and then =num for the number of samples we want to try to create. Great, let's run that. Now you should have ~2,000 images in your info directory, and a file called info.lst. This file is your "positives" file basically. Open that up and peak at how it looks:
0001_0014_0045_0028_0028.jpg 1 14 45 28 28
First you have the file name, then you have how many of your objects is in the image, followed by all of their locations. We just have one, so it is the x, y, width, and height of the rectangle for the object within the image. Here's one of the images:
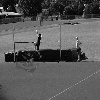
Kind of hard to see it, but the watch is in this image if you look hard. Lower and to the left of the left-most person in the image. Thus, this is a "positive" image, created from an otherwise "negative" image, and that negative image will also be used in training. Now that we have positive images, we now need to create the vector file, which is basically where we stitch all of our positive images together. We will actually be using opencv_createsamples again for this!
opencv_createsamples -info info/info.lst -num 1950 -w 20 -h 20 -vec positives.vec
That's our vector file. Here, we just let it know where the info file is, how many images we want to contain in the file, what dimensions should the images be in this vector file, and then finally where to output the results. You can make these larger if you like, 20 x 20 is probably good enough, and the larger you go, the exponentially longer it will take to run the trainer. Continuing along, we now just need to train our cascade.
First, we want to place the output somewhere, so let's create a new data directory:
mkdir data and your workspace should look like:
opencv_workspace

--neg

----negimages.jpg

--opencv

--info

--data

--positives.vec
--bg.txt

--watch5050.jpg
Now let's run the train command:
opencv_traincascade -data data -vec positives.vec -bg bg.txt -numPos 1800 -numNeg 900 -numStages 10 -w 20 -h 20
Here, we say where we want the data to go, where the vector file is, where the background file is, how many positive images and negative images to use, how many stages, and the width and height. Note that we use significantly less numPos than we have. This is to make room for the stages, which will add to this.
There are more options, but these will do. The main ones here are the numbers of positive and negatives. General concensus is, for most practices, you want to have 2:1 ratio of pos:neg images. Some situations may differ, but this is a general rule people seem to follow. When in Rome. Next, we have stages. We chose 10. You want 10-20 at least here, the more, the longer it will take, and it is again exponential. The first stage is pretty fast usually, stage 5 much slower, and stage 50 is forever! So, we do 10 stages for now. The neat thing here is you can train 10 stages, come back later, change the number to 20, and pick up right where you left off. Similarly, you can just put in something like 100 stages, go to bed, wake up in the morning, stop it, see how far you got, then "train" with that many stages and you will be instantly presented with a cascade file. As you can probably gather from that last sentence, the result of this command is indeed the great, and holy, cascade file. Ours will hopefully detect my watch, or whatever object you decided to go with. All I know is that I am not even through with stage 1 yet from typing this entire paragraph. If you really do want to run the command overnight, but don't want to leave the terminal open, you can make use of nohup:
nohup opencv_traincascade -data data -vec positives.vec -bg bg.txt -numPos 1800 -numNeg 900 -numStages 10 -w 20 -h 20 &
This will allow the command to continue running, even after you close the terminal. You can do more, but you may or may not run out of your 2GB of ram.
10 stages took a bit less than 2 hours to do on my 2GB Digital Ocean server. So, either you have a cascade.xml file, or you stopped the script from running. If you stopped it from running, you should have a bunch of stageX.xml files in your "data" directory. Open that up, see how many stages you did, and then you can run the opencv_traincascade again, with that number of stages, and you will be immediately given a cascade.xml file. From here, I like to just name it what it is, and how many stages. For me, I did 10 stages, so I am renaming it watchcascade10stage.xml. That's all we need, so now head back to your main computer with your new cascade file, put it in your working directory, and let's try it out!
import numpy as np
import cv2

face_cascade = cv2.CascadeClassifier('haarcascade_frontalface_default.xml')
eye_cascade = cv2.CascadeClassifier('haarcascade_eye.xml')

#this is the cascade we just made. Call what you want
watch_cascade = cv2.CascadeClassifier('watchcascade10stage.xml')

cap = cv2.VideoCapture(0)

while 1:
    ret, img = cap.read()
    gray = cv2.cvtColor(img, cv2.COLOR_BGR2GRAY)
    faces = face_cascade.detectMultiScale(gray, 1.3, 5)

    # add this
    # image, reject levels level weights.
    watches = watch_cascade.detectMultiScale(gray, 50, 50)

    # add this
    for (x,y,w,h) in watches:
        cv2.rectangle(img,(x,y),(x+w,y+h),(255,255,0),2)

    for (x,y,w,h) in faces:
        cv2.rectangle(img,(x,y),(x+w,y+h),(255,0,0),2)


        roi_gray = gray[y:y+h, x:x+w]
        roi_color = img[y:y+h, x:x+w]
        eyes = eye_cascade.detectMultiScale(roi_gray)
        for (ex,ey,ew,eh) in eyes:
            cv2.rectangle(roi_color,(ex,ey),(ex+ew,ey+eh),(0,255,0),2)

    cv2.imshow('img',img)
    k = cv2.waitKey(30) & 0xff
    if k == 27:
        break

cap.release()
cv2.destroyAllWindows()
My result:
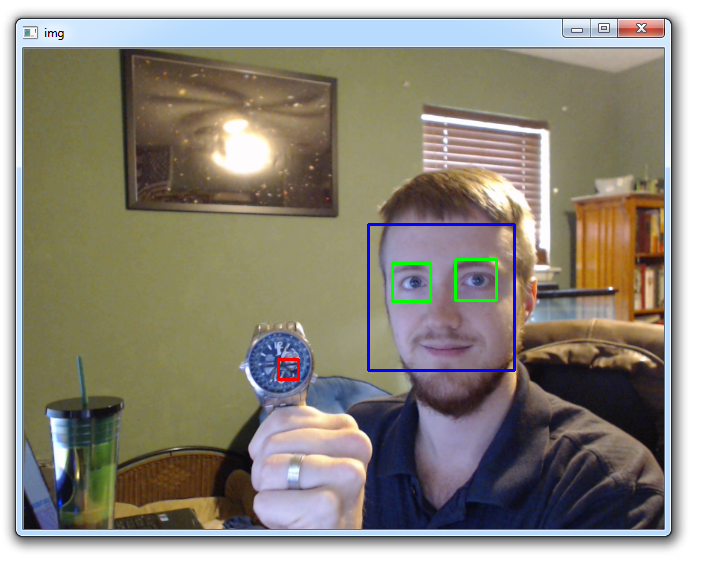
As you probably noticed, the boxes for the watch is pretty small. It doesn't seem to get the entire watch. Recall our training size was 20x20. Thus, we have a 20x20 box at most. You could do 100x100, but, beware, this will take a very long time to train. Thus, rather than drawing a box, why not just write text over the watch or something? Doing this is relatively simple. Rather than doing cv2.rectangle(img,(x,y),(x+w,y+h),(0,0,255),2) in watches, we can do
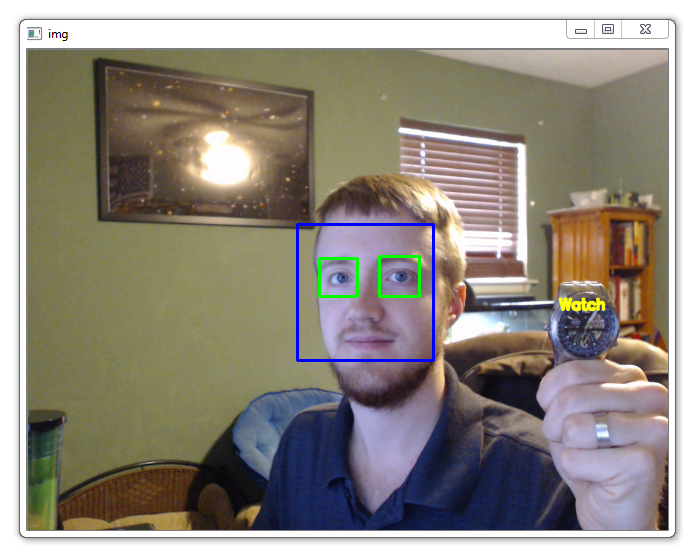
        font = cv2.FONT_HERSHEY_SIMPLEX
        cv2.putText(img,'Watch',(x-w,y-h), font, 0.5, (11,255,255), 2, cv2.LINE_AA)
New result:
Pretty cool! So you probably didn't do the watch with me, how did you do? If you're having trouble, try using everything exactly the same as me. Rather than detecting against a camera feed, detect against an image, and here's one:
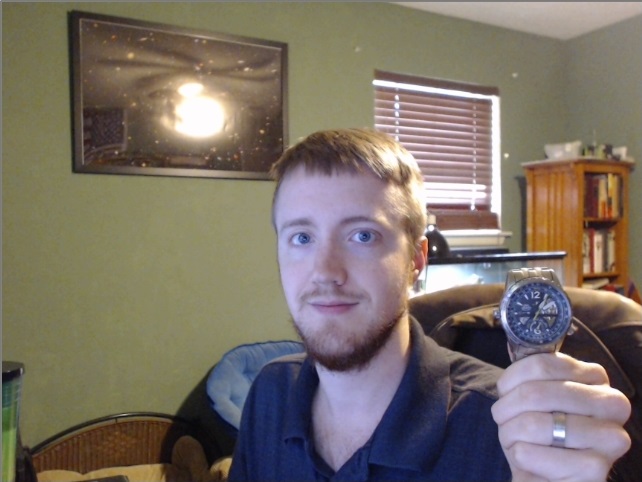
Running detection on this image should give you:

I do not know about you, but once I finally got this working, I was very excited! The most impressive thing to me is the size of the data required to track objects. Haar Cascades tend to be anything from 100-2,000 KB in size. A 2,000 KB Haar Cascade is either too big, or it should be very accurate. Consider in your day you probably come across ~5,000 general objects. Consider the average Haar Cascade is ~ 500 KB maybe. This gives us: 0.5 MB * 5,000 = 2,500 MB, or 2.5 GB. This gives you 2.5 GB of ram needed to recognize 5,000 objects, and probably most objects you will ever come across in a day. This fascinates me. Consider we have access to all of image-net, and can pull general images for a wide range of objects immediately. Consider further than most of the images on imagenet are basically 100% of the "tracking" object, thus you can probably get by in the positives by not manually noting location and just using 0,0 and the full size of the image. The possibilities for what you can do here are massive... Well, that's all for now. I will likely do some character recognition with OpenCV in the future. If you have any other requests, email me, suggest in the community, or post on the videos.
Enjoy your new powers. Use them for good.
-
OpenCV with Python Intro and loading Images tutorial
-
Loading Video Source OpenCV Python Tutorial
-
Drawing and Writing on Image OpenCV Python Tutorial
-
Image Operations OpenCV Python Tutorial
-
Image arithmetics and Logic OpenCV Python Tutorial
-
Thresholding OpenCV Python Tutorial
-
Color Filtering OpenCV Python Tutorial
-
Blurring and Smoothing OpenCV Python Tutorial
-
Morphological Transformations OpenCV Python Tutorial
-
Canny Edge Detection and Gradients OpenCV Python Tutorial
-
Template Matching OpenCV Python Tutorial
-
GrabCut Foreground Extraction OpenCV Python Tutorial
-
Corner Detection OpenCV Python Tutorial
-
Feature Matching (Homography) Brute Force OpenCV Python Tutorial
-
MOG Background Reduction OpenCV Python Tutorial
-
Haar Cascade Object Detection Face & Eye OpenCV Python Tutorial
-
Creating your own Haar Cascade OpenCV Python Tutorial
